 The
favorite list makes it quite clear which country the card manufacturer is from
;)
The
favorite list makes it quite clear which country the card manufacturer is from
;) DVBViewer
As I've previously mentioned, there's a full blown manual on DVBViewer available on the official homepage so I won't go into details and features of the registered version (which I currently don't have). If you have the registered version and want AC3 audio, make sure you read the manual and the audio filter setup part, or you'll never figure that one out.
Channel search
My installation of DVBViewer has already half setup, but your mileage might differ. To do a full channel-search, press Channel, then Channellist...
The
favorite list makes it quite clear which country the card manufacturer is from
;)
 I
have a dual satellite setup, including both Astra and Hotbird, but DVBViewer
comes with a list of channels for a lot of known satellites.
I
have a dual satellite setup, including both Astra and Hotbird, but DVBViewer
comes with a list of channels for a lot of known satellites.
Select the satellite on which you want to perform a channel search, then go to the Edit tab.
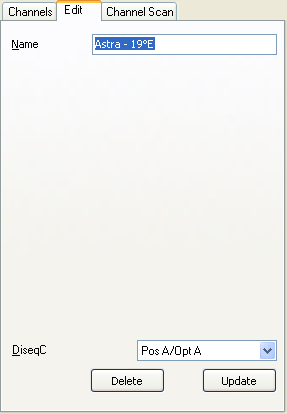 Here
you could change the name of the satellite, but let's have a look at the bottom
of the tab:
Here
you could change the name of the satellite, but let's have a look at the bottom
of the tab:
What the heck is DiseqC and how is it going to ruin my day might you ask? And if you do, you're not alone out there. That little bugger also gave me a serious headache. Basically, if you only want/have/need one satellite, forget about DiseqC and set the option to none.
If you have multiple satellites (for starters that requires multiple LNBs and a DiseqC switch) then the fun starts: You can either have a two output switch or a 4 output switch. And to make things better, they also need different LNBs (those are the heads you put in front of your satellite dish). Either way, this isn't a satellite pre-sales course so I'll stop here. The only important thing to know is that you know the type of DiseqC switch you have, and if you have one, on which port which satellite is connected two.
In my case, I have a twin-LNB, with port A on Astra and port B on Hotbird. Thus I'd set my DiseqC option to SimpleA for the Astra satellite, press the Update button, to back to the Channels tab, select the Hotbird satellite, set the DiseqC option to SimpleB and press Update again. (Interesting tidbit: it seems that the first port on a quad switch is the same as SimpleA on the twin switch and the 2nd port on a quad switch is the same as port B on the twin switch).
Having done that, go to the Channel Scan tab now.
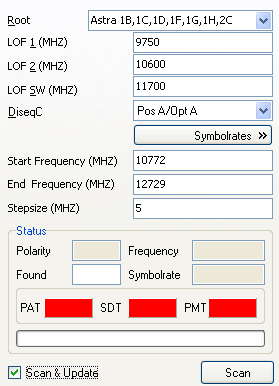 To
do a full channel search, first select the appropriate satellite from the Root
list.
To
do a full channel search, first select the appropriate satellite from the Root
list.
The next 3 options should be left as they are. DiseqC should already be properly set up if you did the last step right.
Then check Scan & Update and press the Scan button.
The progressbar just above the scan button will give you an indication of the progress you're making.
Once you're done, DVBViewer will play the default Windows error sound (and I
have no idea why, after all the operation was successful) and you can press
Ok to get back to the main window or repeat this procedure for every
other satellite you have access to.
Recording
Recording is like a breeze in DVBViewer. Perhaps you have already noted the recording button in the toolbar:
![]()
But before you go ahead and record your favorite show, let's quickly set up the recording session. To do so, press Settings - Options, then go to the Recorder tab.
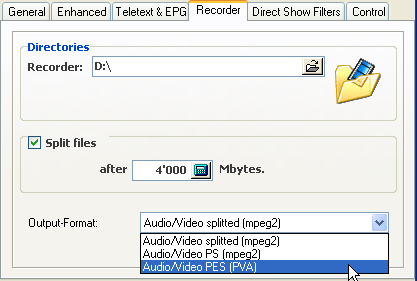 First
of all set the Recorder path to a place where you have enough space. A movie
will need a few GBs. As a general rule of thumb, I'd expect 3 - 5 GB.
First
of all set the Recorder path to a place where you have enough space. A movie
will need a few GBs. As a general rule of thumb, I'd expect 3 - 5 GB.
In case you're using the FAT32 filesystem (bad choice for digital video, it can't handle files larger than 4 GB), check Split files and enter a splitsize. In order not to get too many splitted files and not have to worry about splitted files if the movie isn't too large, I'd enter 4000 MB.
Select Audio/Video PES (PVA) as Output-Format, then press Ok to get back to the main window.