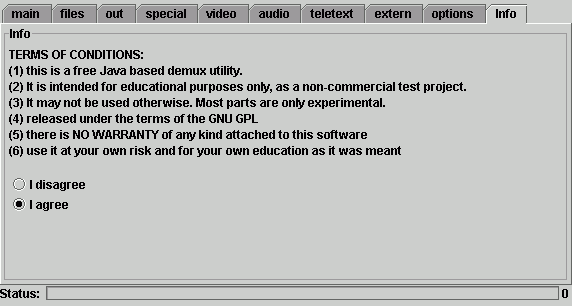
 Upon
checking I agree, you'll be able to switch to another tab. This will
also create an initialization file (ProjectX.ini) in the same directory where
your ProjectX.jar resides.
Upon
checking I agree, you'll be able to switch to another tab. This will
also create an initialization file (ProjectX.ini) in the same directory where
your ProjectX.jar resides.ProjectX reference
In digital TV, the picture is compressed using the well-known MPEG-2 format, before being broadcast as digital data stream (MPEG2 transport stream - MPEG-2 TS). MPEG-2 transport streams are part of the MPEG-2 standard, but most tools cannot directly handle transport streams as its structure is different from MPEG-2 elementary streams we use on DVDs or SVCDs. This is where ProjectX enters the picture. It works like an MPEG-2 TS hardware decoder, splitting the transport stream into its components (MPEG elementary streams like audio, video, and other data (e.g. teletext)). While splitting the transport stream, ProjectX also checks the stream for errors and synchronizes video and audio. If ProjectX converts the transport stream to another format, it won't analyze and fix streams as thoroughly as in split mode.
ProjectX supports the following transport stream formats
ProjectX is an open source project for educational purposes and testing. It is written in Java (hence the look), and distributed as source only so you have to compile it on your own, or download a compiled version from this very site. You can use ProjectX in GUI mode, or via CLI (commandline, if you don't know what CLI is you'll probably never use that mode).
Table of Content
main
files
out
special
video
audio
teletext
extern
options
info
As ProjectX is a Java program, starting it is a bit different from what you're used to. There is no .exe file to double click on. In order to run it, you'll need the Java Runtime Environment (JRE) installed. After the installation, you can just double-click on ProjectX.jar and the program will launch.
The first time you start up ProjectX, you'll be taken directly to the Info tab, where you have to agree to the Terms of conditions.
 Upon
checking I agree, you'll be able to switch to another tab. This will
also create an initialization file (ProjectX.ini) in the same directory where
your ProjectX.jar resides.
As you can see, ProjectX looks quite different from other programs you're used
to. Some people might like that "different" look, but if you rather
stay closer to home, click on Options, then select com.sun.java.swing.plaf.windows.Windows
(that's the 3rd and last option) from the installed look & feels dropdown
list.
In the main tab, you select the main and base tasks of ProjectX. It's also the default start point, as well as the place where you start an operation.
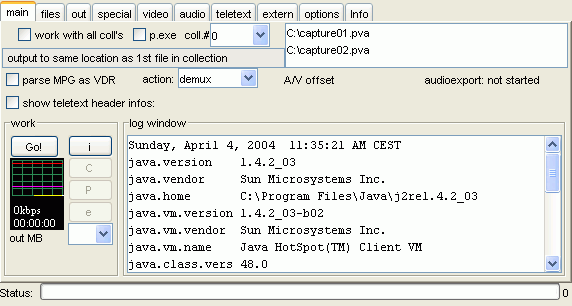 Multiple
streams can be treated as a unit (collection), and be processed together. To
do this, you have to activate work with all coll's. If deactivated, only
the currently active collection will be processed.
ProjectX can launch external applications. To enable this feature, you have to check p.exe and configure the external programs in the options tab.
The coll.# dropdown menu lists available collections. You can use it to switch between collections. The files belonging to the currently active collection are shown to the right of the dropdown menu (currently c:\capture01.pva and c:\capture02.pva). Right clicking in the are where the input files are being shown will open a menu where you can add or remove streams, or switch to the a special menu for collections (specials).
 Using
the same menu, you can also send the currently selected file directly to an
external program (sendTo CL#3). Files can also be dragged and dropped
to the collection window, but more about that when we talk about the files
tab.
parse MPG as VDR enables ProjectX to parse MPEG PS, where the AC3 information is not defined by a SubID . Such streams can only contain one AC3 stream and currently, the VDR format is the only one to require this option. If ProjectX reports many different SubIDs, enable this function.
You can use the action dropdown list to define what ProjectX does with a stream. It can either demux the currently opened stream (collection), or to convert a stream into another format, e.g. PVA, TS or M2P modular stream. If you have enabled cutting in the files tab, please note that the cut is only performed in demux mode. If another action is selected, ProjectX will use the first defined cut point (if there is any) as the starting point for the operation, but only if use BytPos. for cuts has been checked. When converting to another format, streams won't be checked for internal errors either.
The A/V offset field indicates the audio / video offset at the start of the current GOP. There are ways to calculate this:
a) the difference between video and audio presentation time stamps (PTS).
b) the difference between video and audio frame at their physical start.
c) the difference between a) and b), in other words, the actual offset.
The value of c) should be half the length of an audio frame at the maximum (e.g. 12ms for a 48kHz MPA, 13ms for a 44.1kHz MPa and 16ms for a 48kHz AC3).
The audioexport field indicates the status of the audio extraction while it is ongoing.
show teletext header infos will show the headline of the currently found teletext page, in case a teletext stream is being processed. VPS (Video Program Service ) timecodes will also be indicated in case the TV station supports it (ORF uses VPS in digital teletext).
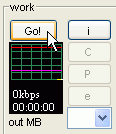 Once
ProjectX has been configured, pressing Go! will start processing. Pressing
the i button will start a quick analyzation pass on the first few megabytes
of the currently selected streams. This can be useful to identify stream IDs.
Those are required to extract PES RAW streams from a PVA file using the e
button, or to limit TS processing to the stream IDs you actually want processed.
The currently active process can be aborted using the button C (for Cancel),
or paused using the P (for Pause) button.
The graphic below the Go! button indicates the timecode of the data that is currently being processed and the newly calculated GOP bitrate. The red line represents 9 mbit/s, the magenta line is 2.5 mbit/s and the yellow line (actually it's normally not really a line since bitrates tend to change), indicates the actual bitrate of the video as time progresses.
The structure of the current GOP is also indicated (just above the bitrate indication in text form). I-frames are cyan, b-frames white and p-frames magenta. If there is a red bar on the right side (peak hold), the current GOP has more than 15 frames (when converting to DVD this can be important as the DVD standard limits a GOP to 15 frames), and if a bar is divided into two parts, it means we're dealing with interlaced frames. A yellow bar on the left border documents an existing sequence header. Last but not least, the number of written MBs is also indicated.
In the log window, ProjectX will display runtime information when starting up, and during processing.
The Status bar will show you the status of the currently active process, as well as time elapsed and remaining
Last but not least, the number in the lower left corner of the window indicates the split number if splitting has been activated.
In the files tab, you manage streams and their directories. This is also where some information about the streams is shown.
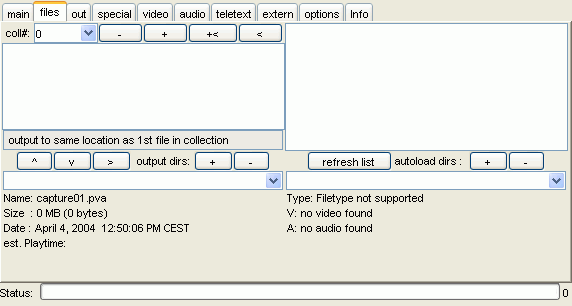 Streams
belonging together are grouped in so-called collections. The first file in a
collection should always contain the (primary) video stream or in case only
audio / teletext is to be processed, the first file should contain the primary
audio / teletext stream, and only then should other, separate audio / ttx streams
be added.
You can group any type of video / audio / teletext file together to a collection.
When adding files, if the 2nd file has the same type as the first file (for instance PVA), they'll automatically be grouped together in a collection (unless you're dealing with elementary streams). All streams of a different type will be treated separately (they are considered to be secondary streams). Secondary streams in PVA / TS or video ES format are not supported and the video data in those streams will be ignored.
The coll# dropdown menu is the same as in the main tab and
allows you to select a collection. The - button will delete the currently active
collection. To create a new collection, press the + button. Pressing the +<
button also creates a new collection, but all currently selected streams that
are present in the autoload directory will be automatically added to the collection.
To add all currently selected streams that are present in the autoload directory
to the active collection, press the < button.
Files belonging a collection will be shown below the coll# dropdown list and right clicking into this area will bring up the same context menu as in the main tab.
Below the list of files, you'll have three buttons. The first two (pointing up and down respectively), allow you to move a file within the collection. The third button (>) deletes the currently selected file from the collection.
Then we have a + and a - button, which can be used to create and delete output directories, which will then be listed in the dropdown list just below those buttons.
 Selecting
a directory from the list assigns it to the currently active collection (the
output directory of a collection is listed above the buttons).
In the right part of the windows we have the autoload directories.
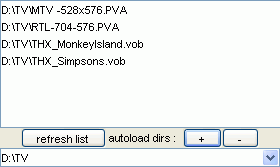 You
can create / delete autoload directories just like you create / delete output
directories. ProjectX will show the contents of the all the autoload directories
in the list shown on the left. Press refresh list to make ProjectX reread
the contents of the autoload directories.
If you select a file ProjectX can process, it'll show you some information about
it in the information area below the directory selection dropdown lists:

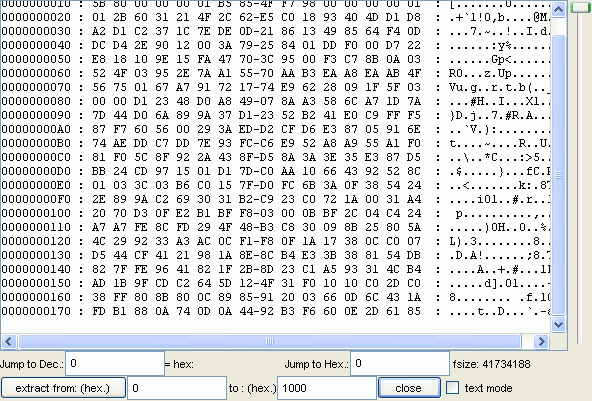
Double clicking on the left side of this information area will bring up a Hex editor.
A double click in the right part of the file information area brings up a window where you can edit the first sequence header.
![]() You
can edit the horizontal (H), vertical (V) and bitrate (BR) of the first sequence
header in the stream. Press change to save the changes, and cancel
to abort.
You
can edit the horizontal (H), vertical (V) and bitrate (BR) of the first sequence
header in the stream. Press change to save the changes, and cancel
to abort.
Now let's have a look at the specials menu (select a stream, right click and select specials)
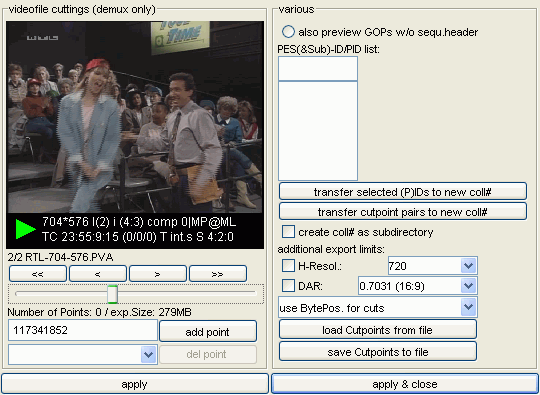 In
this window you can cut streams. Cutting is only active if the stream is being
demuxed (so action in the main tab has to be set
to demux), and only entire collections can be processed (but of course
if you want to treat streams separately, just put them into separate collections).
Use the slider below the preview window to move around the video, and the 4 buttons right above the slider for a more fine grained positioning. The < and > buttons can be used to move to the previous and next I-frame. Just below the picture you'll also see some info about the resolution of the currently active stream, as well as it's aspect ratio, and the position within the stream. Just below that, you'll see the name of the currently active file. Note that the preview window will always show an I-frame
Double clicking on the preview window allows you to save the preview picture to a bitmap file.
You can also navigate the video using your keyboard. First click on the slider once, then you can use the following button shortcuts:
<- moves to the previous I-frame
-> moves to the next I-frame
Shift -> advances at 1/10th the speed
of the >> button
Shift <- works like << but at 1/10th
the speed
Ctrl -> is the same as the >> button
Ctrl <- is the same as the << button
Alt -> works like >> but at 10 times
the speed
Alt <- works like << but at 10 times
the speed
Page up advances even more than
Page down is the reverse action to page up
Home goes to the beginning of the stream
End goes to the end of the stream
a adds a cut point
d deletes a cut point
n goes to the next cut point
p goes to the previous cut point
The number of cut points and the expected output size can be seen just below the position slider. Once you've found a cut point, press add point and del point to delete the currently selected cut point (cut points can be selected from the dropdown list to he left of the deletion button). The cut list will be sorted by position in ascending order automatically.
In the right part of the windows, we have a couple of interesting options:
also preview GOPs w/o sequ. header will enable ProjectX to show GOPs without a sequence header. This is not required / suggested for DVB streams. If activated, ProjectX won't automatically jump to the first cut point.
The PES(&Sub)-ID/PID list allows you to indicate the stream IDs to be processed. Double clicking on an ID in the list will remove it again. The selection can also have an influence on preview (for instance when MPTS streams are to be processed). In case of TS streams, predefined PIDs will be checked until usable data is found.
Pressing transfer selected (P)IDs to new coll# will create a new collection and transfer the (P)ID preselection to that collection. Cut points will not be transferred.
Pressing transfer cutpoint pairs to new coll# will create a new collection and transfer all cutpoints from the currently active collection to the new one. To use this and the (P)ID transfer function, you should enable create coll# as subdirectory, to prevent that settings are overwritten.
If files in a collection have different horizontal resolutions and / or aspect ratios, you can correct that by checking H-Resol: / DAR: and select the appropriate horizontal resolution / DAR.
The next dropdown menu allows you to select one of three cutting varieties. Note that unless use BytePos. for cuts is selected, the preview window will not be active.
It is also possible to save the list of cutpoints to a file by pressing save Cutpoints to file. Similarly, a file with cutpoints can be loaded by pressing load Cutpoints from file and selecting the appropriate file. Those files are standard ASCII files with one cutpoint per line. When loading a cutting file, make sure the cutting mode is set to the same as when the file was saved.
When you have configured your cutpoints, press apply to save everything, or apply & close to save and close the window.
In the out tab, you can set additional conditions and parameters for the output.
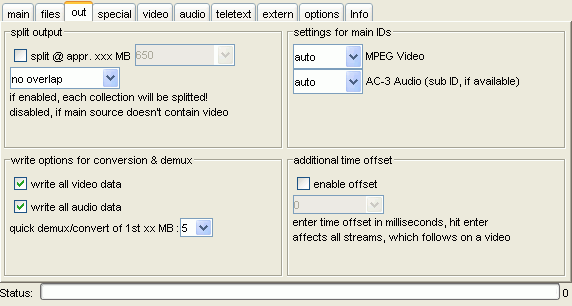 split
@ appr. xxx MB allows you to split the output in pieces of a predefined
size (which you can select from the dropdown list once you've activated the
checkbox). If you want the video to overlap you can select an overlap value
from the 2nd dropdown list (note though since video bitrates vary, using the
same amount of MBs won't necessarily mean you get the same number of seconds
for each video file). This function applies to all streams in a collection.
Splitting is only active if the output mode is set to demux, and only
if the primary stream contains video.
write all video data and write all audio data will ensure that all video and audio streams present in the input will be written to the output file. If video output is disabled, the primary video stream will still be checked, but not exported.
In the settings for main IDs, you can set the stream ID for your video and audio streams that should always be processed. It is preferable to make this selection via the PID list in the specials window.
If the elementary streams in your input have no PTS or get asynch when demuxing despite present PTS, the enable offset function can help. This function will delay all non video data by a certain amount of time (which you can enter as soon as you have enabled the checkbox).
The offset has to be given in milliseconds. Negative values will make the audio start earlier, which means at the end, blank audio frames will be added. Positive values will additionally delay the audio, resulting in the insertion of blank audio frames at the beginning of the stream.
In the spec tab, you can configure special conditions for saving and processing streams.
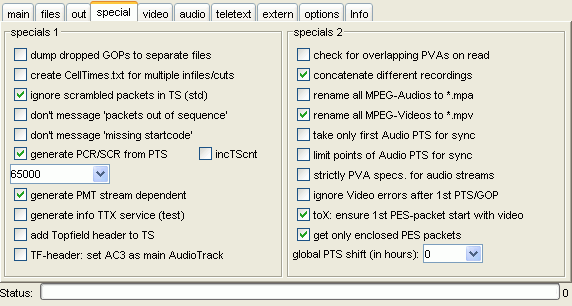 dump
dropped GOPs to separate files will save GOPs that are skipped to a separate
file. Useful for analysis.
create CellTimes.txt for multiple infiles/cuts creates a CellTimes.txt file if your collection contains multiple files, or you're cutting streams. This file can be useful for later DVD authoring (IfoEdit).
By default ProjectX ignores TS packets that are marked as being scrambled. If you suspend that packets are mistakenly labeled as scrambled, try deactivating ignore scrambled packets in TS (std).
don't message 'packets out of sequence' can be useful if you're getting a lot of such error messages (which slows down processing). Checking this option will disable the logging of such errors.
Similarly, don't message 'missing startcode' will ignore such error messages. Note that both a lot of packet out of sequence and missing startcode messages indicate a serious problem with your source.
The Program Clock Reference (PCR) or System Clock Reference (SCR) is a common time reference to synchronize MPEG-2 elementary streams and other stream data. Enabling generate PCR/SCR from PTS generates PCR/SCR stamps from PTS stamps present in the source. The dropdown menu below allows you to select the size of the PTS -> PCR/SCR offset.
You can enableincTScnt to create a jump in the TS packet counter without payload (note that this creates an out of specs stream but it's necessary some time).
generate PMT stream dependent creates a new Program Map Table (PMT) for a new TS, which is optimized for the content of the generated transport stream. The PMT belongs to the Program Specific Information (PSI - a group of tables for identification purposes) and contains information about the type of PES in relation to the transmitted program.
generate info TTX service(test) adds a teletext service stream (PID 0x9F) with status information for testing purposes.
To transmit a TS to a Topfield TF4000 DVB receiver, you have to enable add Topfield header to TS.
Enabling TF-header: set AC3 as main audio track will mark an existing AC3 track as primary audio track. Use this function for transmission to a Topfield DVB receiver.
If a collection contains multiple PVA streams, checking check for overlapping PVAs on read, will make ProjectX to compare the first 256 bytes of each packet with the first packet of the subsequent stream in the collection. This can be useful to find byte-accurate overlapping, but can reduce processing speed considerably (and as most TV stations send content encoded on the fly, you'll probably not be able to filter out overlapping content like this).
concatenate different recordings will concatenate streams recorded at different times. The streams must be of the same type (PVA, MPEG-2PS, VDR). Subsequent streams will get new PTS timestamps if required. This will only work in demux mode, and TS input is not supported. By default, ProjectX assumes that all streams belong to the same recording and have just been split automatically at a certain point, thus there will be no PTS adaptation.
rename all MPEG-Audios to *.mpa will result in all demuxed MPEG audio files having the extension .mpa.
Similarly, rename all MPEG-Videos to *.mpv will result in all demuxed MPEG video streams having the extension .mpv.
If PTS timestamps seem to be incorrect, you can activate take only first Audio PTS for sync. It'll result in only the first audio PTS being used for synchronization.
If PTS timestamps seem to be incorrect, you can activate limit points of Audio PTS for sync. It'll result in synchronization at only a few selected points.
If strictly PVA specs. for audio streams is enabled, ProjectX will stick to the PVA specifications to prevent errors in the detection. For some non standard compliant PVA streams, this function has to be activated to get any audio at all.
If a stream only contains video PTS errors, enable ignore Video errors after 1st PTS/GOP. This will result in only the first PTS in the first GOP being used for synchronization.
toX: ensure 1st PES-packet start with video ensures that during conversion the first PES packet starts with video. If only an audio PES is to be exported, you have to disable this option.
If while checking PES packet lengths, no packets are found because there is no MPEG startcode, deactivating get only enclosed PES packets can help. If this option is active, only subsequent PES packets are processed (applies only to PES, VDR and MPG input).
If no MPEG audio stream is written, and the PTS between video and audio can't be adjusted, a global PTS shift (in hours) can help. First try audio, and if this doesn't work try selecting a value.
In this tab, you can select if a new video bitrate is set / calculated for the output, and if so, how it is calculated. Additionally, you can configure many corrections and manipulations of the video stream.
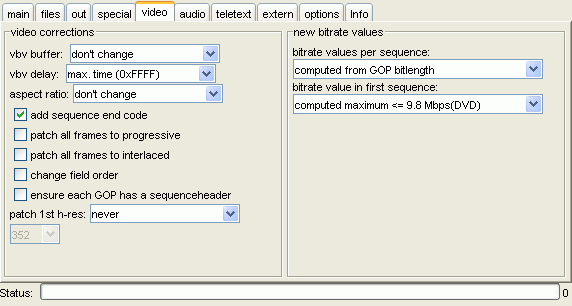 You
normally shouldn't change the vbv buffer, but for some players it can
be useful if video playback is choppy.
The same applies to the vbv delay.
The aspect ratio dropdown menu, allows you to change the aspect ratio of the output. Use this with caution or your video output will be stretched.
If add sequence end code is activated, the sequence is ended conforming with the MPEG-2 standard. This usually happens at the end of a file.
patch all frames to progressive, or its cousin patch all frames to interlaced, can be used to correct incorrect flags from the broadcaster. Be wary though as setting this flag to the wrong value can result in distorted playback or prevent playback all together.
change field order can also be useful if the video has been improperly encoded. Usually, the video should be top field first (field A), except for DV video, where bottom field first (field B) is the default. Enabling this function will switch the current sequence order.
ensure each GOP has a sequence header ensures that each GOP has a sequence header (this is the default in DVB).
Some DVD authoring tools don't like some of the resolutions used for DVB broadcasts. To trick those programs into accepting your DVB streams, you can change the video resolution in the first video header by enabling patch 1st h-res. Note that before you author, you have to set the header back to its original value to prevent playback problems (choppyness, green video). Select ever to always change the horizontal resolution, and enter the desired horizontal resolution via the dropdown list. Alternatively, you can use if <> 352|720, which will only adjust the resolution if the source does not have a horizontal resolution of either 352 or 720 pixels. Similarly, if <> 352|704|720 will adjust the horizontal resolution if the source resolution isn't 352 or 704 or 720.
Then we have the bitrate values per sequence: keep original does not change the bitrate indicated in the video header of the source. computed from GOP bitlength results in bitrate recalculation based on the length of a GOP. If you want the video bitrate to be recalculated based on the VBV data, select computed from VBV. mark as VBR (MPEG-1 video) will mark any MPEG-1 stream as VBR stream. Finally, you can select a fixed bitrate from the list.
Finally, we have the bitrate value in the first sequence (header): keep original will keep the original bitrate from the source stream, computed average (nominal) uses the average bitrate of the entire stream, which can be useful if a codec calculates the length of a stream based on the first sequence. computed maximum <= 9.8 Mbps(DVD) is useful for multiplexers which calculate the required buffer size from the first sequence (this should be your default when you intend to put your DVB streams on a DVD-R later on). computed maximum (e.g. HDTV) is the same, but relaxes the maximum bitrate requirements (DVDs must have a maximum bitrate of 9.8mbit/s for the video stream, HDTV can have up to 80 MBit/s). mark as VBR (MPEG-1 Video) will mark MPEG-1 streams as VBR.
In this tab, you can make configure changes and manipulations for audio streams.
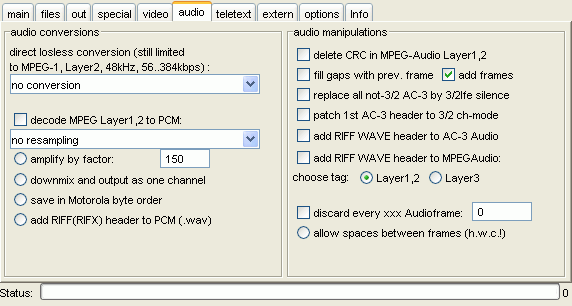 ProjectX
can convert MPEG audio streams losslessly if the input is 48 kHz and the bitrate
lies in the 56 - 384 kbit/s range. no conversion leaves the audio as
it is, single to dual(ch.A=original, B=quiet) converts a mono frame into
a stereo frame (the mono channel is mapped to the first stereo channel, the
2nd one remains mute - thus the bitrate increase is limited). single to stereo
(L+R = original) converts a mono file to a stereo one. Both stereo channels
contain the same audio, thus the audio bitrate is doubled. single to jointstero
(L+R = original) turns a mono frame into a joint stereo one, so both audio
channels contain the same information. Thanks to join stereo, the bitrate increase
is limited.
Converting to joint stereo can be useful for TV stations that often change audio formats. If the source already contains two channels, the audio is not touched. Finally, split 2 channel into 2 single (1=L,2=R) splits a stereo / joint stereo frame into two mono frames. This can be useful of the source was mono but transmitted as stereo.
If you check decode MPEG Layer1,2 to PCM, MPEG layer 1/2 audio is decoded and written in PCM format. This creates a two channel PCM file regardless of the source.
You can use the dropdown list below the decoding checkbox to change the sampling rate when decoding to PCM. linear resampling 48 kHz to 32 kHz reduces the sample rate to 32 kHz, whereas linear resampling 48 kHz to 44.1 kHz reduces the sampling rate to 44.1 kHz.
When decoding, you can also increase the volume of the audio signal by checking amplify by factor, and entering a factor. Values between 0 and 100 do not change the volume, but values above 100 lead to a volume increase by (value - 100). So if you set the factor to 150, the volume will be increased by 50%. Note that a global amplification factor is not such a great idea, as you have no idea on the dynamic range of the source signal. It is better to leave this job up to a utility that can scan the dynamic range before applying an amplification factor (BeSweet can do that).
downmix output as one channel turns the signal into a mono signal during decoding.
save in Motorola byte order changes the byte order for non Intel/x86 systems. This can be useful for Mac or Unix systems.
add RIFF(RIFX) header to PCM (.wav) adds a header to the RAW PCM file, making it compatible with most media players on Windows. The RIFF header serves as self-identification and size indicator of files. Note that RIFF WAV files are limited to a maximum size of 4 GB.
delete CRC in MPEG-Audio Layer 1,2 will remove existing CRC (Cyclic Redundancy Check) data from MPEG audio streams. This can help prevent certain ProjectX error messages, but it only works with MPEG Layer 1 or 2 (but that's what most TV stations use).
If fill gaps with prev. frame is activated, ProjectX will use the last valid audio frame and use it if an audio frame is corrupted. This allows inaudible bridging of short audio stream interruptions. If not checked, ProjectX will enter a silent frame instead.
If add frames is checked, ProjectX will insert audio frames at the end of a stream if required. This ensures that audio and video have the same length.
replace all not-3/2 AC-3 by 3/2lfe silence enables replacing 2ch AC3 frames by 5.1 frames. It requires a suitable AC3.bin though.
patch 1st AC-3 header to 3/2 mode marks the first AC3 frame as 3/2 (5.1ch) frame. Software decoders will now try to create 6 channels, even of subsequent frames have less channels. This can be useful if the audio format is changing within the stream.
If an AC3 stream is to be integrated into an AVI file, checking add RIFF WAVE header to AC-3 audio will add the appropriate header to the AC3 file so that it can be integrated (note that today tools that can mux AC3 into AVI no longer require that header).
add RIFF WAVE header to MPEGAudio does the same but for MPEG audio streams. Make sure you select the proper layer tag (Layer1,2 get a tag 0x0050 - BWF / Broadcast Wave Format, Layer 3 gets a 0x0055 tag (ACM Wave Format / Audio Compression Management))
Finally, discard every xxx Audioframe can be used to discard audio frames in regular intervals. This option only applies to elementary streams.
In the teletext tab, you can configure settings for the decoding of teletext pages.
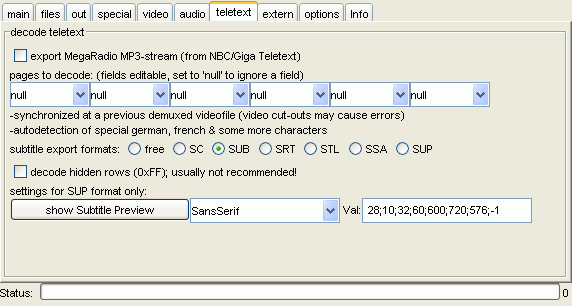 export
MegaRadio MP3-stream (from NBX/Giga Teletext) enables the extraction of
MP3 streams from the teletext service of NBC / GigaTV. This function is no longer
being developed.
The 6 dropdown menus allow you to indicate the teletext pages to be exported. You can export up to 6 pages per pass. Leaving a dropdown to null means no page is extracted.
Then you have to select a subtitle export formats: free is a text only format, SC is the DVD Subtitler Creator Format (timecount and multilines are supported), SUB is VobSub's format (framecount and multilines are supported), SRT is the SubRip text format (timecount and multilines are supported), STL is Spruce's subtitle format (Maestro, timecount and multilines are supported), SSA is Sub Station Alpha Format v4, including color support, and SUP is the compiled subtitle format programs like IfoEdit use.
In case of the SUP format, you'll have to adjust the IFO file using the following codes in VTS_PGC_1 Colors: 0(10,80,80) 1(EA,80,80) 2(8C, C3, 69) 3(89,1E,32) 4(9A,78,AD), 5(CF,93,0B) 6(A4,0B,a7) 7(9B,B8,AC) 8(AB,AD,71) 9(C5,5A,62) 10(9A,78,AD) 11(B5,A5,9E) 12(80,80,80).
decode hidden rows (0xFF); usually not recommended can be used to decode hidden or inactive teletext pages.
In case of SUP export, you can configure the output format using the settings for SUP format only. The Values in the Val field contain the following. The values in brackets indicate supported values.
Font size (24 - 32), Alpha background (transparency of the subtitle rectangle w.r.t. the background - 0 - 15), Y offset (distance between the last subtitle line and the lower frame border), X offset (distance between the subtitle and the left frame border), X width (size of the subtitle rectangle), H (unused), V (vertical resolution of the source file), Y offset 2 (distance between the last subtitle line and the lower frame border - used for the 2nd subtitle file. -1 = inactive, 96 = Letterbox zoom).
You can also select a font, and press show Subtitle Preview to see a preview of the currently selected values.
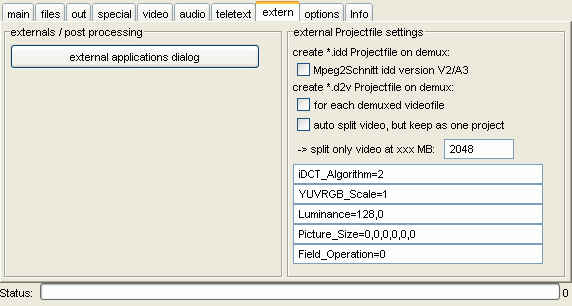
In the extern tab, you can configure external applications that ProjectX can launch, as well as configure settings for those applications.
 Checking
Mpeg2Schnitt idd version V2/A3 will create index files for the MPEG-2
cutting application Mpeg2Schnitt while ProjectX is demuxing. This will speed
up the import of the demuxed files into Mpeg2Schnitt. All input formats except
for teletext are supported, and an index file will be created for each cut part.
If you plan to encode the video after demuxing, the create *.d2v Projectfile on demux: options come in handy, as it allows you to create DVD2AVI project files during demux. You can either create one DVD2AVI project per output file (for each demuxed videofile), or have one DVD2AVI project regardless of splitting (auto split video, but keep as one project). The latter option won't split the audio file.
If you want, you can also indicate a split size for the DVD2AVI project in the -> split only video at xxx MB: field.
Last but not least we have the DVD2AVI configuration. You can find the meaning of these parameters on the DVD2AVI homepage.
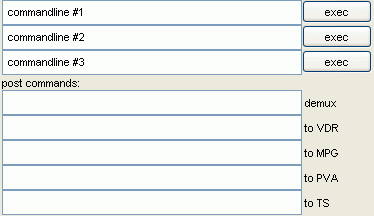
Pressing on external applications dialog will show the following configuration
screen:
 The
programs indicated in the first three lines can be launched directly via the
exec buttons.
The post commands can be used to launch an external program after the appropriate process has finished. For instance, enter the program to be launched after demuxing into the first line. Here are a few examples:
demux: "<path>mediaplayer" starts the media player
demux: "<path>mediaplayer ?0" starts the media player with all
demuxed files as parameters
demux: "<path>mediaplayer ?1" starts the media player with the
first demuxed file as parameter
demux: "<path>mediaplayer ?2" starts the media player with the
first two demuxed files as parameters
Note that for this to work, the application you're launching has to support commandline parameters.
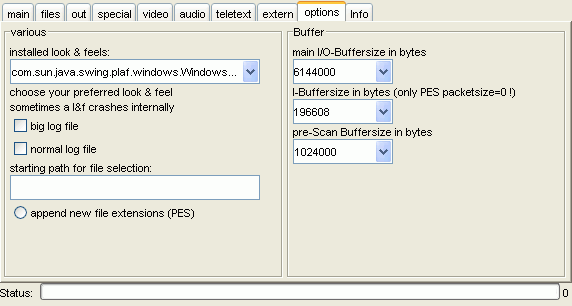
In the options tab, you can globally configure ProjectX.
 You
should already know installed look & feels. MetalLookAndFeel and
MotifLookAndFeel (Sun Solaris look) are always available, the 3rd one depends
on your operating system.
big logfile should only be used for testing purposes, as it creates an extended logfile, whose creation slows down ProjectX considerably.
Checking normal log file will log all the messages from the log window to a logfile.
starting path for file selection indicates where ProjectX will point the file browser to when you have to select an input file.
append new file extensions (PES) will ???
The main I/O-Buffersize in bytes can be used to change the buffer size for file processing. Reducing this value might prevent internal memory overflows as Java only allocates a certain amount of memory by default. Values from 1 MB up till 10 MB are possible, but you can also enter your own value (as long as it is in between those two values).
The I-Buffersize in bytes (only PES packetsize=0 !) should be increased if you get a lot of "missing next startcode (packetsize0)" errors.
pre-Scan Buffersize in bytes indicates the buffer size for pre-scan (when importing files ProjectX scans a part of the file to determine its parameters and substreams).
That's it folks. Many thanks to Lucike for letting me translate his ProjectX reference document.
This document was last updated on May 6, 2004