Only the options that can be of some use are explained in more detail. Two checkboxes in two columns mean that the settings can be applied to a particular field. This isn't of any practical use. You should apply the settings to both fields.
|
|
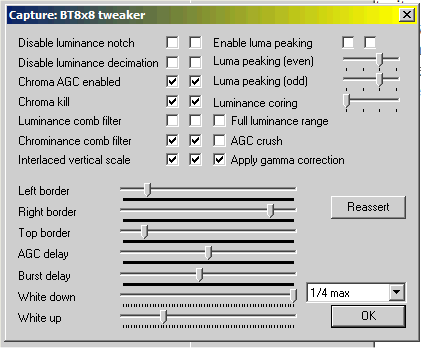
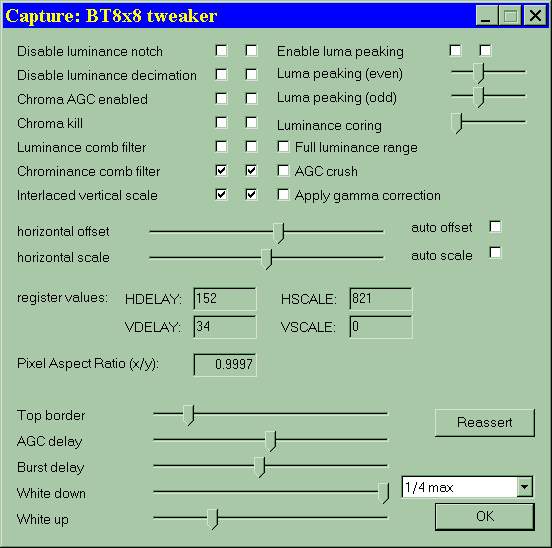
| figure 1: bt-tweaker old version | figure 2: bt-tweaker new version (1) |
1-Disable luminance notch-[LNOTCH]
This setting is used to include the luma notch filter. For monochrome video, the notch filter should not be used. This will output full band-width
luminance.
2-Disable luminance decimation-[LDEC]
The luma decimation filter is used to reduce the high-frequency component of the luma signal. Useful when scaling to CIF
sizes (384x288 or 320x240) or lower.
3-Chroma AGC Enabled-[CAGC]
This setting controls the Chroma AGC function. When enabled, Chroma AGC will compensate for non-standard chroma levels. The
compensation is achieved by multiplying the incoming chroma signal by a value in the range of 0.5 to 2.0.
If you're capping vhs, and you have 'quasi-cuts' (ie not real cuts, but white noise between the segments), then AGC will kick-in on every noise-to-video
transition. This isn't actually what you want to happen and a result will be that few frames after this transition have varying/messed chroma
information. In such cases you can turn this option OFF to avoid such behaviour.
(This setting is same as btwincap's 'auto' saturation checkbox.)
4-Chroma kill-[CKILL]
This setting determines whether the low color detector and removal circuitry is enabled.
It will kill the chroma completely if a very poor chroma signal is received.
Usually chroma is well within limits that prevent this from happening, but sometimes (very poor vhs recordings) you wanna turn this
OFF, as it will assure that chroma is never 'killed' no matter how low or noisy it
is. Some chroma is better than no chroma. Thus, when you notice dissapeared
chroma on your cap, redo your cap with CKILL turned OFF.
5-Luminance comb filter-[YCOMB]
When enabled, the luma comb filter performs a weighted average on 2, 3, 4, or 5 lines of luminance data. The coefficients used for the average are fixed and no interpolation is performed. When disabled, filtering and full vertical interpolation is performed based upon the value programmed into the VSCALE
register. Probably, this applies only to bt848, since there's no YCOMB register in
bt878. It may blur even more than bt's vertical filter/scaler, so we advice you
to leave it disabled.
6-Chrominance comb filter-[COMB]
This setting determines if the chroma comb is included in the data path. If enabled, a full line store is used to average
adjacient lines of color information, reducing cross color artifacts.
You wanna less of cross-color, thus it is adviced to keep this ON.
7-Interlaced vertical scale-[INT]
Used in conjunction with bit 7 (FLDALIGN) to align vertical scaling when overlaying fields at CIF
size (60/50 Hz mode).
Don't worry. When you're capping, you don't use CIF 60/50Hz modes. Leave it as
its default value.
8-Enable luma peaking-[PEAK]
This setting determines if the normal luma low-pass filters are implemented via the HFILT bits or if the peaking filters are implemented.
Sharpness control. Same as btwincap's sharpness regulation. Turn it on for both
fields, move sliders and watch what they do. The default is sharpness
mid-position (ie peaking OFF).
9-Luminance coring-[CORE] (note the values are YUV values, not RGB)
This setting controls the coring value used by the Bt879. When coring is active and the total luminance level is below the limit programmed into these bits, the luminance signal is
truncated to 0 (black). It effects only the lower range. Just leave this
disabled.
10-Full luminance range-[RANGE] (note the values are YUV values, not RGB)
This determines the range for the luminance output on the Bt879. If enabled, it
sets black to 0 (instead of 16) for the YCbCr. Just leave this disabled.
0 = Normal operation (Luma range 16235),
1 = Full-range Output (Luma range 0255)
11-AGC crush-[CRUSH]
When the CRUSH bit is high (adaptive AGC), the gain control mechanism monitors the A/Ds for overflow conditions. If an
overflow is detected, the REFOUT voltage is increased, which increases the input voltage range on the A/Ds.
12-Apply gamma correction-[GAMMA]
A value of 0 enables gamma correction removal. The inverse gamma correction factor of 2.2 or 2.8 is applied and auto-selected
by the respective mode NTSC/PAL. A value of 1 disables gamma correction removal.
BT-tweaker probably reverses this to make it logical. Ticked checkbox means gamma correction is
ON, as it says.
13-horizontal offset/scale
This setting tries to set the capture window (left/right centering and width of capping window) as defined in
ITU-601 if "auto" is selected on 704/720 sizes (this tweaker option is only available
in andreas dietrich modded vdub ie vdubsync (as of version 1.4.11)).
If it seems that your captures (burned to dvd) have different AR than that of
broadcast/vhs, see if enabling this option helps. At 768, 720, 704 (and other
sizes) ticking the auto checkboxes will result in slight horizontal squeeze of the
video, so some black borders appear on the sides. This makes bt8x8's capping window simillar to that of philips capping
chips.
14-Top border-[VDELAY]
Simillar to HDELAY (moving the image left/right), but in top/bottom direction.
This can be useful when capping PAL60 with btwincap. Have a look at this thread.
14-AGC delay-[ADELAY]
AGC gate delay for back-porch sampling.
Hint: macrovison is playing with AGC to garble VHS.
15-Burst delay-[BDELAY]
The burst gate delay for sub-carrier sampling.
16-White down/up-[DNCNT and UPCNT]
The value programmed in these bits accumulates once per field or frame, in the case where the majority of the pixels in the active
region of the image are below a selected value. The accumulated value determines the extent to which the AGC value needs to be
lowered or raised in order to keep the SYNC level proportionate with the white level.
[MAJS] These bits determine the majority comparison point for the White Crush Up function.
00 = 3/4 of maximum luma value.
01 = 1/2 of maximum luma value.
10 = 1/4 of maximum luma value.
11 = Automatic
References:
bt8x8 Data Sheet:
Have a look at the 100119a.pdf document.
After setting up the capture settings, go to the Video-tab and select "BT8x8 Tweaker". Move its window to the right bottom and don't close until you finished capturing. Switch to preview mode, because the settings aren't the same as in Overlay mode. With sliders named Left border and Right border you may stretch that picture horizontally to fit it exactly - removing the black bars on the left and right (1). Since it will mess up the aspect ratio we advice you not to use these sliders.
Vertical adjust is little different - it can't stretch image vertically, it just shifts it with the slider Top border. But it is very useful in case you are capturing from VHS. Shifting picture down, and cutting the bottom instable part can assure much better syncronisation and less dropped frames. Be careful with vertical slide, it can reverse field order, what is visible by flicker on picture, so adjust it very accurately. Because VirtualDub will undo all settings of tweaker, you need to set them back with the Reassert button. It is required after adjusting video properties etc. Always click on Reassert after starting the capture.
Footnote:
(1) There is no left/right border control in advanced tweaker, found in
Dittrich's versions (see figure 2).
Last edited on: 06/12/2004 | First release: n/a | Authors: Version4Team | Content by Doom9.org