Step 3: Find the right bitrate
In GKnot go to the bitrate tab.
Gordian Knot
Gordian Knot contains facilities to do pretty much anything you need in terms of video encoding.
Table of content:
1: Ripping and demuxing
2: Select a project save slot
3: Find the right bitrate
4: Select a resolution
5: Add chapters and subtitles
Robot4Rip combines the best tools for the task: DVD Decrypter is used to rip the DVD, then a DGIndex project is created, BeSweet is used for audio encoding and if desired VobSub is used to rip subtitles.
Step 2: Select a project save slot
Start up Gordian Knot, select a free slot in the dropdown list at the bottom right of the window, click rename to give it a good name and all your settings will be saved in this slot and can be reused later on.
Step 3: Find the right bitrate
In GKnot go to the bitrate tab.
Load the DGIndex project file (.d2v) by clicking on the Open button and selecting the .d2v file you've created before.
 If
FPS equals 29.970 you did not choose Force Film in DGIndex and will have to
perform IVTC (explained later on in the guide). For now set FPS to 23.976. In
all other cases (FPS = 25.00 or FPS = 23.976) you don't have to do anything.
If
FPS equals 29.970 you did not choose Force Film in DGIndex and will have to
perform IVTC (explained later on in the guide). For now set FPS to 23.976. In
all other cases (FPS = 25.00 or FPS = 23.976) you don't have to do anything.
GKnot automatically reads the number of frames and the framerate from the .d2v file. Selecting your DGIndex project file will open another window where you can see the video. Put that window in the background but do not close it.
Then select the DivX3 codec:
![]()
Now set your desired filesize and number of CDs:
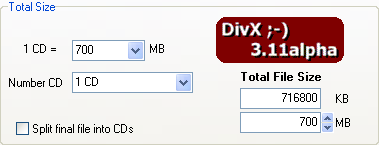 This
is pretty straightforward. Enter the CD size, click on the X CD button or enter
a filesize manually.
This
is pretty straightforward. Enter the CD size, click on the X CD button or enter
a filesize manually.
When creating rips for multiple CDs also select split file into CDs to have
your output split by CD size automatically. When you're including VobSub subs
for several languages you better uncheck the auto-split though as the subtitle
overhead will not be taken into account when splitting.
Now at this point you also need to select a container. If you don't know what
that is, you should probably not touch this option, but if you do, here's a
quick rundown:
![]()
AVI is the default. It's the oldest and most proven container. It can be opened by pretty much any program and does not require any special installation for playback. But it is also the most limited. Even VBR audio can only be used by using certain tricks (but they've been around for years and always work fine), chapters, included subtitles, and other audio than MP3 and AC3 is not possible (well, technically it is but it's a bit complex). OGM was mostly created to offer support for the Ogg Vorbis audio format. It also offers chapters, built-in subtitles (in a text only format), and MP3 and AC3 audio is also supported. MKV, short for Matroska, is the most versatile container and can handle pretty much anything you can throw at it. Both OGM and MKV require special program for editing and special filters for playback.
Then we have the Interleaving and AVI-Overhead options. When you add an audio track to a movie you will notice that the size of the output is larger than the sum of both video and audio input. GKnot can take care of this phenomenon for you so you don't have to worry about getting oversized movies.
 The default is to
create a VBR MP3 in which case you have to select 1x vbr-mp3 as shown on the
left. If you want another type of audio track or multiple tracks please select
the appropriate option instead.
The default is to
create a VBR MP3 in which case you have to select 1x vbr-mp3 as shown on the
left. If you want another type of audio track or multiple tracks please select
the appropriate option instead.
Then let's actually configure the audio tracks themselves:
 First
check Size, then press the select button and select your first audio file (the
one you got from Robot4Rip - it can be an AC3 file, an MP3 file, or an OGG file
depending on what you set up in Robot4Rip). If you have a 2nd audio track repeat
this procedure for Audio B.
First
check Size, then press the select button and select your first audio file (the
one you got from Robot4Rip - it can be an AC3 file, an MP3 file, or an OGG file
depending on what you set up in Robot4Rip). If you have a 2nd audio track repeat
this procedure for Audio B.
If you should only have AC3 files but wanted to have something else, then your Robot4Rip setup was done improperly and it did not encode audio. There's no reason to be alarmed though. If the MP3/OGG file is missing, just select Bitrate rather than Size, and select your desired bitrate. And make a mental note that you have to configure audio encoding prior to the start of encoding (it's in the guide, but you need to remember that you have to perform that step).
Note that this configuration is not final. Just before you start encoding,
you'll be asked to select and configure your audio again, and based on that
configuration, the video bitrate will be calculated. So, even if you forget
about audio here, your files will not be oversized if you configure audio properly
just before starting to encode. However, when performing a compressibility check
(more about that later), it is important that you configure audio properly,
or your resolution choice might be flawed.
Step 4: Select a resolution
Then click on the Resolution tab. The first step is the cropping.
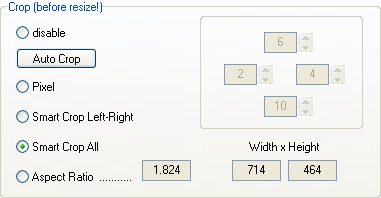 Press the
Auto Crop button (this button is only available when you have loaded the DGIndex
project file). GKnot will go through a couple of frames in the preview window
then you'll see the results. If they are about what you'd expect select Smart
Crop will will give you the ideal crop values to minimize the aspect ratio error.
Press the
Auto Crop button (this button is only available when you have loaded the DGIndex
project file). GKnot will go through a couple of frames in the preview window
then you'll see the results. If they are about what you'd expect select Smart
Crop will will give you the ideal crop values to minimize the aspect ratio error.
There's another issue here: If you go to the options tab again you will find
the "Follow ITU-R BT.601 Standard" button. As I'm one of the people
who thinks PC resizing is okay (and in fact every of my guides is written to
respect that resizing rather than this ITU standard) I deactivate this option.
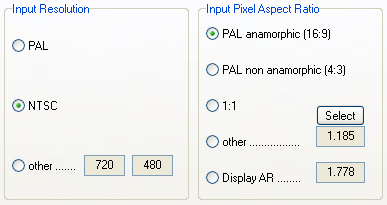
Then set the DAR according to what the value you wrote down in the DGIndex step.
First you select the TV system (PAL or NTSC) according to the video type DVD2AVI
was showing, then you select the actual aspect ratio of the input (16:9 or 4:3
in the Input Pixel Aspect Ratio field) according to the Aspect Ratio field in
DVD2AVI. If you were to use an AVI input you'd have to set the Input Pixel Aspect
Ratio to 1:1.
 You
can go to the window that shows your video and select resized from the view
menu and check if it truly looks okay. And while you're at it, move the slider
to advance in the movie until the end credits start and press the Set Credits
Start button.
You
can go to the window that shows your video and select resized from the view
menu and check if it truly looks okay. And while you're at it, move the slider
to advance in the movie until the end credits start and press the Set Credits
Start button.
Now you have to set the resolution by moving the big slider.

You can see the Aspect Ratio error in one of the fields, and as you can see the results are close to perfect. You also have to keep watching the Bits/Pixel values (Output resolution):
![]()
It's a bit guesswork as you cannot predict compressibility of your movie but here's some hints:
Mode the slider until you're within this range. These values are the general rule for DivX3 encoding but you should not consider them to be the laws of nature. I've encoded many movies that had a lower value and they still looked great.
In case you had r4r extract the subtitles you'll also have to perform the following:
 Use
the add button to add your 2 VobSub subtitle files (they have the extension
.rar and .idx - or in case you do not have WinRar installed .sub and .idx -
I strongly suggest you get Winrar though because it can significantly compress
the subtitles and VobSub can handle compressed subtitles on the fly so no decompression
is required prior to playing back a movie) so that you'll have enough space
to store them onto your CD(s) after the movie has been encoded.
Use
the add button to add your 2 VobSub subtitle files (they have the extension
.rar and .idx - or in case you do not have WinRar installed .sub and .idx -
I strongly suggest you get Winrar though because it can significantly compress
the subtitles and VobSub can handle compressed subtitles on the fly so no decompression
is required prior to playing back a movie) so that you'll have enough space
to store them onto your CD(s) after the movie has been encoded.
Step 5: Chapters and subtitles (optional)
This step only applies if your output is either OGM or MKV. These two containers allow you to put text based subtitles (.srt files) inside the container rather than to have them externally (or use VobSub subtitles, which are also additional files that you have to put onto your CD when you burn the movie). If you want to use VobSub subtitles (they are image based and are imho to be prefered over text based subtitles), forget about the subtitles in this step (you can still have chapters though). So, if you want to use the subtitle and / or chapter facilities of the OGM / MKV container, go to the Subtitles / Chapters tab.
 Check
Add Chapter Info to Video, then press Load, and select the .txt
file Robot4Rip created for you (it's in the same directory as your DGIndex project
file).
Check
Add Chapter Info to Video, then press Load, and select the .txt
file Robot4Rip created for you (it's in the same directory as your DGIndex project
file).
You'll then see the chapters that will be added to the video. You can also change the chapter title to something more meaningful if you like. Pressing Reset will remove all the chapters.
Finally, you can add .srt (Subrip, subtitles in text format), to your video:
 Press
Select, and select an .srt file you want to add to the video.
Press
Select, and select an .srt file you want to add to the video.
>> BACK
This document was last updated on August 10, 2005