DivX in Gordian Knot
Now select Save & Encode from the file menu.
![]()
Now you have quite a lot of options:
 Gordian
Knot will select a resizing filter for you depending on the bitrate. If you
don't like its selection modify it. Lanczos is a good choice unless you
have very low bitrates (> 2h20 movies, or multiple audio tracks). In the
latter case simple can be a viable solution.
Gordian
Knot will select a resizing filter for you depending on the bitrate. If you
don't like its selection modify it. Lanczos is a good choice unless you
have very low bitrates (> 2h20 movies, or multiple audio tracks). In the
latter case simple can be a viable solution.
 Then
we have some more filtering options.
Then
we have some more filtering options.
First of all the Noise Filter. If you think your source is very noisy you can use one of those filters. Personally, I'm not a big fan of such filters so I never use them.
Then we have the field operations.
 If
DGIndex showed your source as interlaced PAL and the preview was interlaced
you enable Separate Fields here or FieldDeinterlace here (the latter is slower
but of better quality).
If
DGIndex showed your source as interlaced PAL and the preview was interlaced
you enable Separate Fields here or FieldDeinterlace here (the latter is slower
but of better quality).
If DGIndex showed your source as NTSC FILM below 95% you enable Inverse Telecine here (this option is only visible if the D2V has a framerate of 29.97fps). In all other cases set Field Operations to None.
Skip the subtitle section because you did those in r4r already (or you have
no subs of course).
And last but not least the compressibility check.
 It's
possible to run a short first pass to find out the optimal compressibility of
a movie (and make an even better resolution choice). Turn the Compressibility
check on and set it to 5%, then press the Now button, wait for a few minutes
until GKnot comes up again. The Edit button allows you to edit the AviSynth
script prior to performing the check but only experienced people should touch
that. Same goes for Codec settings which allows you to manipulate the codec
settings used for the compressibility check.
It's
possible to run a short first pass to find out the optimal compressibility of
a movie (and make an even better resolution choice). Turn the Compressibility
check on and set it to 5%, then press the Now button, wait for a few minutes
until GKnot comes up again. The Edit button allows you to edit the AviSynth
script prior to performing the check but only experienced people should touch
that. Same goes for Codec settings which allows you to manipulate the codec
settings used for the compressibility check.
Once the check is done the Save as window will disappear and you'll notice some
changes in the Bits/(Pixel*Frame) part of the window:
The compressibility check gives you a rough indication of how good a movie can
be compressed. The 3 values shown above are related as follows: the 0.831 is
the value that the compressibility check returned. If the Bits/(Pixel*Frame)
value right above the Load button matches this value you have perfect quality,
going for a higher value (= a lower resolution) would be overkill as the movie
wouldn't look any better.. The limit of the codec has been reached. The 23.7
mean that with the given resolution, your movie will have a 100 - 23.7 = 76.3
% lower Bits/(Pixel*Frame) value than an ideal quality movie (note that ideal
quality doesn't mean as good as the DVD.. it means as good as the selected codec
allows). The percentage field is marked in red because the value is rather low
and GKnot means to suggest that you should lower the resolution for a better
result. A percentage value (as displayed) in the range of 40-60% should yield
optimal results, a value above 80% is serious overkill. Note that features like
B-frames will actually permit a lower Bits/(Pixel*Frame) value and the movie
will still look good, so you should take those values with a grain of salt (I
happen to know that the movie in question will still look OK with the settings
chosen).
You can increase the Bits/(Pixel*Frame) value by decreasing the resolution. Once the value is in the acceptable range set the trim option to Both (enc. credits separately).
 This
way the end credits will be encoded in constant quality mode at a really low
bitrate and then appended to the main movie.
This
way the end credits will be encoded in constant quality mode at a really low
bitrate and then appended to the main movie.
Now press the Save&Encode button which will bring up to save file dialogues
(just click OK in both of them) and then you'll get to the encoder tab:

First you'll get a stats screen with the current options. Keep in mind that since GKnot does the audio encoding for you the final bitrate won't be correct and the audio size won't be either.
 Then
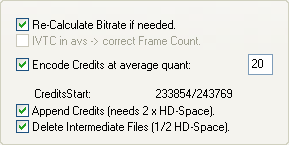
the encoding options. The default values are good. Re-calculate bitrate if needed
should be checked in any case, as should append credits. Also check delete intermediate
files so that only the final AVI remains in the end. Finally you can change
the end credits compression levels if you want to.
Then
the encoding options. The default values are good. Re-calculate bitrate if needed
should be checked in any case, as should append credits. Also check delete intermediate
files so that only the final AVI remains in the end. Finally you can change
the end credits compression levels if you want to.
If you activated IVTC the IVTC in avs -> correct Frame Count. will not be
grayed out and you have to check it.
Then you can also reconfigure the codec. When you first installed GKnot you
have probably set up some codec defaults (at least if you followed this guide).

DivX6 note: Because DivX6 changed the way it stores its configuration, you'll have to enter the codec configuration again and set the bitrate Gordian Knot shows in the Average Bitrate field. In order to make sure that the bitrate is correct, you must have encoded your audio previously, but if you followed this guide, that shouldn't be a problem and all you have to do is load your audio track(s) in the Audio A and Audio B fields and the bitrate shown will be correct.
Then go to the audio1 tab, press Select and select your MP3 (or Ogg) file from Robot4rip (or AC3 file in case you want AC3 audio), and make sure Just Mux is selected.
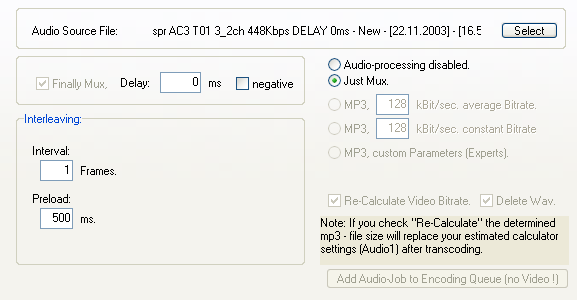
All you have to do here is check Just Mux and you're all set. If you have a 2nd audio track now go to the audio2 tab and do the same.
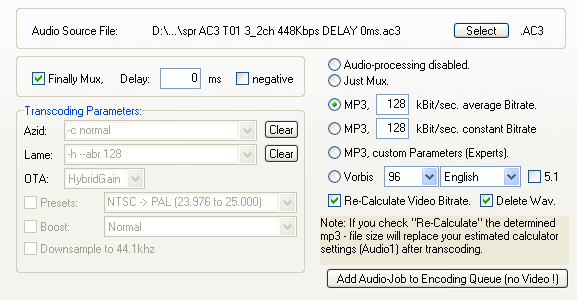
In case you didn't use Robot4Rip or Robot4Rip did not give you the desired MP3/OGG file, you'll only have an AC3 file that you first need to encode (if that's the case, prior in the guide I told you to make a mental note that you need to encode audio). You can select it as described above. The screen will look a bit different though:
 All
you should change is the bitrate, and the type of audio file (set it to MP3,
xyz kBit/s average Bitrate for ABR audio, MP3, xyz kBit/s constant Bitrate
for CBR, MP3, custom Parameter so that you can configure azid and lame
parameters in the Transcoding Parameters section, or finally Vorbis.
In case you select Vorbis, you can also set a language for the track (in the
audio selection menu instead of a track number the language will show up), and
check 5.1 if you want to retain 5.1 audio).
All
you should change is the bitrate, and the type of audio file (set it to MP3,
xyz kBit/s average Bitrate for ABR audio, MP3, xyz kBit/s constant Bitrate
for CBR, MP3, custom Parameter so that you can configure azid and lame
parameters in the Transcoding Parameters section, or finally Vorbis.
In case you select Vorbis, you can also set a language for the track (in the
audio selection menu instead of a track number the language will show up), and
check 5.1 if you want to retain 5.1 audio).
And, if you want to keep the AC3 audio, select Just Mux.
Now go back to the DivX5 encoder tab.
 Pressing
the Add Job to Encoding Queue button will add the job you just set up to the
queue. You'll then be asked whether to start encoding or not. This allows you
to add multiple jobs to the queue and then encode them all without any further
manual interaction. It's of course also possible to add jobs while the encoding
is already ongoing by simply starting to follow this guide from the top again
(of course you must not close GKnot and do everything in the already running
instance of GKnot).
Pressing
the Add Job to Encoding Queue button will add the job you just set up to the
queue. You'll then be asked whether to start encoding or not. This allows you
to add multiple jobs to the queue and then encode them all without any further
manual interaction. It's of course also possible to add jobs while the encoding
is already ongoing by simply starting to follow this guide from the top again
(of course you must not close GKnot and do everything in the already running
instance of GKnot).
From now on you won't have to do any manual interaction until your AVI is finished.
You can even safely work on your PC while it's encoding, just make sure you
don't kill any windows that suddenly will pop up. That's GKnot launching different
programs on its own.
Just in case, let's have a look at the Encoder tab as well:
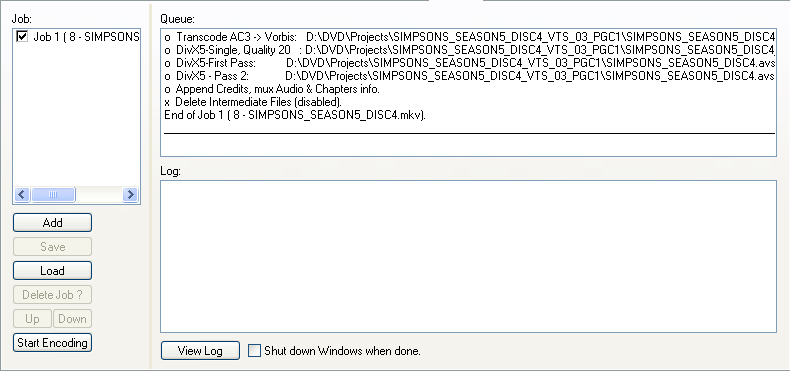 In
the Job section, you'll see all your defined jobs. Pressing Add
will get you back to the job definition window (the one you get to after pressing
Save & Encode in the preview window) - personally I don't get the
sense of that since you ought to go through the preview window where you can
define important project parameters.
In
the Job section, you'll see all your defined jobs. Pressing Add
will get you back to the job definition window (the one you get to after pressing
Save & Encode in the preview window) - personally I don't get the
sense of that since you ought to go through the preview window where you can
define important project parameters.
If you select a job from the list, you can press Save and write all the settings you have made to a file. That allows you to save a job, close Gordian Knot, and when you turn your computer back on, you can go back to this screen, press Load and load your job again and start encoding.
Selecting a job, you can also delete it by pressing Delete Job ?, using the Up and Down buttons you can move a job up and down the list, and Start Encoding will start the first job in the list.
In the Log section, you'll also see Gordian Knot's log. This might come in handy of something goes wrong.. the log should give you some hints regarding what exactly went wrong.
>> BACK
This document was last updated on August 10, 2005