Resizing AVIs for DVD encoding
There are two ways to do this, and proponents of both sides are religious about their way. There's the ITU way, and then there's the software DVD player way. All my guides are based on the latter (but of course we're doing the inverse step.. from DVD to AVI), so I'll stick to my guns. Ask the ITU fraction for their solution.
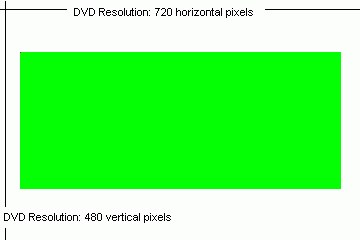
So let's start. Let's assume we're doing an NTSC DVD and our source has a resolution of 640x272. Our desired resolution is 720x480. As we can easily see, our AVI is too small:
So what do we do? Diagonally stretch the video so that it fills the screen as shown below?
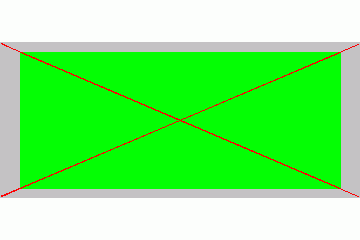 Good
thought, but wrong. If you stretch the video like this, it will look okay when
you encode it. But if you play the DVD, the video will look squeezed. But why?
Good
thought, but wrong. If you stretch the video like this, it will look okay when
you encode it. But if you play the DVD, the video will look squeezed. But why?
Because our playback resolution is not 720x480. Assuming we don't have an anamorphically
squeezed AVI with a vertical resolution of 480, we'll create a 4:3 DVD. And
the playback resolution of a 4:3 NTSC DVD is (480*4/3)x480 = 640x480 (more about
DVD resolutions can be found here). So let's
start over but this time we consider the playback resolution:
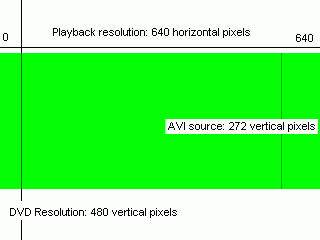 The vertical
playback resolution remains the same, but the movie has to look okay at playback
resolution, or 640x480. Since our video is already 640 pixels horizontally,
it fits perfectly into the playback window. All we have to do is add black bars
to fill up the vertical space. We have to add 480 - 272 / 2 = 104 horizontal
lines of black on top and bottom of our AVI.
The vertical
playback resolution remains the same, but the movie has to look okay at playback
resolution, or 640x480. Since our video is already 640 pixels horizontally,
it fits perfectly into the playback window. All we have to do is add black bars
to fill up the vertical space. We have to add 480 - 272 / 2 = 104 horizontal
lines of black on top and bottom of our AVI.
In AviSynth lingo, we'd have to write the following:
AddBorders(0, 104, 0, 104)
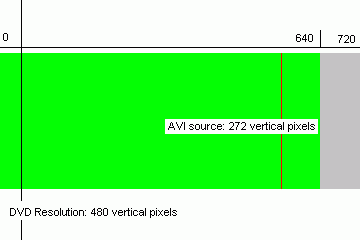
Now, we have the perfect playback picture. However, our encoder expects a 720x480
picture. Well, that's no problem. Now we stretch the entire image horizontally
to 720 pixels. It will look stretched that way, but that doesn't concern us
because the player will do the inverse upon playback.
 In AviSynth,
add the following line to your script:
In AviSynth,
add the following line to your script:
BicubicResize(720,480,0,0.5)
And that's it. Your script now has 3 lines:
AviSource("c:\movies\somemovie.avi")
AddBorders(0, 104, 0, 104)
BicubicResize(720,480,0,0.5)
Okay, that was relatively easy. Now how about something more complex? Let's
assume our source AVI has a resolution of 576x240. Let's see how this looks
when compared to the playback resolution (that's right, let's not make the same
mistake and worry about the encoding resolution):
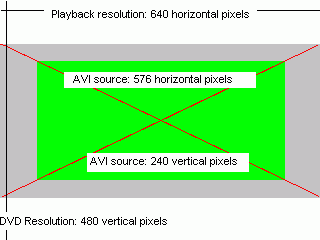 What we
have is the green rectangle, and what we need, is stretch the movie to full
out the gray area as well. To stretch the movie horizontally to fill out the
entire gray area, we have to stretch it by a factor of 640 / 576 = 1.11111
What we
have is the green rectangle, and what we need, is stretch the movie to full
out the gray area as well. To stretch the movie horizontally to fill out the
entire gray area, we have to stretch it by a factor of 640 / 576 = 1.11111
We of course also have to stretch the movie vertically by the same amount, which gives us a horizontal resolution of 240 * 1.111 = 266.6. Round this to the next even number, so 266. In script form, our stretching operation looks like this:
BicubicResize(640,266,0,0.5)
Now remember, we're not done yet. The white area in the image above has to be
filled with black bars. That can easily be done using the following script line:
AddBorders(0, 106, 0, 108)
And how did I get the number of black lines to be added? Remember that the vertical resolution of the stretched AVI is 266, and that the horizontal resolution of a DVD is 480. This means we have to add 480 - 266 / 2 = 107 lines of black on top and bottom of the image. However, 107 is an odd number, so let's pick two even numbers instead: Let's add 106 pixels of black on top, and 108 pixels of black at the bottom.
And we're still not done yet. Now we have to stretch the whole image to DVD resolution: 720x480.
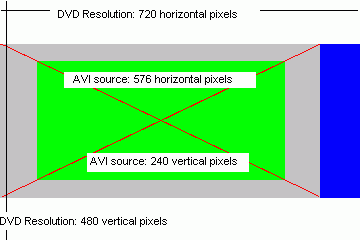 As before,
we can do this using the following line:
As before,
we can do this using the following line:
BicubicResize(720,480,0,0.5)
Hmm, now you're wondering why we have two resizing lines. Can't we combine them? Indeed, we can. Instead of linearly zooming the source picture to fill our playback area horizontally, we can stretch it vertically to the proper size, and horizontally overstretch it to fit into our playback image as shown on the left (instead of zooming to the gray area we go for the gray + blue area). Thus, our first resize line would become:
BicubicResize(720,266,0,0.5)
Adding borders is still the same, so:
AddBorders(0, 106, 0, 108)
To recapitulate:
We have to stretch the source movie linearly so that it will look okay at the playback resolution (640x480 for NTSC). Then we have to add black borders to fill the image if it's not already filled after stretching (if your source is a 4:3 movie the area should be filled). Finally, we stretch our now properly looking movie to DVD resolution. During playback it will be unstretched again.
And here's the entire AviSynth script:
AviSource("c:\movies\somemovie.avi")
BicubicResize(720,266,0,0.5)
AddBorders(0, 106, 0, 108)
>> BACK
This document was last updated on November 4, 2004