 For
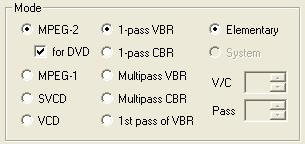
the first pass, set the encoding mode to MPEG-2 for DVD. Also activate
1-pass VBR.
For
the first pass, set the encoding mode to MPEG-2 for DVD. Also activate
1-pass VBR.Here are the video settings needed for a constant quality first pass. Before you start setting up, let me explain how this works: CCE has a so-called Q factor, which can be seen as an indication of video quality. The higher this value, the lower the video quality. Values in the range of 0 - 40 mean CCE prefers video quality over size, 40 - 80 is what the makers of CCE consider standard settings, at 80 - 120, compression ratio is favored over quality, and above 120 the image deteriorates considerably (you'll probably find that it will deteriorate a lot quicker than that).
Anyway, some claim that this Q factor is a constant. So, you should make tests to find a Q value that you deem the lowest acceptable quality, or whatever you feel comfortable with. Then set this value in the Q field shown below. Instead of performing a full pass using those values, you can now perform an abbreviated pass, encoding only a few percent of the video source. From that abbreviated first pass, you can calculate the size of your movie, had you encoded it as a whole using the same quality factor, and from that, you get the average bitrate required for multipass VBR encoding to still reach the desired quality factor. Knowing the average bitrate required to make your movie look good, you now have two choices:
If the bitrate is a value that you can afford (meaning encoding the entire movie at this bitrate won't give you a file you can no longer fit on a DVD±R), you can go ahead and encode the DVD at the bitrate you have calculated (thus filling up the entire disc).
If the bitrate you get is too high (meaning encoding the entire movie at this bitrate will give you a file that you can no longer fit on a DVD±R), you have to make a choice: You either have to live with a degraded video, or you have to find more space somewhere else (for instance be removing extras, removing audio streams, etc).
That being said here's how you set up a constant quality first pass:
For
the first pass, set the encoding mode to MPEG-2 for DVD. Also activate
1-pass VBR.
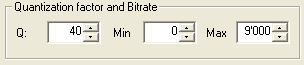 Then
set the Quantization (Q) factor to your desired quality factor the Min
bitrate to 0 and the Max bitrate to 9000. Theoretically, DVD allows a
bitrate of up to 9800, but using the whole bitrate range could lead to problems
during authoring, so using a lower value is safer.
Then
set the Quantization (Q) factor to your desired quality factor the Min
bitrate to 0 and the Max bitrate to 9000. Theoretically, DVD allows a
bitrate of up to 9800, but using the whole bitrate range could lead to problems
during authoring, so using a lower value is safer.
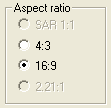
Don't forget to set the Aspect Ratio as well:
All other settings remain the same as described in the guide you've come from.
There's just one more thing: We don't want to encode the entire movie, rather
only a small percentage of it. I suggest 1 or 2 % of the entire movie. To make
sure only that much is encoded, add the following line to the end of your AviSynth
script (I'm afraid this only works if your input is frameserved via AviSynth):
SelectRangeEvery(1200,12)
Replace 1200 by 600 to encode 2% rather than 1%.
Then set up CCE as usual, and encode. This obviously will not take as long as usual. Once you're done, write down the size of the file, the number of frames (of the entire movie - remove the last line from the AviSynth script, then load the script in CCE and it'll show you the number of frames), and the framerate, and plug them all into the Excel sheet attached to this forum thread. Upon getting the bitrate, you can now start the 2nd pass, or go cut some corners to make your movie fit.
Here's how you set up the 2nd and subsequent CCE passes: Create another profile, changing only what's shown below:
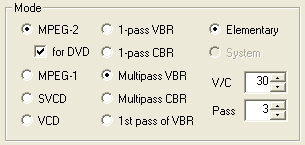 The
Mode is set to MPEG-2 for DVD and Multipass VBR.
The
Mode is set to MPEG-2 for DVD and Multipass VBR.
Also set the V/C parameter and the desired number of passes. I'd suggest a
value of 3 - 5, with 5 being useful for lower quality menus and extras.
Further down you can now configure the bitrate:
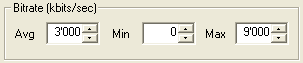 Set
the Avg bitrate to whatever bitrate you desire (or a calculator has calculated
for you), and keep the Min and Max bitrate.
Set
the Avg bitrate to whatever bitrate you desire (or a calculator has calculated
for you), and keep the Min and Max bitrate.
As you can see, the Video information file options have now become active. Check Create newSet Video information file to Create new.
Save the new template as you did before, then make sure the appropriate profile
is set for every source file (remove everything, set the proper profile and
add the files again), then press Encode again. And that's all there is to it.
Note: Make sure you've removed the SelectRangeEvery command from your AviSynth
script before you start encoding!
This document was last updated on August 9, 2005