 The
first thing to do is select a new name in the Title field. I'd suggest
something easily recognizable, like 16:9 Progressive" for progressive 16:9
content.
The
first thing to do is select a new name in the Title field. I'd suggest
something easily recognizable, like 16:9 Progressive" for progressive 16:9
content.CCE Basic guide
Not so long ago, Cinemacraft has replaced it's dumbed down version of CCE - SP (considered by most to be THE best MPEG-2 software encoder when it comes to encoding DVDs) with a new entry level product: CCE Basic. CCE Basic offers almost the same features as it's big brother (which is 32 times more expensive), it's only limited to two pass encoding. This makes it a real bargain and a 58 bucks well spent. If you've seen CCE SP before, you'll also feel right at home because the user interface is very similar.
When you first get started with CCE Basic, I suggest you create a few templates. During subsequent encoding sessions, you'll no longer have to configure everything, rather you just select the appropriate template, select your source(s) and start encoding. To create a template, select Template from the menu, then select the Standard template.
The
first thing to do is select a new name in the Title field. I'd suggest
something easily recognizable, like 16:9 Progressive" for progressive 16:9
content.
Then make sure the timecode is set to 00 00 00 00 rather than the default 01 00 00 00 (that would mean your video "starts" at 1h).
Uncheck Audio file unless you want to use CCE as audio encoder. If you keep audio encoding enabled, you can also configure the audio encoder. There are arguably better audio encoders, but if you insist, just make sure that Mode is set to Joint Stereo and the sampling rate to 48'000 Hz.
Then we have the Video settings:
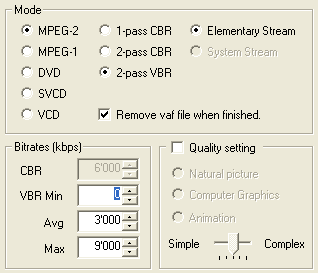 Set
the Mode to MPEG-2, check 2 pass VBR and Elementary
Stream (checking the last one disables audio encoding).
Set
the Mode to MPEG-2, check 2 pass VBR and Elementary
Stream (checking the last one disables audio encoding).
Set the Bitrate fields as follows: VBR Min to zero, Avg to your "default" average bitrate (you'll have to edit that for each video item anyway, unless you always use the same bitrate), and set the Max to 9000. Theoretically, DVD allows a bitrate of up to 9800, but using the whole bitrate range could lead to problems during authoring, so using a lower value is safer.
Uncheck Quality setting. Depending on the complexity of the source, you might want to move to slider in either direction (left means it's easy to encode content, right means it's hard to encode content).
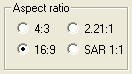 Set
the Aspect Ratio this to 16:9 for 16:9 content (most DVD movies), and
4:3 for 4:3 content (most series on DVD, DVB and DV and analogue sources).
Set
the Aspect Ratio this to 16:9 for 16:9 content (most DVD movies), and
4:3 for 4:3 content (most series on DVD, DVB and DV and analogue sources).
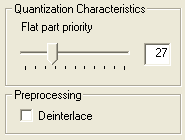 Set
the Flat part priority to 27 - 30 for optimal results.
Set
the Flat part priority to 27 - 30 for optimal results.
If you want CCE to do this, check Deinterlace. I would advise you to
perform deinterlacing prior to CCE though (preferably via AviSynth).
If you check Blanking, you can crop the video directly inside CCE.
Then click on the Advanced video settings button:
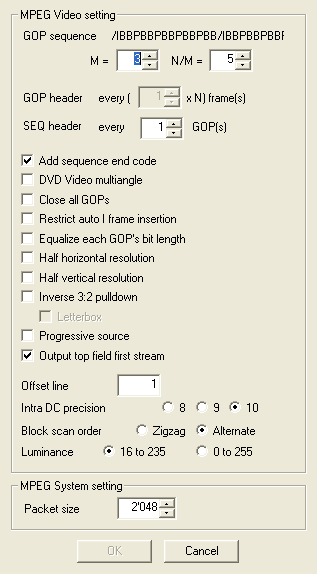 Change
the N/M parameter to 4 for PAL sources and leave it at 5 for NTSC sources.
Change
the N/M parameter to 4 for PAL sources and leave it at 5 for NTSC sources.
Make sure Add sequence end code is checked.
When encoding multiangle content, you should check DVD Video multiangle This will automatically check Close all GOPs, Equalize each GOP's bit length and Restrict auto I frame insertion which are also useful for multiangle content.
Half horizontal resolution and Half vertical resolution can be used to reduce the horizontal and vertical resolution respectively. However, the resizing method CCE uses is very low quality so if you want to reduce the resolution, do this outside of CCE (for instance in an AviSynth script).
Inverse 3:2 pulldown detection would allow CCE to perform automatic inverse telecine on telecined NTSC content, but that feature might not offer the same quality as tools like Decomb, so I suggest you use Decomb instead. Letterbox should only be used together with Inverse 3:2 pulldown detection - it ensures that black bars at the top / bottom of a frame are excluded from the pulldown detection.
Check Progressive source if you're dealing with progressive content, if your content is interlaced, make sure this is not checked.
Keep Output top field first stream checked unless you have a bottom field first stream (rare and normally only interlaced content).
The Offset line is a source of much confusion. It should always be set to 0, unless you're dealing with interlaced bottom field first content (in which case it should be set to 1). What it does is shift frames by the number of lines specified, thus switching bottom fields into top fields (CCE will always return top field first video). If you're unsure whether to set Offset line to 1, check the CCE FAQ which mentions a method how to figure this out.
The Intra DC precision should be set to match the source - most DVDs use 10 so set your template to use that value (you can still change it).
For progressive content, set the Block scan order to Zigzag. For interlaced content, you'd set the Block scan order to Alternate.
The Luminance level setting does not matter unless you're dealing with RGB input (VFAPI), in which case you should select 0 to 255.
Finally, leave the Packet size at the default of 2048.
Press OK to get back to the template configuration. Then press the Save
button to add the profile to the list of profiles, or press Replace to
replace the profile you're currently editing.
Now, select the the appropriate profile for the files you're going to encode from the templates list:
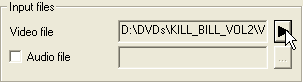
Then drag and drop your source files into CCE. The currently selected template applies to all files you add, so if you start adding files that need another template, select the required template, then continue adding files. If you double click on a file from the list, you can access it's properties and configure essentially what you've already seen when creating the template. You should do that for every file, and set the proper average bitrate that you've calculated (remember, we set a generic average bitrate in the template).
While you're in there, you can press the Play button shown in the next screen. This will take you to a built-in player, where you can change the start and end point for your encoding session.
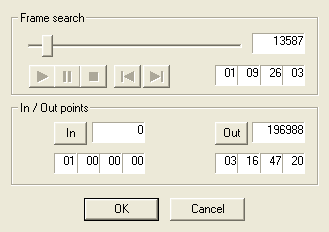 The
player controls should not cause you any problem, should they? Move the slider
to the position you want your video session to start, press In, and to
the same for the end position (press the Out button). Then press OK
to save those changes. Or never go in there and encode the whole thing ;)
The
player controls should not cause you any problem, should they? Move the slider
to the position you want your video session to start, press In, and to
the same for the end position (press the Out button). Then press OK
to save those changes. Or never go in there and encode the whole thing ;)
When you're all done adding files and reconfiguring, press Encode. But before you start, if you want to cut away a little from the beginning or the end of the video, double click on your source file in the main CCE screen, then double click on the play button in the next window and you should get to the screen shown on the left.
Using this screen you can trim the beginning and end of the video by configuring an In and Out position for the video. The In and Out buttons can be used to set the beginning and end of the part of the video that is going to be encoded. Press OK 3 times to get back to the main screen.
Now it's time to start encoding. Press Encode and watch as CCE does its magic.
You might want to do something else than use your computer as CCE is quite a
CPU hog.
This document was last updated on August 29, 2005