DVD2SVCD Basic setup
The defaults of DVD2SVCD are quite good but especially when you run the program
for the first time or if you want to perform special operations like having
multiple audio tracks, subtitles, custom CD change pictures or custom split
points you'll have a few more steps to perform. Once you've set up DVD2SVCD
there's no need to come back to most of these options, all you may want to change
are the audio options and subtitle options, after setting
those up you can go directly to the conversion tab, press Go and select Rip
and convert and then advance to CD burning.
But let's configure the program: Select the DVD Rip tab.
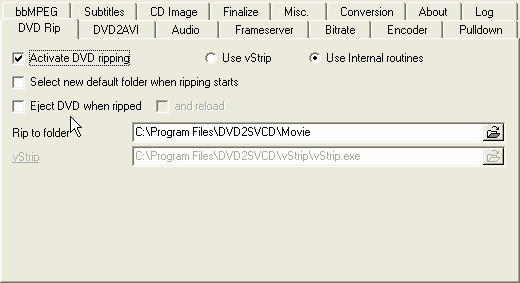 First
of all you have to check Activate DVD ripping. While it would be possible to
use DVD2SVCD from an already ripped disc, I strongly suggest you let DVD2SVCD
do this as well as it uses the best program on the market but spares you to
learn the complicated commandlines required for it. So check Activate DVD ripping.
If once you're starting the whole process ripping should not start come back
here and select Use vStrip instead. Eject DVD when ripped should be pretty straightforward.
It will eject the disc once it's not needed anymore.
First
of all you have to check Activate DVD ripping. While it would be possible to
use DVD2SVCD from an already ripped disc, I strongly suggest you let DVD2SVCD
do this as well as it uses the best program on the market but spares you to
learn the complicated commandlines required for it. So check Activate DVD ripping.
If once you're starting the whole process ripping should not start come back
here and select Use vStrip instead. Eject DVD when ripped should be pretty straightforward.
It will eject the disc once it's not needed anymore.
Also, in almost each tab there's an Extract to (or Rip to, Save to, etc.) Folder.
Since there's no free space check it's important that you select a folder and
drive that has more than enough space. You should have at least 10GB free for
a large movie, more is even better. The Select new default folder when ripping
starts will make sure that if you have updated the default folder it will be
used throughout the whole process. If you want to store the files all in the
same place you can go to Misc. settings:
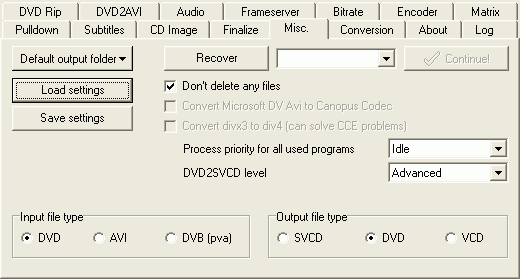 The
Default output folder will give you two options. The first is set a folder where
all files will be stored, the 2nd allows you to create a directory hierarchy
for the default folder, meaning that audio files have their own folder, video
files their own, subtitles their own, etc. Also set Input file type to DVD if
you're converting a DVD and PVA2SVCD if you're converting a PVA stream (captured
MPEG2 broadcast). Selecting AVI2SVCD would activate AVI input and you can convert
your AVIs to SVCD.
The
Default output folder will give you two options. The first is set a folder where
all files will be stored, the 2nd allows you to create a directory hierarchy
for the default folder, meaning that audio files have their own folder, video
files their own, subtitles their own, etc. Also set Input file type to DVD if
you're converting a DVD and PVA2SVCD if you're converting a PVA stream (captured
MPEG2 broadcast). Selecting AVI2SVCD would activate AVI input and you can convert
your AVIs to SVCD.
Output file type sets what kind of output you're getting. You can create a
VCD, SVCD or a DVD.
The crash recovery option might come in handy if the program aborts somewhere.
It will write a logfile which you can load pressing the Crash Recovery button
and then you can press the Continue button and the conversion process should
continue. In order to make this process as smooth as possible you should always
leave don't delete any files checked.
Process priority sets how much CPU time DVD2SVCD will take. I set this to idle
so that I can still use my PC without any problem whenever needed. DVD2SVCD
will only take as much CPU time as is available and giving priority to other
tasks.
You should also set the DVD2SVCD level to Advanced. This is especially important
for DVD output, where you couldn't keep a movie in 16:9 format unless the level
is set to Advanced.
The two Convert... options below Don't delete any files are only useful in
the AVI2SVCD mode, but the latter one might be useful if you're using CCE and
just can't get it to work properly.
If you change the Input file type to DVB (pva), the DVD Rip tab will be replaced
by a PVA tab:
 Here
you have to configure the path of cPVAS.exe, the commandline version of PVAStrumento.
Note that you need PVAStrumento 2.0.23a which you can get here.
Here
you have to configure the path of cPVAS.exe, the commandline version of PVAStrumento.
Note that you need PVAStrumento 2.0.23a which you can get here.
The DVD2AVI tab gives you some additional DVD2AVI configuration parameters:
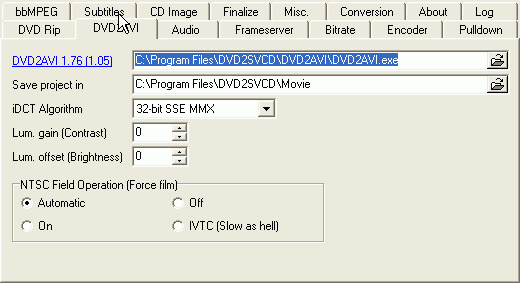 Here
we have some options to influence contrast and brightness. Increase Lum. gain
and Lum. offset to increase contrast and brightness of the picture respectively.
Here
we have some options to influence contrast and brightness. Increase Lum. gain
and Lum. offset to increase contrast and brightness of the picture respectively.
Then there are the NTSC Field Operations (which are only active for NTSC discs
of course). Leaving it to automatic is your best choice (Force Film will be
activated if the Film percentage is higher or equal to 95%, otherwise IVTC will
be performed).
The iDCT algorithm should not be changed. The quality difference when using
the higher quality filter is invisible but encoding time will increase considerably.
Now let's move forward to audio:
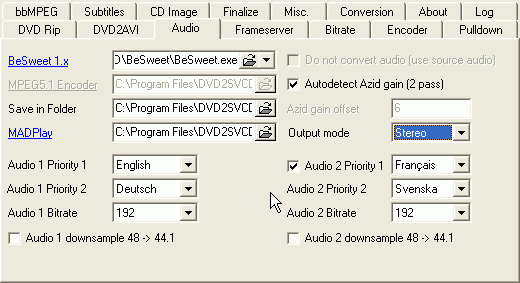 Make
sure Autodetect Azid gain is checked to get the optimal audio volume without
clicks. Output mode should be set to Stereo. It's possible to set it to 5.1
audio in which case you'll have to configure the MPEG5.1 Encoder location. While
5.1 audio sounds tempting keep in mind the following: Your DVD player must be
able to output 5.1 MPEG2 multichannel audio and only few players can do that
(most player will output something, but only downmixed 2.0 audio) and more importantly
you need a receiver capable of handling MPEG2 multichannel audio (which is also
rather rare). If you want multichannel audio I strongly suggest you start making
DVD-Rs where we have > 90+% standalone compatibility, not < 5%.
Make
sure Autodetect Azid gain is checked to get the optimal audio volume without
clicks. Output mode should be set to Stereo. It's possible to set it to 5.1
audio in which case you'll have to configure the MPEG5.1 Encoder location. While
5.1 audio sounds tempting keep in mind the following: Your DVD player must be
able to output 5.1 MPEG2 multichannel audio and only few players can do that
(most player will output something, but only downmixed 2.0 audio) and more importantly
you need a receiver capable of handling MPEG2 multichannel audio (which is also
rather rare). If you want multichannel audio I strongly suggest you start making
DVD-Rs where we have > 90+% standalone compatibility, not < 5%.
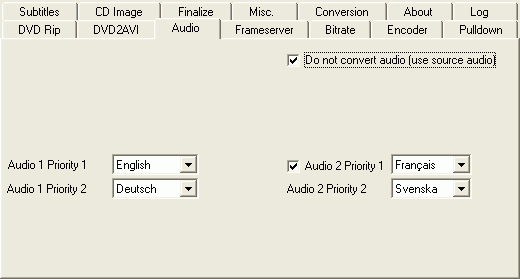
Then select your audio channels. This works as follows: You have 2 priorities
for an audio track. Here I set the first audio track to English and German.
This means that if there's no English track the German track would be taken
as first audio track. As 2nd track I selected French. You will only get a 2nd
track if you check the checkbox before Audio 2 Priority 1.
Also select the bitrate for both audio tracks (obviously the Audio 2 Bitrate
is useless if you have deactivated the 2nd audio track).
About downsampling. The SVCD specs require 44.1KHz audio but on the DVD you
have 48KHz audio. As you most likely have a DVD player to play your SVCDs using
an 48KHz soundtrack should work in most cases so unless your player can only
play 44.1KHz audio tracks you shouldn't bother downsampling as it decreases
audio quality and takes more time.
Now in case you're making a DVD, converting the audio doesn't make much sense.
Rather, you would check Do not convert the audio and then the selection is limited
to the following:
 All
you have to do now is make a default selection for your audio channels. But
don't worry, you'll be able to keep more than two audio tracks if desired.
All
you have to do now is make a default selection for your audio channels. But
don't worry, you'll be able to keep more than two audio tracks if desired.
Note that if you uncheck Do not convert audio, you'll end up having
an MP2 audio track. While this is permitted for PAL DVDs, NTSC DVDs must contain
either an AC3 or PCM soundtrack to correspond to the specs, so your player might
not play an NTSC DVD with only an MP2 soundtrack.
Then let's proceed to the frameserver setup.
 Normally
you shouldn't have to reconfigure everything as the DVD2SVCD installer sets
all the paths right.
Normally
you shouldn't have to reconfigure everything as the DVD2SVCD installer sets
all the paths right.
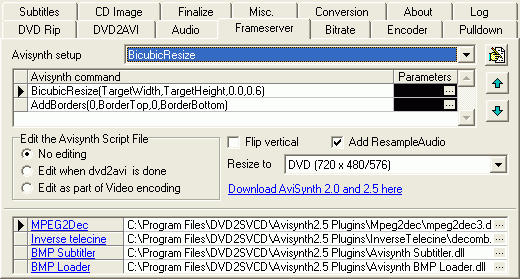
First of all you can select a resizing filter. I suggest the Bicubic filter
for SVCD, but for VCD you can squeeze out a bit more speed by using the Bilinear
or SimpleResize, and most likely you won't notice that the result is a bit less
crisp.
It is possible to configure the AviSynth script (if you don't know what this
is, don't worry, you don't have to know) using the Avisynth command options.
Then you can opt to edit the AviSynth script manually at a later point using
the Edit the Avisynth Script File options. Obviously, this is only a
feature for advanced users.
You should keep Add ResampleAudio checked because CCE might crash if
it's not checked.
The Resize to option is only available in Advanced mode, and you can use it
to get a non standard output resolution (not suggested). Just leave this as
it is. Also note that depending on your project type, the available resize options
differ from what is shown on the screenshot.
Finally, you could configure the path of various AviSynth plugins, but if you've
used the standard DVD2SVCD installer, there's no need to reconfigure anything
there.
Then move forward to Bitrate:
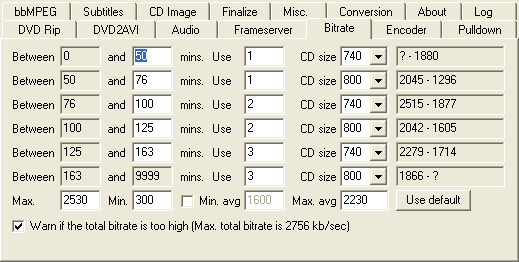 First
of all: CD size 740 is a regular 74 minute CD and CD size 800 for a 80 minute
CD.
First
of all: CD size 740 is a regular 74 minute CD and CD size 800 for a 80 minute
CD.
This should be pretty straightforward. Between x (minutes) and y (minutes)
gives the range of length of the movie in which the number of (the field after
mins. use) CDs of size (the field after CD's size). The last field shows the
bitrate range you'll get for your movie. As an example let's take line 4: It
means: if your movie is between 100 and 125 minutes the movie will be placed
onto 2 80 minute CDs and the bitrate you'll get will be between 1605kbit/s (movie
length = 125 minutes) and 2042kbit/s (movie length = 100 minutes).
The default bitrate values are pretty good, but if you want to use more CDs
or squeeze the movie down change the minute values accordingly. The last field
in each line shows the bitrate range you will get for each length range.
Also leave the Last checkbox checked. This will tell you if you're chosen bitrate
is too high (for instance when you have 2 audio tracks). Some players have problems
when the bitrate goes outside the allowed specification which will result in
skips or freezes in the video.
When doing a DVD project, your bitrate tab will look like this:
 All
you have to do is select the proper CD size (actually DVD size would be more
suitable ;), and select either DVD-R or DVD+R depending on the disc format you're
going to use.
All
you have to do is select the proper CD size (actually DVD size would be more
suitable ;), and select either DVD-R or DVD+R depending on the disc format you're
going to use.
Then press Use default for some reasonable settings concerning the Maximum
and Minimum bitrate. Note that while DVD could go up to 10mbit, with multiple
audio tracks and subtitles 9mbit (= 9000) is a more sensible value that will
not lead to any problems.
Next comes the encoder tab. Here you have two possibilities. You can either
use CCE in which case you select CinemaCraft Encoder, or you use TMPG in which
case you check TMPGEnc (that's the official name of the encoder but almost everybody
just calls it TMPG ;)
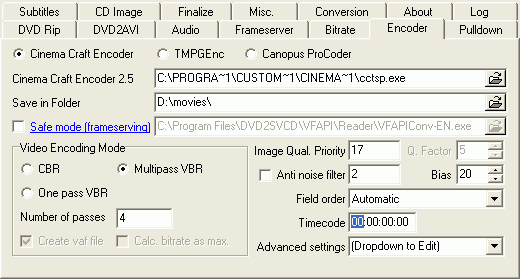 First
of all you have to give the path of CCE.
First
of all you have to give the path of CCE.
When using CCE greater than 2.50, you must use EclCCE and specify its path
rather than the path of the CCE executable. The safe mode is no longer required
when using EclCCE, but might help you if you can't get CCE to work (it's much
slower though).
Then select Multipass VBR with at least 3 passes, and 5 passes as maximum.
Higher values won't really improve quality anymore. Personally I chose 4.
The Image Quality Priority indicates how many bits will be allocated to complex
parts of the picture. It's a value between 0 and 100 and the smaller the value
the more bits will be allocated to complex parts. If you think scenes with a
low amount of action look bad you should increase this value.
If you have a noisy source you can activate the noise filter. Field order automatic
should be OK.
When your project output type is DVD, you should set the timecode to 00:00:00:00
as shown, otherwise leave it at the default 01:00:00:00.
Then we have the advanced settings:
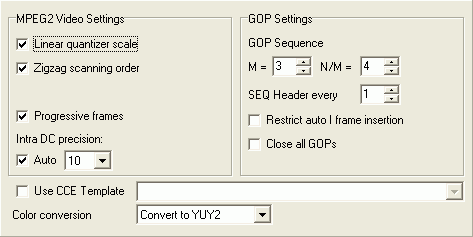 Linear
quantizer scale and Zigzag scanning order is generally OK, as is the Intra DC
decision and the GOP sequence.
Linear
quantizer scale and Zigzag scanning order is generally OK, as is the Intra DC
decision and the GOP sequence.
If you set the deinterlacing mode to keep interlaced in the beginning you'll
want to uncheck Progressive frames.
As for the GOP settings, if doing an SVCD you should set the N/M factor
to 5, for DVD output, it should be 4.
If you have defined any encoding templates in CCE, you can check Use CCE
Template and then select an available template from the list.
Leave Color conversion to Convert to YUV2.
Now let's have a look at the TMPG options:
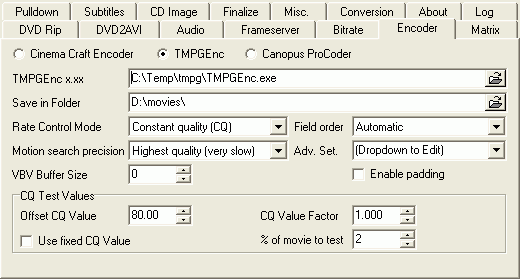 First
of all you'll have to configure the path to TMPG.
First
of all you'll have to configure the path to TMPG.
Rate Control mode will offer you constant bitrate (not to be used), 2 pass
VBR (probably the best to get a predictable size) or Constant Quality (now reasonably
precise as well but twice as fast as 2 pass encoding).
If you select CBR or 2 pass VBR you don't have to set a bitrate as it's being
calculated automatically. If you use the CQ mode you have 3 parameters: Offset
CQ Value, CQ Value Factor and % of movie to test. The first value indicates
a starting point for the CQ factor estimation. DVD2SVCD will encode a short
part of the movie (given by the % of the movie to test), using the Offset CQ
Value, then use the obtained results to estimate a size, and reduce / increase
the CQ value in order to reach the target size. As this is no exact science,
the CQ Value Factor can be used as a multiplication factor for the final CQ
value (so if you set this to 1.000, the actual value DVD2SVCD calculated will
be taken, if you set this to 0.500, the CQ value found by DVD2SVCD would be
divided by two). Unless you have reason to (oversized or undersized output),
don't change the CQ Value Factor.
Leave Field order at automatic. Set motion precision as high as you can take
it encoding time wise (TMPG is slow as hell imho).
Then the advanced options:
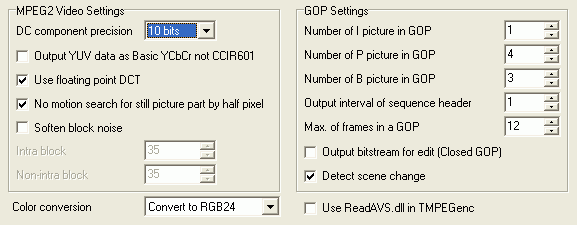 Set
DC component precision to match the according field in BitrateViewer (DTC precision
value). No motion search for still part by half pixel reduces the motion blur
in still parts but results in bit spoilage for parts with little motion.
Set
DC component precision to match the according field in BitrateViewer (DTC precision
value). No motion search for still part by half pixel reduces the motion blur
in still parts but results in bit spoilage for parts with little motion.
Soften block noise can reduce block noise around edges when bitrate shortages
occur but it will also blur the movie a bit.
Then there's the GOP settings which you shouldn't touch unless you really know
what you're doing.
Color conversion set to Convert to RGB24 should work in every
case, but you can try YUV2 as well. If you're getting a black output video,
try checking Use REadAVS.dll in TMPEGenc.
If you've chosen CCE 2.6x or TMPG you will have another option: Matrix:
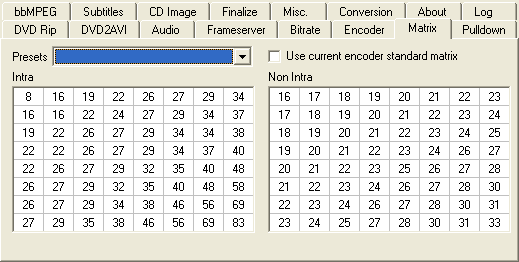 Normally
you shouldn't change that unless you understand what you're doing. You can select
a list of different Matrices from the dropdown list:
Normally
you shouldn't change that unless you understand what you're doing. You can select
a list of different Matrices from the dropdown list:
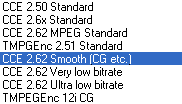
There's different settings for animation content (CG) and low bitrates, select
what fits your needs.
Then next step is configuring bbMPEG.
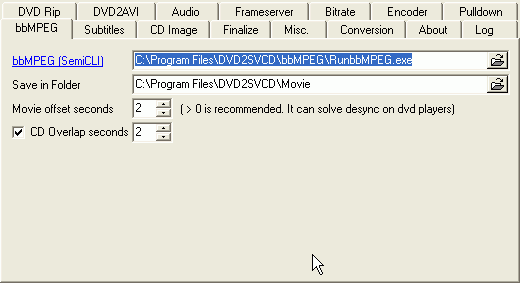 There's
one interesting option here: CD Overlap. This option allows you to set a content
overlap between CDs. So you can have the 2nd disc repeat the last scene from
the first disc (and the same goes for CD2&3 respectively).
There's
one interesting option here: CD Overlap. This option allows you to set a content
overlap between CDs. So you can have the 2nd disc repeat the last scene from
the first disc (and the same goes for CD2&3 respectively).
Then let's configure the subtitles:
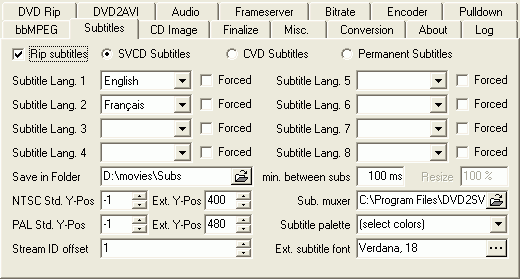 If
you want subtitles check Rip subtitles and select the subtitle streams you want.
Leave the Min. ms between subtitles value alone.
If
you want subtitles check Rip subtitles and select the subtitle streams you want.
Leave the Min. ms between subtitles value alone.
When you select SVCD Subtitles you will get selectable subtitles (works only
on standalones and not on all). CVD subtitles are equivalent to what I-author
creates for you, they should be less supported but who knows, maybe that's the
only mode that works for you. In any case both SVCD subs and CVD subs can be
turned on and off. Permanent Subtitles will burn the subtitles in the video
stream so that they cannot be removed.
If you check a Forced checkbox, only the forced subtitles from the original
DVD are taken. Forced subtitles are often used during foreign language bits
on a DVD (for instance when people talk Spanish in an otherwise English movie).
If the subtitle colors seem odd then you can change the colors using the subtitle
palette.
When you're creating a DVD, the options will look slightly different:
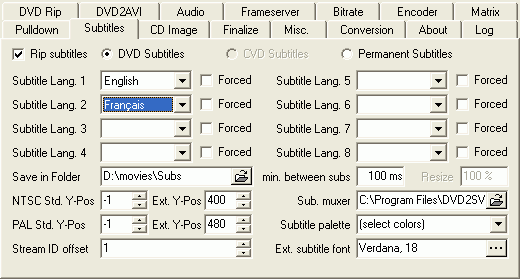 You
should check DVD subtitles for normal, selectable subtitles. Permanent subtitles
would "burn" the subtitles into the video stream so that you cannot
turn them off.
You
should check DVD subtitles for normal, selectable subtitles. Permanent subtitles
would "burn" the subtitles into the video stream so that you cannot
turn them off.
The rest of the configuration as the same as above.
The next thing we're going to configure is CD Image:
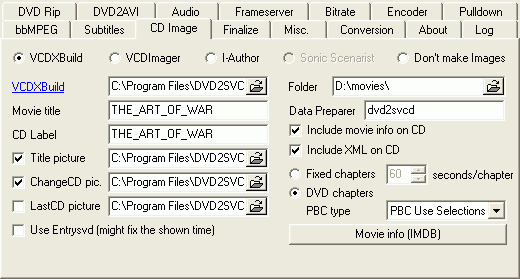 The
first thing here is to set a label for the CD and the title of the movie.
The
first thing here is to set a label for the CD and the title of the movie.
You can also specify a Title picture and change CD picture (that's being displayed
when you have to enter the 2nd CD). Selecting Use ChangeCD picture on all CD's
will add a change picture to the last CD as well.
Include movie info on CD will put a DVD2SVCD generated textfile that contains
various program settings onto the CD. Include XML on CD will put the VCDXBuild
XML script onto the CD.
Title picture, change CD pic. and LastCD picture should be pretty straightforward.
Change CD picture is what's being shown when you have to switch CDs, LastCD
picture is the picture that's being shown when the movie is over and Title picture
is the picture that's being shown before you start playing a disc.
If you have problems with the elapsed time on your player you can try checking
Use Entrysvd.
About chapters: Normally you want the same chapters as on the DVD. If you prefer
chapters at fixed intervals check Fixed chapters instead and set the chapter
interval. For DVD chapters there are 3 options: PBC Use Selections which creates
a playlist using selections (don't worry about the term.. you don't really need
to know what it means), PBC Use Playlist and no PBC. Use selections is the default
as this not only enables you to go forward and backward using your remote, but
also select a chapter via a numerical button (pressing 5 would start playing
chapter 5 for instance). Some players don't like Selections and will do strange
things (sometimes you can no longer using chapter forward/backward if you press
another key, or chapter selection will interfere with audio / subtitle stream
selection) so you can try PBC use Playlist instead. If your player does not
support PBC at all select no PBC. This will also disable the Title picture and
ChanceCD picture.
Finally select the authoring program. If you have I-Author and it works better
for you select that, otherwise leave it at the default of VCDXBuild. If you
don't need images select Don't make images.
When creating a DVD, you'll have less options:
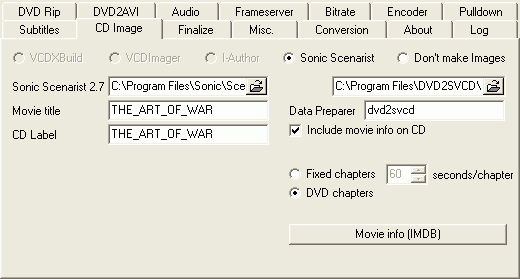 For
now, you'll need Sonic Scenarist to multiplex the output and create a usable
DVD.
For
now, you'll need Sonic Scenarist to multiplex the output and create a usable
DVD.
You can specify movie title and CD label as usual but that's about it then.
If you want anything to happen after the images have created, you could go to
the Finalize tab and configure any action (for instance burning a CD image).
Though personally I prefer to check the images before burning anything so I'll
do the burning manually.
All the options you have set will be kept, and there's one set of options for
each output type (VCD, SVCD and DVD), so you'll only have to configure these
things once.
>> BACK
This document was last updated on
March 6, 2004