Full DVD Backup guide
This guide will teach you how to create a perfect backup of a DVD-9 retaining
every asset present on the original disc. It's possible to remove audio or subtitle
tracks and replace useless stuff like FBI logos by some blank video but in the
end we're not going to change the basic structure of the DVD and thus risk the
least amount of problems.
This guide allows you to use your favorite MPEG-2 encoding tool to re-encode
video assets but in order to achieve the best possible quality I'm going to
use CCE SP. As authoring tools Scenarist NT is my favorite choice and it's the
only one allowing you to fully reconstruct even complicated DVDs. In order to
not have to do many repeating tasks I'm also going to use DoItFast4U, a tool
which automates ripping, demultiplexing, DVD2AVI project creation, AviSynth
script creation and subtitle processing. I'm going to refer to this tool as
DIF4U throughout the guide.
You will need the following software for this guide
DoItFast4U
IfoEdit
ImgTool
IfoUpdate Scenchap
SubRip or Subresynch
ChapterXtractor
Scenarist
Audio dummy files (Thanks
to Trilight for providing them)
Table of content
1: Preparation
2: Demultiplexing
3: Encoding
4: Subtitles (optional)
5: Reauthoring
6: Process the main movie
7: Putting it all back together
8: Make the disc regionfree
9: Remove User option prohibitions
10: Final sector adjustments
11: Burn the DVD
Step 1: Preparation
In this guide we're going to put the DVD-9 Training Day, R2 having a total
size of 7.5GB onto a single DVD-R disc. This edition of the movie contains 3
language tracks, a commentary track, multiple PGCs in the main movie VTS having
different audio tracks than the main movie, 20 subtitle tracks and a lot of
extras. If that doesn't scare you then I suppose you either don't know what
the heck I am talking about and may be better off learning the DVD-R
basics first or you reauthor The Matrix for breakfast in which case you
most likely have no use for this guide ;) This training day is going to take
you very far into DVD-R land and you're going to see things you have never seen
before. But if you stick to the path you should be getting where you want to
go to.
To begin with here's the directory listing of the DVD:
29.03.2002 03:47 16'384 VIDEO_TS.BUP
29.03.2002 03:47 16'384 VIDEO_TS.IFO
29.03.2002 03:44 1'968'128 VIDEO_TS.VOB
29.03.2002 03:46 30'720 VTS_01_0.BUP
29.03.2002 03:46 30'720 VTS_01_0.IFO
29.03.2002 03:44 0 VTS_01_0.VOB
28.03.2002 04:18 1'073'739'776 VTS_01_1.VOB
28.03.2002 04:18 58'195'968 VTS_01_2.VOB
29.03.2002 03:47 79'872 VTS_02_0.BUP
29.03.2002 03:47 79'872 VTS_02_0.IFO
29.03.2002 03:45 8'607'744 VTS_02_0.VOB
28.03.2002 04:20 1'073'739'776 VTS_02_1.VOB
28.03.2002 04:21 1'073'739'776 VTS_02_2.VOB
28.03.2002 04:22 881'936'384 VTS_02_3.VOB
28.03.2002 04:23 1'073'739'776 VTS_02_4.VOB
28.03.2002 04:24 1'073'739'776 VTS_02_5.VOB
28.03.2002 04:25 1'073'739'776 VTS_02_6.VOB
28.03.2002 04:25 39'243'776 VTS_02_7.VOB
29.03.2002 03:47 20'480 VTS_03_0.BUP
29.03.2002 03:47 20'480 VTS_03_0.IFO
29.03.2002 03:45 0 VTS_03_0.VOB
28.03.2002 04:26 658'708'480 VTS_03_1.VOB
VTS_02 is obviously the main movie VTS set as it's the largest one. In this
guide I'm going to show how to transcode each video item, but in some cases
you might prefer to only encode the main movie. CCE can give you good video
quality using a bitrate of 2500 kbit/s or higher. If you add the bitrate of
the audio tracks you're going to keep to that and multiply this by the length
of the movie in second you have an approximation of the size of the main movie
(add about 100-150MB for the muxing overhead to get a more realistic result).
If you add the size of the extras (VTS1 & VTS3 in this case, and don't forget
about VIDEO_TS.VOB) and you're still below the size of a DVD then you may not
want to bother doing the extras as well.
The best way to begin is create an ISO
image of the DVD and mount this as a virtual drive. That way we'll always
have every file we need available right on our harddisk and won't have to insert
the original DVD again. It also saves us from embarrassment of accidentally
deleting a file you'd still need as all the files in the image are read only.
Step 2: Demultiplexing
Now we literally have to rip our movie to pieces. In less martial terms we're
going to separate audio, video and subtitles and process them independently
of each other. So start up DIF4U and let's get started. The first thing you'll
have to do is select a working directory. This is the directory where all the
demultiplexed files will be stored (alternatively you can create a new folder,
right click on it in Explorer and select DoItFast4U into this directory).
 Create
folder for this VTS, if checked, will create a new folder and demux the currently
selected (see the next screenshot) VTS into this folder. It's a per VTS setting
so you can decide to put multiple VTS sets into the same folder by unchecking
this option for the VTS you'd like to go together (they'll be placed in your
working directory). HDD Demux would have to be used if you previously ripped
the whole DVD to a directory on your harddisk (not suggested!) in which case
you'd have to select the directory containing the ripped files as working directory.
Demux All VTSes Checked Below should also be enabled. Otherwise only the currently
selected VTS in the Mandatory section will be demuxed.
The next thing we're going to look at is the mandatory section:
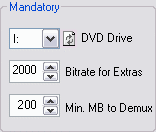 Under
DVD Drive you select the drive letter of the mounted ISO image. Under VTS you
can select a VTS set which you're then going to configure. If you'd uncheck
the checkbox in front of VTS the VTS in question wouldn't be processed (in this
case the main movie will only be processed if once VTS 02 is listed the checkbox
is checked).
Start and End PGC allow you to decide which PGCs are going to be processed
in the VTS set currently selected. Normally you won't have to touch that option.
The same applies to the last option, which allows you to not process VTS sets
that are below a certain size (in this case if there were a VTS set smaller
than 200 MB you wouldn't bother processing is as the possible space gain would
be outweighed by the invested time).
So after selecting a VTS set let's decide what we're going to do with it:
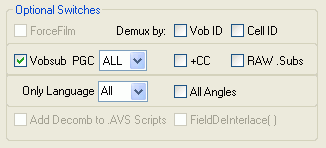 By
default DIF4U demuxes by PGC which is okay for most cases. Only seamless branching
and multiangle movies require a different treatment and for those we have special
guides. There are some rare cases where a different demuxing scheme is required
and I'm going to outline that just in a second but first let's have a look at
the screen on the left.
If Vobsub is checked subtitles will be processed. By default all PGCs will
be checked for subtitles. If you know what certain PGCs don't have subtitles
you could save a few seconds by only having PGCs that have subtitles to be processed
but generally it's not worth the effort. If a PGC has no subtitles the subtitle
file will be 0 bytes and you'll know there are no subtitles to be imported once
you reauthor. If you check +CC Closed Captions will also be processed. RAW .Subs
should not be checked. If you're interested in Closed Captions please read the
Closed Caption addendum, it will tell you what
to do with the files DIF4U will output when you check +CC.
Then for Only Language. This would allow you to select a single language to
be demultiplexed. By default all languages are demultiplexed which leaves your
options open (you can still decide not to process a certain language later on)
and I suggest you leave it like that. In case of a multiangle DVD you'd also
have to check All Angles but as this guide is for a single angle DVD don't check
it.
To the right DIF4U will also show you some info about the currently selected
VTS set:
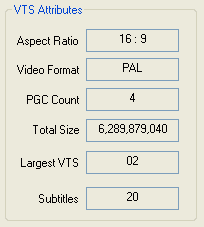 This
is the main movie. As you can see it's 16:9, has 4 PGCs, the total size is listed,
it's the largest VTS sets and there are 20 different subtitles.
VTS 1 and VTS 3 are 4:3, have 4 and 1 PGCs respectively and less subtitles.
Now you want to configure every VTS the way described above. Yet normally you
can leave everything at its default (this is what I did), in fact unless you
have a case that requires special demuxing (I'll get to that in just a second)
or do not want to process a certain VTS set I strongly suggest you leave it
as it is.
In order to find out if we have to demux by VOB ID we have to start up IfoEdit
and have a look at each VTS_xy_.IFO file. The section you'll want to look at
is the one I marked in red:

For each PGC there's a (uses VOB_IDs: ) section. If a number is listed in multiple
PGCs them I'm afraid you'll have to go the
hard way (seamless branching titles are the most popular ones requiring
processing by VOB ID).
After configuring DIF4U we're ready for demuxing.
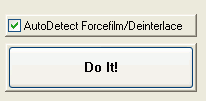 Before
you press the Do It! button let me tell you about the AutoDetect Forcefilm/Deinterlace
option. This option will automatically perform IVTC on assets that need it,
and the same goes for interlacing (the latter is used for PAL movies, the former
for NTSC). And now press the button and go do something else because you're
PC will be blocked for a bit.
Step 3: Encoding
Unlike previous guides I'm going to outline a slightly different CCE process
this time, also known as the RoBa method. If the
results are really better is controversial but in any case it allows us to speed
up the process somewhat. Right now you're only going to encode your extras.
This allows you to first re-create all the extras, and then accurately calculate
the bitrate for the main movie in order not to waste any space on your DVD±R.
Once CCE completes you have to perform an additional step if you have an NTSC
project: Start up DIF4U again, select the path where CCE put your mpv files,
then select Utilities - Pulldown/Rename and press the Pulldown button. If you
don't want to delete the original files after pulldown has been performed uncheck
Delete .MPVs (this will of course double the space requirements of this operation).

Step 4: Subtitles (optional)
If you don't need subtitles just skip this step.
DIF4U has already preprocessed your subtitles. In fact you'll find a number
of .Sub and .Idx files in each VTS folder. The next step is to turn these streams
into something Scenarist can digest. The quickest way to approach this problem
is Subresynch. Originally written to synchronize subtitles it can also convert
subtitle formats. Start up Subresynch and load the first .Idx file DIF4U has
created.
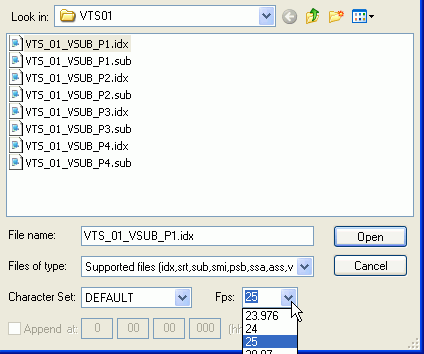 Obviously
you only have to process the subs you actually care about. First of all .Idx/.Sub
sets that are 0 bytes large do not have to be processed. And then if you think
a certain extra shouldn't have subtitles either so skip them.
Once you've selected an .Idx file also make sure that the Fps: value is properly
set. For PAL movies that would be 25, for NTSC 29.97. Now you can press the
Open button.
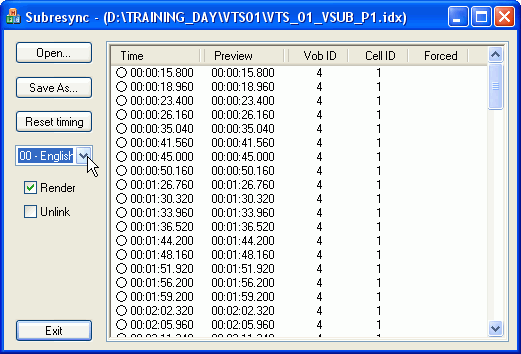 Subresynch
will now show you all the subtitles found in the file you selected. Now follow
the mousepointer and select the language you want to extract. Then press Save
As...
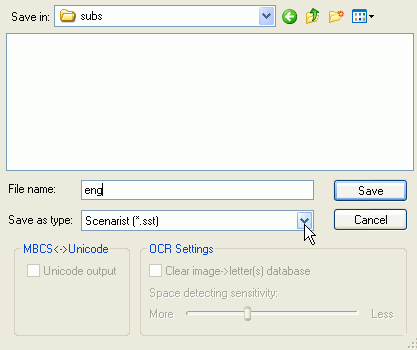 Select
an appropriate name for the subtitle file (the proposed name isn't good, Scenarist
would complain if you were to try importing subtitles having the default name
so I use a 3 letter code to specify the language). Also create a separate folder
for the subtitles or you'll quickly get confused by the huge number of files
in a VTS folder.
Also set the Save as type to Scenarist, then press Save. After a few seconds
you'll have a number of .bmp and one .SST file in the selected folder.
Now repeat this procedure for every subtitle stream you want to extract and
make sure you place them all in the same directory (otherwise you'll have to
change the path in the sst script manually or Scenarist won't find the subtitles).
If you have forced subtitles (that are subtitles that you cannot switch off,
such subtitles will usually be displayed during foreign language part of the
movie) you'll want to reconstruct them again. In order to do that what you need
to do is extract the forced subtitles to a separate stream which later allows
you to identify the forced subtitles and make them forced again. In order to
do that you have to identify the forced subs first, then edit the .Idx file
to ensure that only forced subs will be extracted by Subresynch. You'll find
all these steps in a separate guide on forced subs.
Alternatively you can also use SubRip to process
your subtitles. It will take considerably longer to both set up and extract,
but Subresynch is not yet perfect when it comes to subtitle timing and will
in rare cases give you subs that start and end at the same time and Scenarist
can't handle those (though in those cases you'll have to edit the .SST file
manually to resolve the problem).
Step 5: Reauthoring
Now it is time to start up Scenarist. Create a new project as usual and make
sure you set the aspect ratio properly. Extras as usually 4:3 (and that's the
default option in Scenarist) but don't forget to check your assets before selecting
an aspect ration (in the beginning you could use DIF4U to show you the aspect
ratio of every VTS set). If you used Subresynch to process the subs you can
click your way through all the questions Scenarist is asking, in case you used
SubRip there's one additional thing to take care of: After being presented with
subtitle conversion colors you'll have a screen where you can select 4 colors:
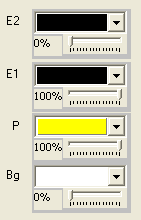 Make
sure that E2 and E1 are set as shown here and that E2 is set to 0% and E1 to
100%. The P color is your subtitle font color, select whatever color you like.
As you can see I chose yellow, but many people prefer white. Also make sure
that the slider is set to 100%. and last but not least set Bg to white and 0%.
Once the project has been created drag and drop your video file(s) and audio
file(s) into the lower right part of the screen. Scenarist will then check the
files for compliance.
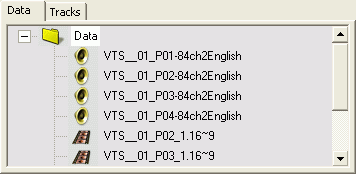 In
Training Day we have one audio track per PGC in both VTS1 and VTS3, and one
video track for each PGC as well. As you can see from the names of the audio
files all audio streams had substream ID 84 (the part after ch in the filename
indicates the substream ID). Audio streams will get indexes starting at 80 and
in order to put the audio track at the same position as in the original file
we have to use a trick: It's not possible to set a substream ID, the ID is increased
by each stream you add. So what we're going to do is to add a dummy audio file
4 time (thus creating an audio track having ID 80, 81, 82 and 83) and then add
the real audio file. BeSliced can be used to create
such dummy files.
Dummy files are only used to offset real audio tracks. If VTS1 had only audio
on substream ID 80 then there would be no need for a dummy file. As PGCs in
a VTS all need to have the same number of audio tracks, when leaving out an
audio track dummy files also have to be used.
In the right "window" of the lower part of the screen Scenarist will
show the results of the compliance check and eventual errors when you're importing
assets. Then click double click on one of the imported assets (media objects
are called assets in Scenarist) to bring up its properties:
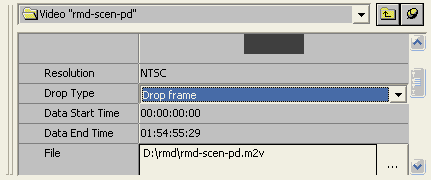 If
your source is NTSC you must set Drop Type to Drop frame for EVERY asset (including
audio even if an audio has no framerate).
PAL projects don't need that step.
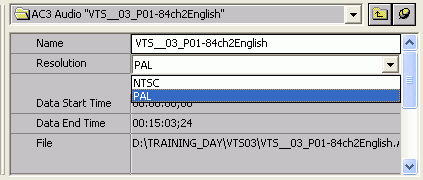
For a PAL project we may have another complication though: Sometime Scenarist
forgets the TV format you chose and imports AC3 files as NTSC. Then when you'd
try to add an audio file to a video it would complain about non matching drop
type. So, it cannot hurt to make sure that if you're working on a PAL project
the resolution of each audio file is set to PAL.
Once you've imported all the files, click on the Track editor tab and drag
and drop the main movie video file to the track editor. There will be a dark
gray rectangle in the main part of the window now representing that track. If
you have multiple PGCs add the video streams corresponding to the other PGCs
as well. In my case I have 4 tracks for the 4 PGCs in VTS1, and one track for
VTS3.
Before we go on. There might be assets on your original DVD that you do not
necessarily wish to be on your backup. One option would be to strip them out
using IfoEdit once you've completed this guide. The probably better option (because
you do not risk screwing up the disc navigation) is to replace the asset in
question with a dummy asset. A few frames of black will do you just fine.
The next step would be to add chapter positions to
each track. In Training Day extras are not chaptered so I can skip that
step. Now you might be wondering how I can determine which PGC needs chapters
and which does not. The probably easiest way to determine this is to start up
DVD Decrypter, point it to your virtual DVD drive, select a PGC and look at
what's being displayed below the VTS - PGC selection.
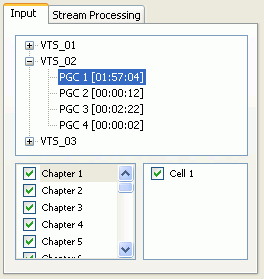 This
is an example from the main movie PGC of Training Day. Obviously it has chapters,
but every other PGC does not.
Now let's configure our PGCs. Double click on the first one.
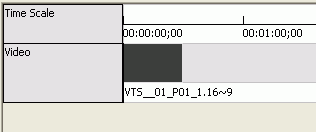 At
first the track only contains a video track and nothing else.
In order to add an audio track you select the appropriate audio tracks at the
bottom right in the asset folder, and you drag and drop it below the video track.
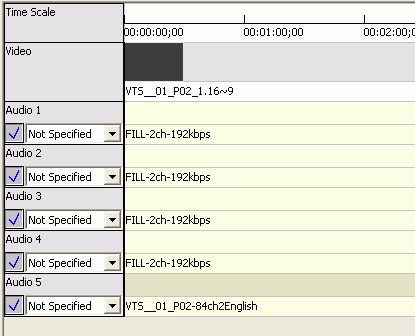 Now
you might recall me telling you about dummy audio tracks. As every PGC in VTS1
and VTS3 has one audio track having ID 84 we have to add 4 dummy audio tracks
before the real audio track. What you can see on the left is the final audio
configuration for one of my PGCs.
Then it's time to import the subtitle tracks.

Press the blue button shown below (first one from the right).
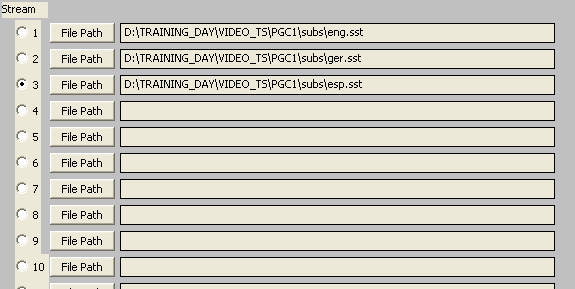 Here
select your subtitle script(s) then press Start and then OK to start importing.
If you get warnings about improper resolutions I guess you haven't been following
my hints in the subtitle section of the guide and it's time to go back there
;)
As usual you can see the status of this operation in the "window"
on the bottom left.
If you get errors like this
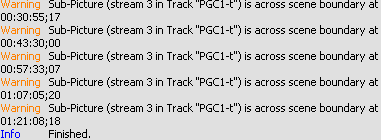 there's
nothing to be worried about. It simply means that if you select a certain chapter
and you have a subtitle that starts before the chapter point and ends after
the chapter point, that subtitle will not be shown if you fast forward to the
chapterpoint (but if you watch the movie normally it will be shown... your original
DVD will exhibit the same behavior).
As I mentioned before, you can leave out subtitle tracks if you don't need them.
Now you repeat this procedure for every PGC. Also, do not worry about setting
the correct language for audio and subtitles, we'll take care of that later
but do make sure that both W and L buttons are checked for every subtitle track
you're adding.
Once you're done creating your PGCs it's time to go to the Scenario editor.
 The
first thing you want to do is create a sufficient number of VTS sets. As you
may recall, the extras are located in VTS1 and VTS3 so we have to create 2 VTS
sets (don't worry about the names, you'll have to rename them anyway).
After creating the appropriate number of VTS sets it's now time to re-create
the original DVD structure.

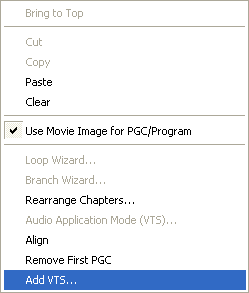
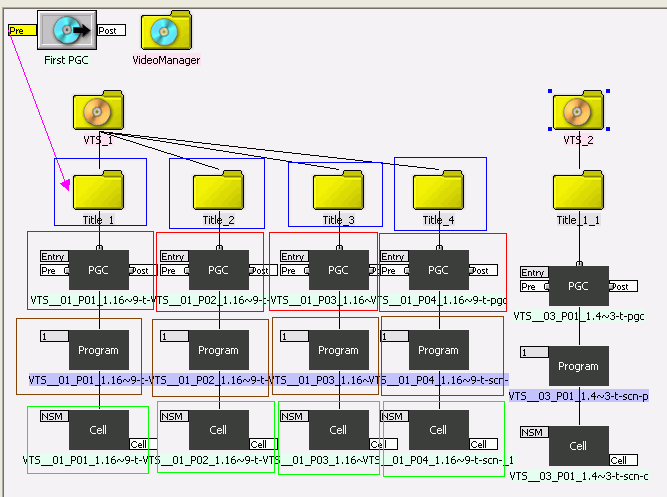
Below you'll see how this should look in Scenarist. Keep in mind that dropping
an asset (from the asset list in the bottom right) on a Title folder will create
a PGC, when you drop an asset on a PGC folder it will become a chapter, and
if you drop it on a chapter icon it will become a cell. And, in order to attach
a Title to a VTS, right click on the VTS and select Add Title, to add a PGC
to a title you can either drag & drop an asset directly on a title folder,
or right click on the title folder and select add PGC, then drag and drop the
asset directly on the PGC. In order to make the process a little bit more visual
I have colored corresponding elements, all Titles are marked blue, PGCs red,
Chapters brown and Cells green.
After recreating the original DVD structure all that remains to be done is
compile the project. To do that go to the Scenario editor.
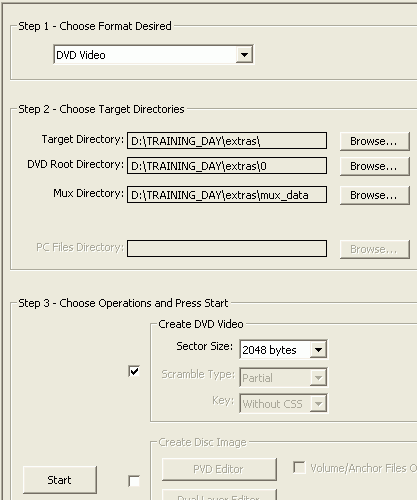 Target
Directories should be filled out according your selections when you created
the project.
All that remains to be done is check the first checkbox in the Step 3 - Choose
Operations and Press Start section, then press Start and wait for completion.
After compilation you find your compiled assets in the path indicated by DVD
Root Directory in the screen above. Now we're ready to handle the main movie.
Step 6: Process the main movie
DIF4U comes with a good bitrate calculator which we're going to use now. Start
up DIF4U again and select Utilities - DVDCalc.

Then press the Browse button and select the directory in which Scenarist put
your compiled extras.

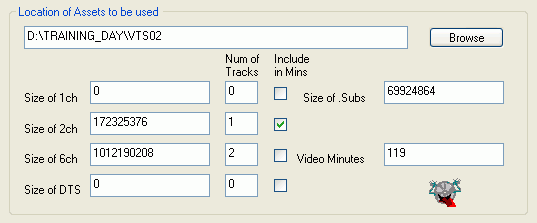 Then
press the next Browse button and select the path of your demuxed main movie
VTS set. DIF4U will automatically fill in the size of the audio and subtitle
files and calculate the length of the movie. If you prefer to dump some audio
tracks change the number behind the appropriate track type accordingly. As an
example, Training Day has 3 5.1ch AC3 tracks and since I don't speak Spanish
I don't see a reason to keep the Spanish audio track, hence I reduced the number
of 6ch tracks to two.
Before you go on we have the Include in Mins option. By default DIF4U calculates
the length of the main movie (and additional PGCs in the main movie VTS set)
by the combined length of 2 ch audio streams (one for each PGC). If you happen
to have one PGC with only 6ch audio tracks then of course these calculations
would be wrong and you'd have to also check Include in Mins in the row for the
6ch audio tracks.
Once everything is set up it's time to press the calculate button.
 As
you can see we have to set the average bitrate in CCE to 3002 and the maximum
bitrate to 8712 to prevent any bitrate overflows (which would prevent Scenarist
from compiling).
Now that you know the bitrate to be used you can encode
the assets of the main movie VTS set (don't worry, it's the same procedure
as for the extras but I suggest less passes here as the bitrate is higher. Using
5 passes at 3000kbit/s would definitely not make much sense, in fact many people
are already happy performing just one additional pass after the One pass VBR
pass).
Once the main movie has been encoded it's time to start Scenarist again and
create a new project. Make sure you chose the proper aspect ratio (most main
movies are 16:9). Comments about subtitle color issues when using SubRip still
apply.
Then you import your main movie assets. Below you can find the list of every
file needed. As you can see there are two dummy AC3 tracks, I'll explain how
we're going to use them later.
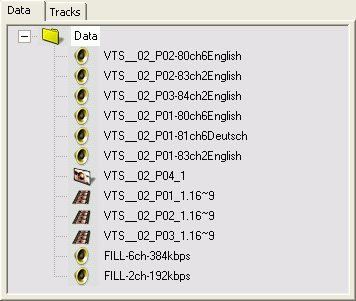
The next step is to create one track for each PGC. As you can see in the image
above, VTS__02_P04 (in other words, VTS02, PGC4) is different from the rest.
When you drag and drop it into the track editor you'll be presented with the
following selection:
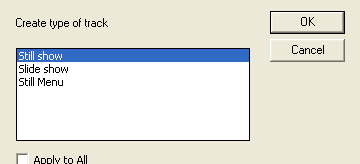 Here
I chose still show.
If you demuxed by VOB ID you'll have to create
your chapters manually. Otherwise, once you've created all the tracks you
have to export your Project to a script so that we can add the chapters automatically
(unless you want to add 30+ chapters all manually by copying and pasting timecodes
from ChapterXtractor that is ;) To do that select File - Export.
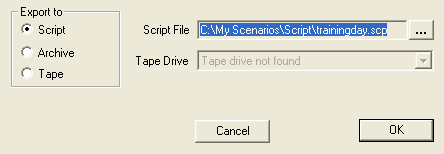 Select
a name for the script file and make sure Export to Script is checked, then press
OK. Now you can close Scenarist momentarily.
Start up ScenChap then drag and drop the .scp file you've just exported into
ScenChap (drop it over the Input Script: line).
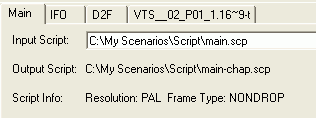
Then select the IFO tab and drag & drop VTS_02_0.IFO into the IFO File:
line in ScenChap.
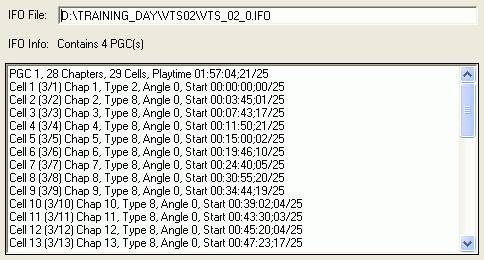
Last but not least select the last tab (representing your main movie track),
then select Copy from IFO. If you have created multiple tracks (for instance
if other PGCs also need chapters) you have to repeat this procedure for the
other PGCs - thus it is very important that you create your tracks in the correct
order in Scenarist, PGC after PGC.
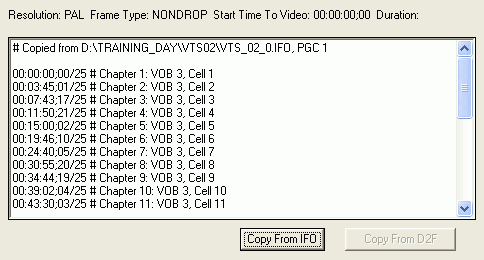
Now press the Create New Script button. This will export another Scenarist
script, having chapters at the appropriate positions.
Back in Scenarist select File - Import:
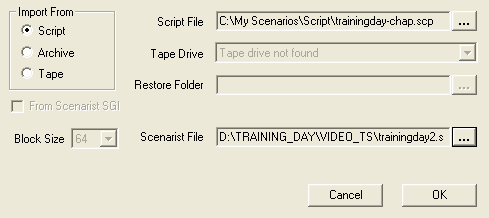 Make
sure Import From Script is checked, select the chaptered scp file and don't
forget to set a Scenarist file (that file will be created from the script file)
then press OK.
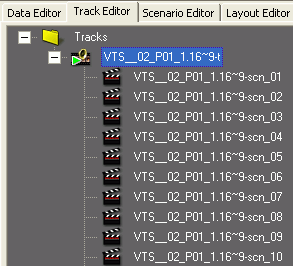
Once Scenarist has created the project you can go back to the Track editor and
you'll see that all the chapters have already been set.
Now it's time to set up the PGCs properly. Let's have a look at the main movie:
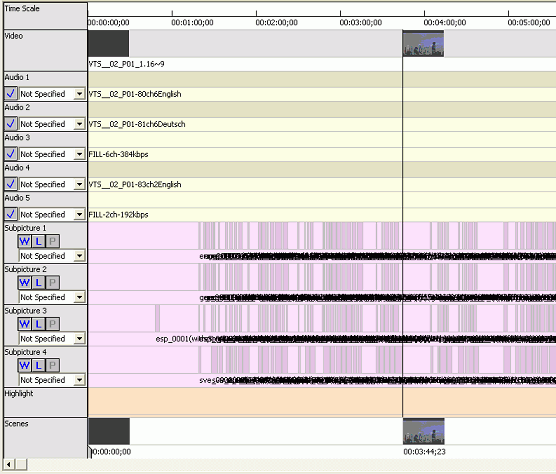 This
is the final result after adding audio and subtitles. As previously mentioned
I have dumped the Spanish soundtrack and replaced it with a 6ch dummy file having
the same bitrate as the original soundtrack. There's also a 5th audio track,
this is due to the other PGCs in VTS2 having an audio track with ID 85.
Before we go to the next PGC one word about forced subtitles. If you've exported
them separately you should import the original subtitle track containing forced
and non forced (provided they were in the same stream, if not it's even easier)
one after another, this will allow you to identify the subs that are present
in both subtitle streams. Once you have located such a subtitle, click on the
subtitle to be forced in the main subtitle track (the subtitle track containing
forced and non forced subs).
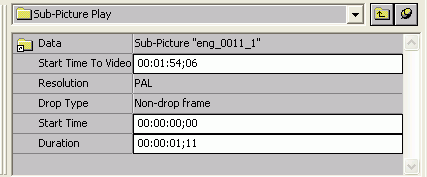 In
the middle are at the bottom click on the Data folder.
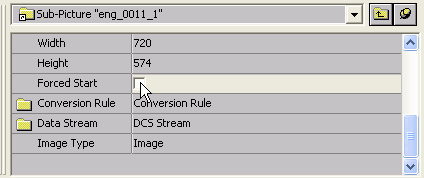 Then
check Forced Start to make this subtitle forced and repeat this procedure for
all subs that are present in the forced-only subtitle stream and the regular
subtitle stream.
After making all the subs forced you can delete the subtitle stream containing
the forced subs only.
In case your forced subs were in a separate stream you just make all subtitles
in that stream forced but then do not delete any subtitle streams.
Once the main movie track has been properly done let's move on to other PGCs:
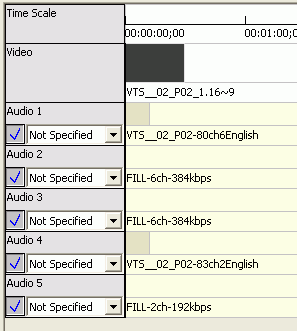 PGC2
has a different audio combination. It has one 5.1ch audio track having ID 80,
then one 2ch audio track having ID 83. To give the 2nd audio track the correct
ID we add 2 dummy 6ch tracks, and a 2ch dummy track as 5th audio track.
This track has no subtitles (incidentally it's the Warner Brothers studio logo).
And now PGC3:
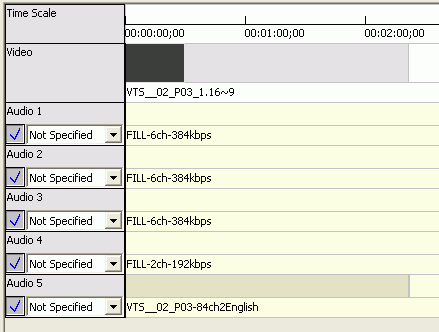 This
is the reason why we added a 5th audio track in both PGC1 and PGC2. PGC3 has
only one audio track having ID 84. To be consistent with the other PGCs we add
3 6ch dummy tracks and one dummy 2ch track and then the real audio track which
gets ID 84 as in the original.
PGC4 has neither audio nor subtitle tracks so we're done in the track editor.
As before we don't set the audio and subtitle languages.
Once we proceed to the scenario editor we now have the following assets available:
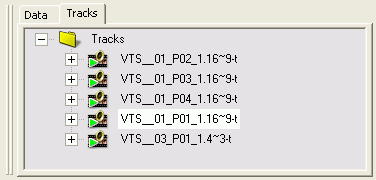
Using those tracks we create the following scenario:
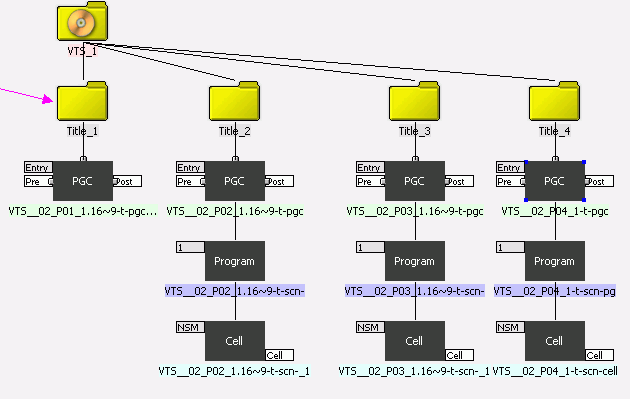 If
you analyze the IFO you'll see Title 1 having one PGC with lots of cells. That's
our main movie (to save space I have contracted the PGC in Title1).
Title 2 - 4 have each one PGC with one chapter and one cell.
Once this has been done you have to compile your project as we did with our
extras.
Step 7: Putting it all back together
The first thing we have to do is properly rename the compiled output. We first
processed the extras in VTS1 and VTS3. As VTS sets have to be named consecutively
Scenarist created a VTS1 and a VTS2 for our extras:
09.02.2003 16:03 6'144 VIDEO_TS.BUP
09.02.2003 16:03 6'144 VIDEO_TS.IFO
09.02.2003 16:03 28'672 VTS_01_0.BUP
09.02.2003 16:03 28'672 VTS_01_0.IFO
09.02.2003 16:04 404'606'976 VTS_01_1.VOB
09.02.2003 16:04 20'480 VTS_02_0.BUP
09.02.2003 16:04 20'480 VTS_02_0.IFO
09.02.2003 16:05 236'212'224 VTS_02_1.VOB
And for the main movie I got:
09.02.2003 15:44 6'144 VIDEO_TS.BUP
09.02.2003 15:44 6'144 VIDEO_TS.IFO
09.02.2003 15:44 75'776 VTS_01_0.BUP
09.02.2003 15:44 75'776 VTS_01_0.IFO
09.02.2003 15:49 1'073'608'704 VTS_01_1.VOB
09.02.2003 15:53 1'073'680'384 VTS_01_2.VOB
09.02.2003 15:57 1'073'672'192 VTS_01_3.VOB
09.02.2003 15:59 407'326'720 VTS_01_4.VOB
So, we have to rename VTS2 of the extras to VTS3, and VTS1 of the main movie
to VTS2. DIF4U offers batch renaming. Start it up and set the working directory
to the directory where Scenarist put your extras. Then select Utilities - pulldown/rename.
 Now
set the first number to 02 and the 2nd number to 03, then press Rename. Then
close this tool, change the working directory to the directory where you have
your main movie, go to the renaming tool again, configure it as shown on the
left and press Rename again.
At the time I'm writing this DIF4U does not rename IFO files so you'll have
to rename IFO and BUP files manually. After renaming your Scenarist output for
the extras will look like this:
   09.02.2003 16:03 6'144 VIDEO_TS.BUP

   09.02.2003 16:03 6'144 VIDEO_TS.IFO

   09.02.2003 16:03 28'672 VTS_01_0.BUP

   09.02.2003 16:03 28'672 VTS_01_0.IFO

   09.02.2003 16:04 404'606'976 VTS_01_1.VOB

   09.02.2003 16:04 20'480 VTS_03_0.BUP

   09.02.2003 16:04 20'480 VTS_03_0.IFO

   09.02.2003 16:05 236'212'224 VTS_03_1.VOB
And the main movie:
   09.02.2003 15:44 6'144 VIDEO_TS.BUP

   09.02.2003 15:44 6'144 VIDEO_TS.IFO

   09.02.2003 15:44 75'776 VTS_02_0.BUP

   09.02.2003 15:44 75'776 VTS_02_0.IFO

   09.02.2003 15:49 1'073'608'704 VTS_02_1.VOB

   09.02.2003 15:53 1'073'680'384 VTS_02_2.VOB

   09.02.2003 15:57 1'073'672'192 VTS_02_3.VOB

   09.02.2003 15:59 407'326'720 VTS_02_4.VOB
The next thing is copying all the files together to a common directory. You
do NOT need to copy the VIDEO_TS.* files. These files contain important navigational
info on the original disc, but nothing useful in our Scenarist output (all that
will be in those files is telling the player to start playing the movie, but
we'd like to start with the menu;).
   09.02.2003 16:03 28'672 VTS_01_0.BUP

   09.02.2003 16:03 28'672 VTS_01_0.IFO

   09.02.2003 16:04 404'606'976 VTS_01_1.VOB

   09.02.2003 15:44 75'776 VTS_02_0.BUP

   09.02.2003 15:44 75'776 VTS_02_0.IFO

   09.02.2003 15:49 1'073'608'704 VTS_02_1.VOB

   09.02.2003 15:53 1'073'680'384 VTS_02_2.VOB

   09.02.2003 15:57 1'073'672'192 VTS_02_3.VOB

   09.02.2003 15:59 407'326'720 VTS_02_4.VOB

   09.02.2003 16:04 20'480 VTS_03_0.BUP

   09.02.2003 16:04 20'480 VTS_03_0.IFO

   09.02.2003 16:05 236'212'224 VTS_03_1.VOB
So far we don't have a complete movie yet. What is missing is VIDEO_TS.* and
VTS_XY_0.VOB (the menu files for the VTS sets). We can take those files from
the original DVD. Note that there should be no overlapping files, if Windows
asks you to overwrite a file when you copy the files from the three directories
together you have made a mistake. VIDEO_TS.IFO, VIDEO_TS.BUP, VIDEO_TS.VOB,
VTS_01_0.VOB, VTS_02_0.VOB and VTS_03_0.VOB are taken straight off the DVD,
the rest of the files have been created by Scenarist. In the end the directory
containing your final movie should look like this: Note that the original files
are dated 03/29/2002 while the Scenarist generated ones are dated 02/09/2003.
   29.03.2002 03:47 16'384 VIDEO_TS.BUP

   29.03.2002 03:47 16'384 VIDEO_TS.IFO

   29.03.2002 03:44 1'968'128 VIDEO_TS.VOB

   09.02.2003 16:03 28'672 VTS_01_0.BUP

   09.02.2003 16:03 28'672 VTS_01_0.IFO

   29.03.2002 03:44 0 VTS_01_0.VOB

   09.02.2003 16:04 404'606'976 VTS_01_1.VOB

   09.02.2003 15:44 75'776 VTS_02_0.BUP

   09.02.2003 15:44 75'776 VTS_02_0.IFO

   29.03.2002 03:45 8'607'744 VTS_02_0.VOB

   09.02.2003 15:49 1'073'608'704 VTS_02_1.VOB

   09.02.2003 15:53 1'073'680'384 VTS_02_2.VOB

   09.02.2003 15:57 1'073'672'192 VTS_02_3.VOB

   09.02.2003 15:59 407'326'720 VTS_02_4.VOB

   09.02.2003 16:04 20'480 VTS_03_0.BUP

   09.02.2003 16:04 20'480 VTS_03_0.IFO

   29.03.2002 03:45 0 VTS_03_0.VOB

   09.02.2003 16:05 236'212'224 VTS_03_1.VOB
Once this has been done start up IfoUpdate.
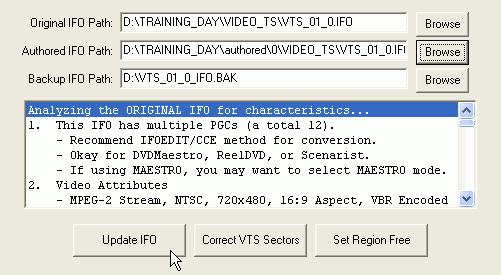 Select
the path of the original IFO file to be updated under Original IFO Path
(DIF4U put this in the VIDEO_TS folder for you, it's the same file as on your
DVD disc), then set the Authored IFO Path to the corresponding IFO file
Scenarist has created for you (you'll find it in the path where Scenarist wrote
the output to, there'll be a 0\ in the pathname as shown in the screenshot),
make sure there's a valid Backup IFO path but before you press Update
IFO let's have a look at the options first:
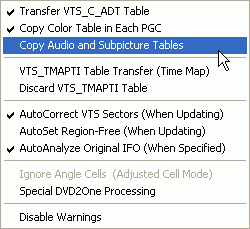 Make
sure Copy Audio and Subpicture Tables is not checked (otherwise the settings
of your Scenarist project will overwrite the setup contained in the original
IFO files and since we didn't set any languages in Scenarist this wouldn't be
too great), and check AutoCorrect VTS Sectors (When Updating) or your project
won't work afterwards.
Repeat this process for every IFO file (one per VTS set, so 3 in total for the
movie in question).
Now it's best to check out if your disc works. To do that use a software DVD
player like PowerDVD. A problem that sometime occurs is that the wrong audio
track is playing. If this should be the case, open the corresponding IFO file
in IfoEdit, go to the VTS_PGCITI section and select the appropriate PGC.

As you can see the audio stream status increases by increments of 256. If instead
of the first stream the 2nd one is being played set Audio stream 1 status to
33024 (and Audio stream 2 status to 32768) and save the IFO again.
Now press Update IFO. Once this has been done you're basically ready for burning.
However, you may want to remove certain user prohibitions (as in not being able
to change the audio track via the appropriate button on the remote while watching
the movie), make the disc region free, or strip out subtitle and audio channels
that you have no included in the re-authored project. You can find all these
steps here.
Special thanks to Eyes'Only for motivating me to write this guide and endure
my constant pestering when DIF4U didn't work the way I expected it to. Thanks
also to Trilight who has been an inspiration for my work on many occasions.
This document was last updated on
April 12, 2009
 Create
folder for this VTS, if checked, will create a new folder and demux the currently
selected (see the next screenshot) VTS into this folder. It's a per VTS setting
so you can decide to put multiple VTS sets into the same folder by unchecking
this option for the VTS you'd like to go together (they'll be placed in your
working directory). HDD Demux would have to be used if you previously ripped
the whole DVD to a directory on your harddisk (not suggested!) in which case
you'd have to select the directory containing the ripped files as working directory.
Demux All VTSes Checked Below should also be enabled. Otherwise only the currently
selected VTS in the Mandatory section will be demuxed.
 Under
DVD Drive you select the drive letter of the mounted ISO image. Under VTS you
can select a VTS set which you're then going to configure. If you'd uncheck
the checkbox in front of VTS the VTS in question wouldn't be processed (in this
case the main movie will only be processed if once VTS 02 is listed the checkbox
is checked).
 By
default DIF4U demuxes by PGC which is okay for most cases. Only seamless branching
and multiangle movies require a different treatment and for those we have special
guides. There are some rare cases where a different demuxing scheme is required
and I'm going to outline that just in a second but first let's have a look at
the screen on the left.
 This
is the main movie. As you can see it's 16:9, has 4 PGCs, the total size is listed,
it's the largest VTS sets and there are 20 different subtitles.
 Before
you press the Do It! button let me tell you about the AutoDetect Forcefilm/Deinterlace
option. This option will automatically perform IVTC on assets that need it,
and the same goes for interlacing (the latter is used for PAL movies, the former
for NTSC). And now press the button and go do something else because you're
PC will be blocked for a bit.
 Obviously
you only have to process the subs you actually care about. First of all .Idx/.Sub
sets that are 0 bytes large do not have to be processed. And then if you think
a certain extra shouldn't have subtitles either so skip them.
 Subresynch
will now show you all the subtitles found in the file you selected. Now follow
the mousepointer and select the language you want to extract. Then press Save
As...
 Select
an appropriate name for the subtitle file (the proposed name isn't good, Scenarist
would complain if you were to try importing subtitles having the default name
so I use a 3 letter code to specify the language). Also create a separate folder
for the subtitles or you'll quickly get confused by the huge number of files
in a VTS folder.
 Make
sure that E2 and E1 are set as shown here and that E2 is set to 0% and E1 to
100%. The P color is your subtitle font color, select whatever color you like.
As you can see I chose yellow, but many people prefer white. Also make sure
that the slider is set to 100%. and last but not least set Bg to white and 0%.
 In
Training Day we have one audio track per PGC in both VTS1 and VTS3, and one
video track for each PGC as well. As you can see from the names of the audio
files all audio streams had substream ID 84 (the part after ch in the filename
indicates the substream ID). Audio streams will get indexes starting at 80 and
in order to put the audio track at the same position as in the original file
we have to use a trick: It's not possible to set a substream ID, the ID is increased
by each stream you add. So what we're going to do is to add a dummy audio file
4 time (thus creating an audio track having ID 80, 81, 82 and 83) and then add
the real audio file.
  If
your source is NTSC you must set Drop Type to Drop frame for EVERY asset (including
audio even if an audio has no framerate).
 This
is an example from the main movie PGC of Training Day. Obviously it has chapters,
but every other PGC does not.
 At
first the track only contains a video track and nothing else.
 Now
you might recall me telling you about dummy audio tracks. As every PGC in VTS1
and VTS3 has one audio track having ID 84 we have to add 4 dummy audio tracks
before the real audio track. What you can see on the left is the final audio
configuration for one of my PGCs.
  Here
select your subtitle script(s) then press Start and then OK to start importing.
 there's
nothing to be worried about. It simply means that if you select a certain chapter
and you have a subtitle that starts before the chapter point and ends after
the chapter point, that subtitle will not be shown if you fast forward to the
chapterpoint (but if you watch the movie normally it will be shown... your original
DVD will exhibit the same behavior).
 The
first thing you want to do is create a sufficient number of VTS sets. As you
may recall, the extras are located in VTS1 and VTS3 so we have to create 2 VTS
sets (don't worry about the names, you'll have to rename them anyway).

 Target
Directories should be filled out according your selections when you created
the project.

 Then
press the next Browse button and select the path of your demuxed main movie
VTS set. DIF4U will automatically fill in the size of the audio and subtitle
files and calculate the length of the movie. If you prefer to dump some audio
tracks change the number behind the appropriate track type accordingly. As an
example, Training Day has 3 5.1ch AC3 tracks and since I don't speak Spanish
I don't see a reason to keep the Spanish audio track, hence I reduced the number
of 6ch tracks to two.
 As
you can see we have to set the average bitrate in CCE to 3002 and the maximum
bitrate to 8712 to prevent any bitrate overflows (which would prevent Scenarist
from compiling).
 Here
I chose still show.
 Select
a name for the script file and make sure Export to Script is checked, then press
OK. Now you can close Scenarist momentarily.


 Make
sure Import From Script is checked, select the chaptered scp file and don't
forget to set a Scenarist file (that file will be created from the script file)
then press OK.
 This
is the final result after adding audio and subtitles. As previously mentioned
I have dumped the Spanish soundtrack and replaced it with a 6ch dummy file having
the same bitrate as the original soundtrack. There's also a 5th audio track,
this is due to the other PGCs in VTS2 having an audio track with ID 85.
 In
the middle are at the bottom click on the Data folder.
 Then
check Forced Start to make this subtitle forced and repeat this procedure for
all subs that are present in the forced-only subtitle stream and the regular
subtitle stream.
 PGC2
has a different audio combination. It has one 5.1ch audio track having ID 80,
then one 2ch audio track having ID 83. To give the 2nd audio track the correct
ID we add 2 dummy 6ch tracks, and a 2ch dummy track as 5th audio track.
 This
is the reason why we added a 5th audio track in both PGC1 and PGC2. PGC3 has
only one audio track having ID 84. To be consistent with the other PGCs we add
3 6ch dummy tracks and one dummy 2ch track and then the real audio track which
gets ID 84 as in the original.
 If
you analyze the IFO you'll see Title 1 having one PGC with lots of cells. That's
our main movie (to save space I have contracted the PGC in Title1).
 Now
set the first number to 02 and the 2nd number to 03, then press Rename. Then
close this tool, change the working directory to the directory where you have
your main movie, go to the renaming tool again, configure it as shown on the
left and press Rename again.
 Select
the path of the original IFO file to be updated under Original IFO Path
(DIF4U put this in the VIDEO_TS folder for you, it's the same file as on your
DVD disc), then set the Authored IFO Path to the corresponding IFO file
Scenarist has created for you (you'll find it in the path where Scenarist wrote
the output to, there'll be a 0\ in the pathname as shown in the screenshot),
make sure there's a valid Backup IFO path but before you press Update
IFO let's have a look at the options first:
 Make
sure Copy Audio and Subpicture Tables is not checked (otherwise the settings
of your Scenarist project will overwrite the setup contained in the original
IFO files and since we didn't set any languages in Scenarist this wouldn't be
too great), and check AutoCorrect VTS Sectors (When Updating) or your project
won't work afterwards.