Recode 2 Guide - Main Movie Only / Multiple discs
The first thing to be done after selecting an operational mode is select
/ configure a profile.
Recode can add both Video and data files into a disc. By default you start out in the video mode and the DVD-Video Files button is pressed.
![]()
By clicking on the DVD Data files button, you can add data files (for instance a software DVD player so that you can watch the DVD on any DVD equipped computer even if it does not have a software DVD player installed). Just press the Add Files button and select the files you want to have added. You can then organize your data files just like you would in Windows Explorer.
To select the video source, press the DVD-Video Files button again, then press Import Titles.
![]()
 Initially,
this dialog will be rather empty and you'll have to press the Browse button
and select the source path of your DVD (the VIDEO_TS directory either on your
HD or DVD, or the drive where you inserted your DVD). If you're opening the
DVD for the first time, Recode will quickly analyze the source and show you
the progress in the following window:
Initially,
this dialog will be rather empty and you'll have to press the Browse button
and select the source path of your DVD (the VIDEO_TS directory either on your
HD or DVD, or the drive where you inserted your DVD). If you're opening the
DVD for the first time, Recode will quickly analyze the source and show you
the progress in the following window:
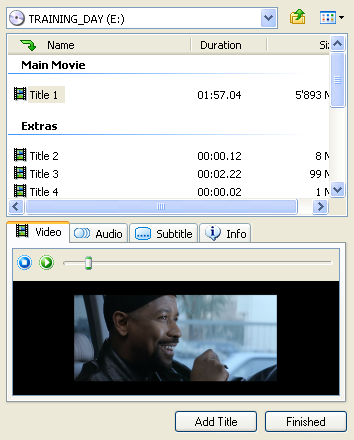
After the analyzation phase you'll get a listing of all video items available on the DVD, ordered by 3 categories: There's the Menus which are not interesting for Nero Digital output, the Extras and the Main movie. In case of an episodic disc you'd have multiple main movies all having about the same length. And if you have multiple main movies and the disc does not contain episodes, use the preview window to find out which Title you want to back up.
In the Info tab, Recode will also show you some more information about the video stream.
Once you've made your decision, select the appropriate title and press the Add Title button. In case of a disc with TV episodes you'll obviously want to select all items shown under Main Movie so make sure you add them all.
And now there's yet another possibility. Nobody forces you to take all titles from the same disc ;) Say you have a movie that stretches over 2 DVDs, or you want to put two movies into the same DVD±R disc. All you have to do is add the main movie of disc one, then press the Browse button again, select your 2nd DVD, and add its main movie as well. Note that both DVDs must be accessible to Recode at all times, so you cannot switch discs in the middle of the process.
Press Finished when you have added all the titles you want.
 This
is an example of 4 TV episodes on the same disc. If you have a regular movie,
you'd obviously only have one title. Combining two movies you'd have two titles.
This
is an example of 4 TV episodes on the same disc. If you have a regular movie,
you'd obviously only have one title. Combining two movies you'd have two titles.
You can also see the duration of each title, the target size and the compression
factor of each item (given both as position on a slider and percentage value).
As you move the slider to the left you note that the percentage value means
down, which means you'll decrease image quality (100% means the picture will
not be recompressed and be the same as on the original DVD).
Recode will try to scale each title in order to make the output fit on a single
DVD±R disc. If you uncheck Fit to target, moving a slider will no longer
trigger Recode's size correction mechanism and you can now run the risk of getting
undersized or oversized backups.
In order to prevent this from happening, Recode has a size bar which indicates the current size of the project. As long as the red dotted line is not crossed, your output will fit on the selected target size (which you can of course also change using the dropdown menu shown in the previous screenshot).
![]()
But before you start playing with the sliders, let's first check out our audio and subtitle streams, which are shown to the right of the preview window.
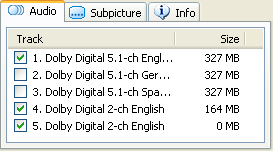 As
per your selection in step 0, only your preferred audio tracks will be selected
by default. Track 4 would be the director's commentary, and Track 5 is not used
in the main movie, but has to be present for authoring related issues (which
you don't have to know about).
As
per your selection in step 0, only your preferred audio tracks will be selected
by default. Track 4 would be the director's commentary, and Track 5 is not used
in the main movie, but has to be present for authoring related issues (which
you don't have to know about).
If you click on the Subpicture tab, you'll see the same thing for subtitles.
Make sure that only the audio and subtitle tracks you want to preserve are actually checked.
If you're using Recode's automatic size adjustment but still want to reconfigure the compression ratio of certain titles, the Lock Ratio button comes in handy.
![]()
Select the title, whose compression ratio you'd like not to be changed anymore, and press Lock Ratio. Note that in the Content overview, a small lock will now be shown to the left of the slider, and you can no longer move the slider.
If you want to change the compression ratio for titles separately, the preview window will come in very handy. Just select the title you're interested in and start playing.
Before we start encoding there's yet another feature you might want to look at: Select a title, then press the Start / End button.
![]()
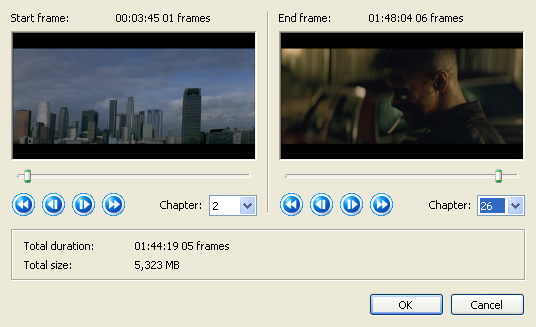 If
you rather not include the entire movie (or episode), you can set a start and
end point manually in this screen.
If
you rather not include the entire movie (or episode), you can set a start and
end point manually in this screen.
The usage is pretty straightforward so I doubt you'll have any problems.
Last but not least, also only applicable if you have multiple titles is the Merge Titles feature.
![]()
If you select two ore more titles (keep pressing the control button, then click on the titles you want to join), the Merge Titles button becomes active. Press it and the selected items will be joined. This can be useful when combining a movie that stretches over 2 DVDs, as merging them will prevent a pause when switching between the two titles. As a result, the two titles that you're going to merge are now shown in a folder called Merged Titles so that you can easily recognize them:
 If
you want to split the titles again, click on the Merged Titles folder,
then click the Separate button (the Merge Titles button will be
renamed to Separate in this case).
If
you want to split the titles again, click on the Merged Titles folder,
then click the Separate button (the Merge Titles button will be
renamed to Separate in this case).
Now you're ready for encoding.
This document was last updated on December 31, 2004