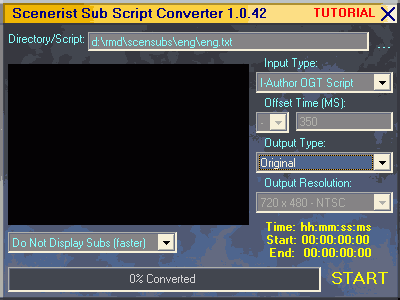
 Select
your I-Author script by pressing on the 3 dots (...) to the right of the Directory/Script
field.
Select
your I-Author script by pressing on the 3 dots (...) to the right of the Directory/Script
field.S3conv Guide
This is meant as an easier alternative to the Subadjust/MaestroSBT/Notepad way. While it has worked for myself and a couple of others there are issues when it comes to PAL projects and if you get asynch subs you may want to do subtitles the hard way.
Step 1: Subrip
Use Subrip to get the subtitle from the main movie VOBs. Come back after performing step 1 of that guide and at the point where you get to the cropping options make sure you set the minimal output resolution to the respective DVD resolution (720x480 for NTSC DVDs, 720x576 for PAL DVDs). Don't worry about selecting the I-Author format, it's exactly what we need.
Then start up S3Conv:
 Select
your I-Author script by pressing on the 3 dots (...) to the right of the Directory/Script
field.
Make sure Output Type is set to Original or your subs will get progressively asynch.
Then press Start to start processing.
Don't delete the bitmap files afterwards, you'll still need them.
Step2 requires that you've already set up a Scenarist project so you may want to go back to that guide now (press the back button of your browser) then come back here (press the forward button of your browser) right before I explain how to import the subtitles.
Step 2: Subtitle import in Scenarist
You have to import your video and audio assets and create the track where the subs are to be placed before you do that. Then you can import the subtitles as follows:
Then it's time to import subtitles. Before we import our subtitle script(s) let's make sure that the color palette matches and that we're getting the colors we want. Open your s3sub.sst file in a text editor and have a look at the header. You'll find something like this:
Color (9 7 3 3)
Contrast (15 15 15 0)
This means 9 is the color index for E2 (Emphasis2), 7 for E1 (Emphasis1), 3 for PA (Pattern) and 3 for BG (Background). Confused? Don't worry, we'll get there.
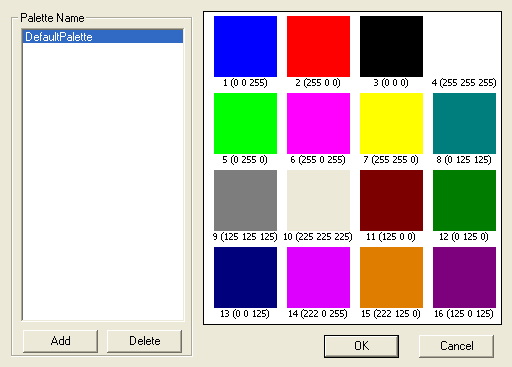
Now select Settings - Color Palette in Scenarist.
 Here
you can see the color indexes. Maybe you'll recall the order of the colors in
Subrip: We have background, font, outline and aliasing. The 2nd value was set
to 7 but that's the subtitle font. Normally you prefer white so you should change
this value to 4. Background (first value) should be black, the outline as well
(or as you like it) and I prefer black aliasing so I left that at 3 as well.
So, change these values to
Color (3 4 3 3)
The 2nd line indicates opacity. 15 means opaque, 0 means transparent.
>> BACK
This document was last updated on 07/17/02