Final steps
Once you've gone through the expert settings, a few more things before you can start encoding:
Recode can automatically shut down your PC when encoding is done. All you have to do is check Shut down computer when finished.
![]()
If you plan on using your PC while Recode is encoding, also set Priority to Low. If you're not using your PC, Low can't hurt either, as you won't notice a difference in speed.
![]()
Now it's time to go to the Burn Options.
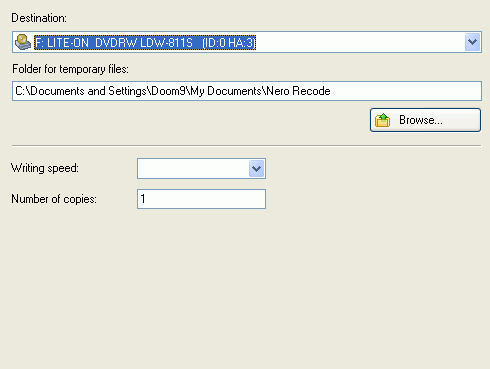 You
have the choice between writing to your harddisk (select Hard Disk Folder
and a Target folder), burn directly to a CD / DVD by selecting the a
CD/DVD burner and the appropriate Writing speed and Number of copies
you want to burn.
You
have the choice between writing to your harddisk (select Hard Disk Folder
and a Target folder), burn directly to a CD / DVD by selecting the a
CD/DVD burner and the appropriate Writing speed and Number of copies
you want to burn.
The 3rd option is Image Recoder, which would create a CD image file to your harddisc, which you can burn to a CD at a later point.
In every case, you'll have to select a folder to either store the output files, the CD image or temporary files (in case of burning). Make sure there's enough space left on the device you select.
Then it is finally time to get started. Press the Burn button.
![]()
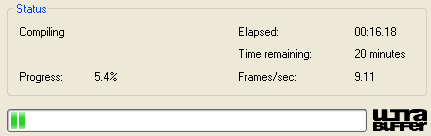 Recode
will show you a preview of what is currently being encoded (that you can switch
off and should switch off to get a slight speed increase), and of course there's
the status indication where you get to see the actual number of frames encoded
per second, the elapsed and remaining time and progress bar with percentage
indicator.
Recode
will show you a preview of what is currently being encoded (that you can switch
off and should switch off to get a slight speed increase), and of course there's
the status indication where you get to see the actual number of frames encoded
per second, the elapsed and remaining time and progress bar with percentage
indicator.
Once encoding (and burning) is done, Recode will show you this friendly message.

If you're interested in knowing what Recode did, press Yes. And if you're not interested in being asked each time, check Never show me again.
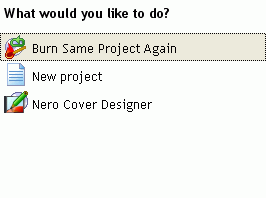
Then press Next and you get to a screen where you can burn the project again, start a new project or design a cover for your project.
In case you haven't burned the project, simply create a regular CD ISO project in Nero 6 at any point, add the MP4 file to the project and burn it whenever you feel ready for burning.
This document was last updated on December 31, 2004