VirtualDubMod procedures
For short, VirtualDubMod (also known as VDubMod) is a program based on the
popular VirtualDub video editing application, and it incorporates various modifications
that have been made to VirtualDub into one program. It can import MPEG-2 video,
AC3 audio, has built-in AviSynth support and supports OGM and MKV (Matroska)
output. Furthermore, it can handle AC3 and DTS audio which makes it the most
versatile video editing tool you can use when making DVD backups.
This document is not intended to be a complete reference, rather it tries to
point out the most important operations. And because VDubMod is based on VirtualDub,
many of the instructions explained in the VirtualDub
procedures document also apply to VDubMod. Also note that VDubMod comes
with a good help file that you should check out as well.
First time setup
The first time you start VDubMod you might be warned about hacked codecs that
you have installed on your system. This warning reflects to the original DivX3.11alpha
installation, if you get it, just click your way through, there's no need to
worry.
The first thing you'll want to do is set some global preferences. Select Options
- Preferences.
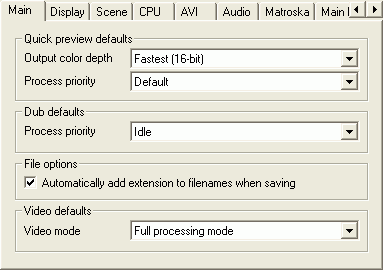 The
first thing that might be interesting is the Process priority. Personally
I like to run all programs at idle priority, meaning they will use up whatever
processing power that is not otherwise used. Using that option you can easily
encode a movie but playing a CPU consuming computer game, but of course encoding
will take longer. It also allows you to surf, read emails, listen to music,
etc. without experiencing any slowdowns while you're doing a video encoding
/ editing task. And if you're not using the PC, idle priority doesn't hurt you
either.
The
first thing that might be interesting is the Process priority. Personally
I like to run all programs at idle priority, meaning they will use up whatever
processing power that is not otherwise used. Using that option you can easily
encode a movie but playing a CPU consuming computer game, but of course encoding
will take longer. It also allows you to surf, read emails, listen to music,
etc. without experiencing any slowdowns while you're doing a video encoding
/ editing task. And if you're not using the PC, idle priority doesn't hurt you
either.
The 2nd interesting option here is Video mode. Since AviSynth Full
processing mode has lost most of its appeal. This mode is still useful when
you're using filters in VirtualDub, but when you're filtering in AviSynth you'll
want to set it to Fast recompress. And in case you're just using VDubMod
to add audio files to your video or edit video files, you can even set the default
to Direct Stream Copy. Of course, this only sets the default value, you
can still change it outside the preferences menu at any time.
The 2nd place you'll want to go is the AVI tab.
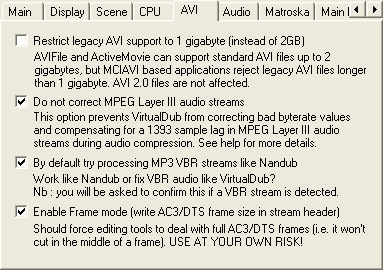 The
first option is of no particular interest to us. But the 2nd one is. If you
open an AVI containing a VBR MP3 stream, VDubMod, like its brother VDub, will
suggest that it adjust the MP3 audio stream. But that's not a good thing because
doing so will turn video and audio asynch. So, to get rid of this annoying warning
we better get rid of it for good ;)
The
first option is of no particular interest to us. But the 2nd one is. If you
open an AVI containing a VBR MP3 stream, VDubMod, like its brother VDub, will
suggest that it adjust the MP3 audio stream. But that's not a good thing because
doing so will turn video and audio asynch. So, to get rid of this annoying warning
we better get rid of it for good ;)
The 3rd option is also a good one. Nandub was the first program to work with
VBR MP3 streams and it does a reasonable job at this.
Last but not least we have an option for AC3 and DTS files. Checking that option
prevents cutting at undesirable points which would make break the audio (you
can't actually hear it but if you're trying to reassemble such a file you'll
run into problems because you'll have a corrupt audio frame). But as the developers
wrote, use it at your own risk. If you're not going to do any editing or re-conversion
it's probably better if you don't check this option.
Then we have the audio tab.
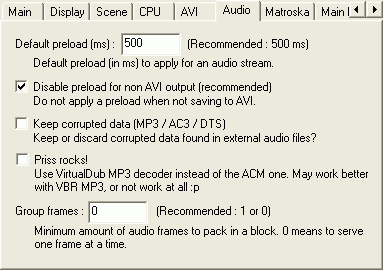 If
you prefer other than the default audio preload values you can set them here.
If
you prefer other than the default audio preload values you can set them here.
What might be interesting here is the Keep corrupted data (MP3 / AC3 / DTS)
option. While you will hopefully never have to deal with corrupted streams
(and if you do, BeSplit should be able to fix it for MP3s and AC3 files), if
you ever do this option might be useful.
The rest of the options mostly concern keyboard shortcuts so they are of no
particular concern to you if you're a normal mouse user.
Multiplexing
Now that you have properly configured, it's time to get working. Video encoding
is the same as in VirtualDub and will thus not be explained. What makes VDubMod
interesting for multiplexing is that it can handle VBR MP3, AC3, DTS and Ogg
Vorbis audio, more than any other program. It can also output not only AVIs
but also OGMs and Matroska files (MKVs). Before multiplexing you obviously need
an encoded video stream and one or multiple audio streams. You can also have
subtitle streams in SubRip (srt) format. Not all output formats support all
features, but if you try to add too much for a given output format, VDubMod
will eventually warn you when you're trying to multiplex.
The first step is loading a video file. You can do that by selection File
- Open Video File or pressing Control-O and then selecting your AVI file.
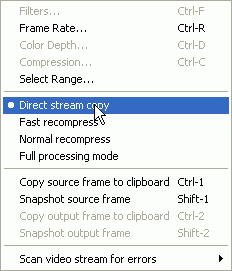
Then set video to Direct Stream Copy (Video - Direct Stream Copy) to
ensure that the video is not getting compressed again.
Then it's time to add audio and subtitles. In VDubMod audio and subtitle functionality
have been combined and put into the Streams menu. You can access the screen
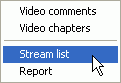
to add streams by selecting Streams - Stream list from the menu.
Initially VDubMod will show a rather empty screen now. You can then add audio
and subtitle streams by pressing the Add button and selecting an audio file.
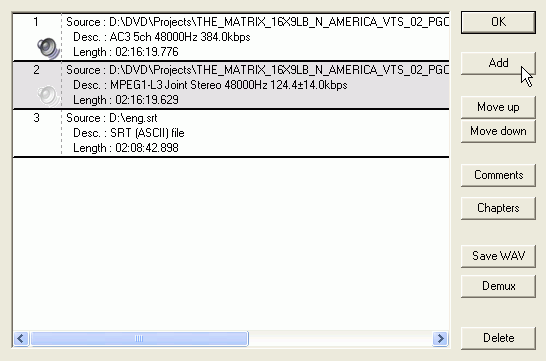 Using
the same Add button you can also add subtitle files.
Using
the same Add button you can also add subtitle files.
Use the Move up / Move down buttons to move streams up and down. The uppermost
audio stream will be the first listed in the audio stream selection, the 2nd
one will be listed at the 2nd position, etc. The same applies for the subtitles
as well. Please note that audio tracks and subtitle tracks usually have separate
selections so you don't have to worry about the placement of audio vs. subtitle
tracks.
Once you have added all your audio tracks you might want to assign them a language
so you will be able to easily select the appropriate language from a menu in
your favorite media player. To do that, select the audio / subtitle stream you
want to assign a language to, then press the Comments button.
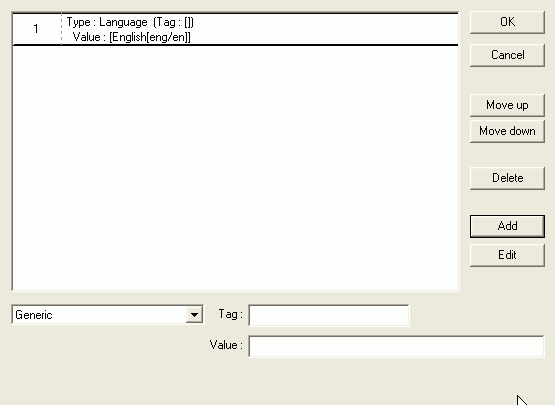
This is the screen you'll get when pressing the Comments button.
Now you can select the Comment type in the lower left. Select Language.
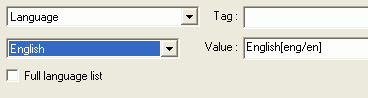
After having selected Language, a new dropdownlist appears, giving you a selection
of available tags. Select the appropriate language, then press the Add button
to add this comment.
The comment will then show up in the list as shown in the screenshot on the
left. If you've made a mistake, you can simply select the comment again and
press Edit.
It's possible to add a number of different tags, but most of them don't make
sense as no player will ever display an URL (just to give you an example) for
an audio or subtitle stream.
Once you're done press OK to get back to the stream list.
You might've noticed the Chapters button in the main stream list window. You
might think this is where you add chapters, but it only allows you to add chapters
to a specific stream which doesn't make much sense. What you'll want is global
chapters which you set as follows:
Press OK to get back to the main VDubMod window. Then select Streams - Video
Chapters from the menu. Initially you'll be presented with an almost empty
window.
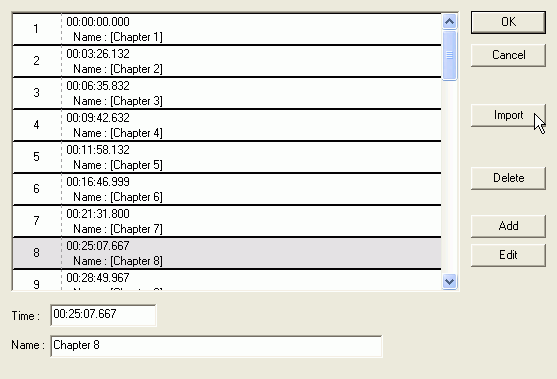 Press Import and select a chapter file that you got from your ripping program,
ChapterXtractor or Robot4Rip.
Press Import and select a chapter file that you got from your ripping program,
ChapterXtractor or Robot4Rip.
On the left the situation after the import is shown. If you're not happy with
the names, select a chapter, edit the name at the bottom and press the Edit
button to apply the change.
Using Add and Delete button you can also add respectively delete chapters.
If you prefer to get the actual chapter titles (where applicable, and only
in English) you can use ChapterGrabber
to get them from the Internet.
Press OK once you're done.
Now you're basically ready. If you like you can add some generic Comments to
the video, like author, etc. To do that select Streams - Video comments
from the menu. The screen will look familiar because it's the same as when you
add comments to an audio or subtitle stream. For a list of supported attributes
by container format please refer to the VDubMod manual (Help - VirtualDubMod
help).
Once you're happy with your setup press F7 to bring up the save dialogue.
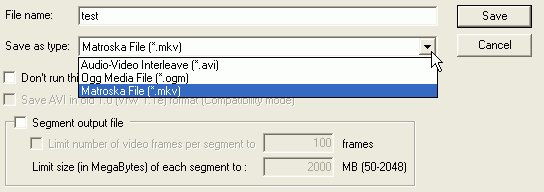 Fill
in a name for the file, then use the Save as type dropdown list to select
an output format.
Fill
in a name for the file, then use the Save as type dropdown list to select
an output format.
Now which format should you choose? Here's a very abbreviated feature overview:
AVI: The standard, supports MP2, MP3, AC3 and DTS audio, no subtitles and has
no error correction.
OGM: Supports MP3, AC3 and Ogg Vorbis audio, subtitles and it has built-in
error correction which can be useful for XCDs. Requires
special playback filters and the standard might change in the future as the
lead developer has teamed up with the Xiph foundation to provide an open source
container based on the Ogg framework (OGM is supposed to implement the Ogg specs
but there's been a lot of debate if it truly does that). OGM also supports chapters.
Matroska is the youngest of the containers and still very much in development.
It was designed from scratch to support most DVD backup scenarios and will be
very editable (OGM is more designed for streaming and it took a long time to
get a useful OGM editing application: VDubMod). Matroska currently supports
MP2, MP3, AC3 and Ogg Vorbis audio, and the specs include AAC audio, Chapters,
error correction and many more but those have so far not been implemented. Matroska
requires a special playback filter and is currently in public beta stage. The
only video editing application supporting Matroska at the moment is VDubMod.
For more information about Matroska please visit the official
homepage.
Okay, after this small overview you should be able to select your output format,
then press Save, select a name and off you go.
Editing
After all this you'll end up with one AVI/OGM/MKV file that might just be too
large to fit into a CD, or maybe you'd like to cut out a piece for demonstration
purposes, etc. VDubMod can of course open all filetypes it can write to and
you open a file like you did before when you loaded the video: Select File
- Open Video File or press Control-O and select your file.
Then set video to Direct Stream Copy (Video - Direct Stream Copy) to
ensure that the video is not getting compressed again.
Then it's time to meet a very practical feature that is also present in VirtualDub:
the buttonbar at the bottom.
 Using
the slider you can navigate the video. Using the buttons marked 1 you can jump
to the previous/next frame and using the buttons marked 2 you can jump to the
previous / next keyframe. You can also navigate by keyframe by using the left
/ right arrow buttons while holding down the shift key (if you don't hold down
the shift key you'll advance/go back frame by frame).
Using
the slider you can navigate the video. Using the buttons marked 1 you can jump
to the previous/next frame and using the buttons marked 2 you can jump to the
previous / next keyframe. You can also navigate by keyframe by using the left
/ right arrow buttons while holding down the shift key (if you don't hold down
the shift key you'll advance/go back frame by frame).
Move the slider to the beginning of the video and press the Home button on
your keyboard. Then use the slider and buttons to move to a suitable cut position.
Note that the cut position should absolutely be a keyframe, otherwise the 2nd
part of your video will not actually begin where you intend to (because playback
can only start at a keyframe). If you're cutting your file to put onto a number
of CDs there's a better way than try and guess where to cut. Press Control-Shift-J
which will bring up the following menu:
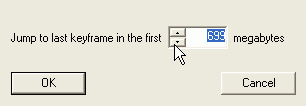 Enter
the size if your CDs (minus one or two MB safety margin), then press OK. Note
that you'll have moved to a different position in the movie. Now press the End
button. Note that the white part on the left of the slider at the bottom has
turned blue. The blue part is the currently selected part of the video. Now
press F7 to bring up the saving dialogue and save the file again. Make sure
you use the same output format as the input format or the cut point might not
be accurate. After saving, don't move the slider, press Home to mark the end
point of the first part of the movie as the start point for the next part. If
you're aiming for a 2 CD rip all you have to do is move the slider all the way
to the right, press End and F7 to save again. Or if you're going for a 3+ CD
rip use the Control-Shift-J menu again to go to the next split point.
Enter
the size if your CDs (minus one or two MB safety margin), then press OK. Note
that you'll have moved to a different position in the movie. Now press the End
button. Note that the white part on the left of the slider at the bottom has
turned blue. The blue part is the currently selected part of the video. Now
press F7 to bring up the saving dialogue and save the file again. Make sure
you use the same output format as the input format or the cut point might not
be accurate. After saving, don't move the slider, press Home to mark the end
point of the first part of the movie as the start point for the next part. If
you're aiming for a 2 CD rip all you have to do is move the slider all the way
to the right, press End and F7 to save again. Or if you're going for a 3+ CD
rip use the Control-Shift-J menu again to go to the next split point.
Make sure you don't forget to save your last file.
And that's all for now folks.
This document was last updated on
May 7, 2003