XviD in VirtualDub
Start up VirtualDub, press Control-O to load the AVS file GKnot has created for you.
Then set the video mode to Fast recompress by selecting the Video menu and clicking on Fast Recompress.
Then go to the same menu again and select Compression, or simply press Control-C.
 Select the XviD MPEG-4 CODEC from the list of codecs. Then press the
configure button to configure the encoding session.
Select the XviD MPEG-4 CODEC from the list of codecs. Then press the
configure button to configure the encoding session.
First of all you get a rather spartanic window.
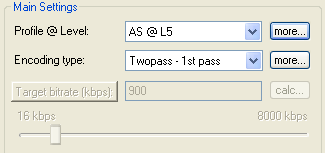 First we have
the Profile @ Level. These profiles correspond to the MPEG-4 standard
and selecting a profile will limit the codec and produce output that is playable
by other devices, for instance standalone DVD players.
First we have
the Profile @ Level. These profiles correspond to the MPEG-4 standard
and selecting a profile will limit the codec and produce output that is playable
by other devices, for instance standalone DVD players.
There are 5 types of profiles:
Simple is the MPEG-4 simple profile, which is limited to VCD-like resolutions (352x) and bitrates up to 384 kbit/s. ARTS means advanced real time streaming and is useful for streaming video content. Obviously, streaming also means you cannot have too high a bitrate and use too many complex features, so the resolution is once again limited at 352x but the bitrate can go up to 4 mbit/s.
AS means Advanced Simple and that's what you want to use in most cases. Advanced simple profiles support multiple quantization types and advanced features like b-frames, QPel and GMC. Then there are the DXN profiles that correspond to the DivX hardware profiles. They can be used to create content that works on DivX certified standalone players. However, they are somewhat restricted in comparison to the Advanced Simple profiles, and with new MediaTek based XviD capable standalones, it is actually safe to use the Advanced Simple profile. Last but not least there is the (unrestricted) profile which imposes no constraints whatsoever.
Now, every profile is divided into a multitude of levels. The lower the level, the more restricted the resolution, bitrate and available features become. I suggest AS @ L5 for regular XviD encoding, and (unrestricted) for high res HDTV content.
All DXN profiles correspond to the profiles available in DivX. They limit the power of XviD though, by enforcing stricter contraints than the MPEG-4 Advanced Simple Profile offers (this is mostly done because DivXNetworks would not force their hardware partners to develop more powerful chips - these days except for XviD's GMC you can use all of XviD's features and they work on reasonably modern players).
After selecting a profile and level, press the more... button to the right of the profile selection.
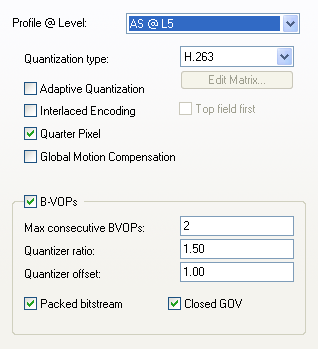 In
this screen you get to see the actual possibilities a chose profile and level
offer.
In
this screen you get to see the actual possibilities a chose profile and level
offer.
Set the Quantization type to H.263 for 1 CD rips and to MPEG for 2 CD rips. MPEG-Custom allows you to select a custom quantization matrix but only experts should use this.
Adaptive quantization is the formerly called lumi-masking, which tries to give less bitrate to scenes that the human eye can't see very well.
Interlacing can be checked to improve performance when encoding interlaced content. Top field first can be checked when your interlaced content has the top field first (that's the default for most interlaced sources)
Furthermore we have Quarter Pixel, which enables quarter pixel motion estimation - a more accurate motion estimation. Quarterpel can be useful especially for lower resolutions. Note that you need a MediaTek based standalone player in order to handle QPel.
Global Motion Compensation can be useful to save bits on panning scenes. Note that there is currently no standalone player that can handle XviD's GMC. If you decide to use it, make sure the VHQ option is used (and you can go higher than VHQ level 4 with GMC).
Reduced resolution is only applicable for streaming and would make XviD use a lower resolution that the source video has.
BVOPs are B-frames. You can use the Maximum B-frames option to set the number of consecutive B-frames. Unlike DivX5 you can go higher than 1, though it's suggested that you do not go higher than 3. B-frame quantizer ratio indicates the additional compression a B-frame gets as compared to a P-frame. Quantizer offset is the offset which gets added to each quantizer. So if the surrounding P-frames have quantizer 2 and both ratio and offset are 1.0, the b-frame would get a quantizer of 3.
Checking Packet bitstream creates a bitstream that can be decoded delay-free (as introduced with DivX5.01, in VDub you'll no longer be a number of frames behind due to B-frame decoding).
Finally we have Closed GOV, which ensures that a p-frame is used befor every new I-frame. This option should always be checked (otherwise you might end up with a frame sequence like PBIP where the B frame has a forward reference to an I-frame which makes no sense).
If you want to see the actual limitations on resolution, bitrate and buffer size, click on the Level tab.
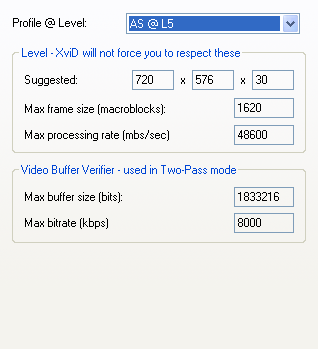 As
you can see, AS @ L5 can go up to DVD resolution and use a bitrate of up to
8 mbit/s which should be more than enough for a DVD rip.
As
you can see, AS @ L5 can go up to DVD resolution and use a bitrate of up to
8 mbit/s which should be more than enough for a DVD rip.
In the Aspect Ratio tab you can configure the aspect ratio of the input video.
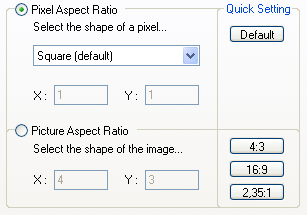 By
default, XviD considers the input to be square pixels. We usually resize a DVD
in a way such that this is true.
By
default, XviD considers the input to be square pixels. We usually resize a DVD
in a way such that this is true.
However, if you prefer to do what is done on 16:9 DVDs, that is squeeze the horizontal resolution and unsqueeze it during playback, you could set the Pixel Aspect Ratio to 16:9 PAL or 16:9 NTSC depending on your input type. Please note that XviD encoding tools like GKnot and AutoGK cannot handle this feature and hence if you use them, you cannot use this feature as the picture is resized to correspond to square pixels by default (but you could reconfigure GKnot manually).
Also note that you need the XviD or 3ivX filter play back your content so that the aspect ratio flag is used.
Press OK to get back to the main screen. The next thing you want to set is the encoding type.
Single
pass encodes the movie at a constant given bitrate which you can configure.
Twopass - 1st pass: analyzation pass for 2 pass encoding. The codec will write a text file containing a suggested bitrate for each frame, which we call bitrate curve.
Twopass - 2nd pass: is the internal 2nd pass encoding mechanism. The codec will scale the bitrate curve in accordance with a couple of settings I'm going to explain later.
Now press the Advanced Options button.
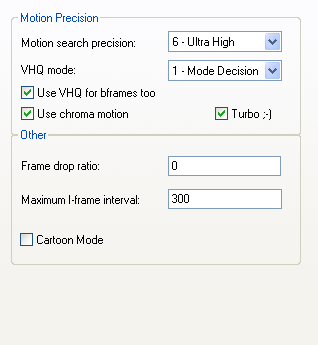 Here
we can figure options that deal with motion estimation.
Here
we can figure options that deal with motion estimation.
Motion search precision sets the precision of the motion estimation mechanism. Use 6 - Ultra High, or 5 - Very High for multiple CD rips.
VHQ mode enables an even more accurate motion search. Setting it to more than level 1 usually only cripples speed but won't increase image quality.
Check Use VHQ for bframes too in case you're using B-frames. That way, the VHQ mechanism to increase quality will be used for every frame.
Check Use chroma motion. If this option is activated XviD also uses chroma information to calculate motion - it's sort of a search precision 7. These calculations will slow down encoding by 5-10% but they're pretty effective against blocks.
Turbo ;-) enables speed optimizations in the motion estimation. While they theoretically could degrade the output, it seems safe enough to active them and during my tests I was unable to spot any degradation.
Leave Frame drop ratio at 0 (don't you dare to change it, we want all our frames to be encoded).
Leave the Maximum I-frame interval at 300. This will ensure that you'll get an I-frame (AKA Keyframe) at least every 300 frames. If an I-frame is inserted via scene change detection before this number has been reached the counter is reset.
Finally, if you're encoding cartoon content you can check Use cartoon mode.
Then off to the Quantization tab:
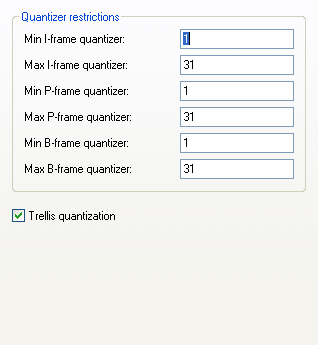 Here
you can configure the minimum and maximum quantizer factors for the 3 frame
types. But as it should be the codec's job to pick the proper values I suggest
you leave them at their default. Setting the minimum quantizer to 1 won't do
any good, just blow up the size of the video.
Here
you can configure the minimum and maximum quantizer factors for the 3 frame
types. But as it should be the codec's job to pick the proper values I suggest
you leave them at their default. Setting the minimum quantizer to 1 won't do
any good, just blow up the size of the video.
Trellis quantization optimizes the motion estimation following a rate distortion function. It slightly decreases encoding speed and leads to a slight quality loss along (but the decrease in used bitrate is considerable in comparison).
The Debug tab is less interesting but it allows you to configure the
FourCC code.
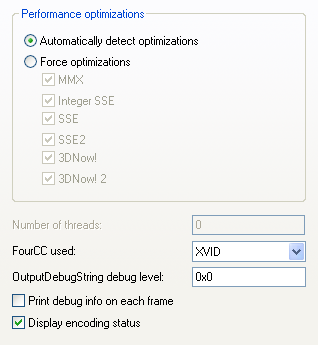 If
you're using an alternative decoder than XviD or ffdshow, you could change the
FourCC used in order for another decoder to recognize and play the video but
this option is often of little to no use.
If
you're using an alternative decoder than XviD or ffdshow, you could change the
FourCC used in order for another decoder to recognize and play the video but
this option is often of little to no use.
Click OK to get back to the main screen.
And before you get started with the first pass there's one more feature to look at, the zones:
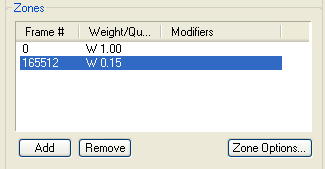
You can define multiple zones where you apply special settings. For instance in the example above, I have two zones, one starting at the first frame, using the regular settings, and another one starting at the point where the credits start. Press Add to add another zone, then press Edit to configure the zone:
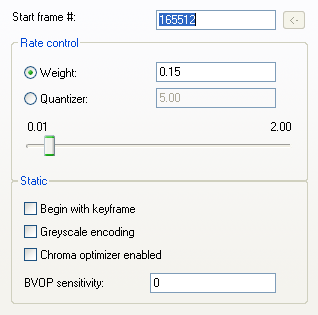 The
first thing to do is set the start frame at the appropriate position.
The
first thing to do is set the start frame at the appropriate position.
Then we have the Rate control, where you can choose between applying a different Weight to the bitrate, or specify a Quantizer (compression factor). As you can see, I have chosen a weight of 0.15, which means that the end credits will get 15% of the bitrate of the main movie. However, you might want to use a fixed quantizer in the range of 20 for now as the weight option seems to be bugged.
Then there's multiple options you can also select from for a zone:
Force keyframe ensures that a zone begins with an I-frame.
Greyscale enables a mode optimized for greyscale (black and white) content. It discards all information from the U/V plane (that's where color information is stored) and you end up with a black and white picture.
Chroma optimizer is a filter that interpolates colors in uniform black/white areas/pixels. This can help to reduce the "red stairs" effect.
BVOP sensitivity is a treshold for B-frames. The higher the value, the more b-frames will be used (and using negative values the number of b-frames will be reduced).
Press OK to get back to the main screen.
That being done you're now officially ready for the first pass. If you want
to set the path of the stats file that is written during the first pass, press
the ... button to the right of the Encoding type selection.
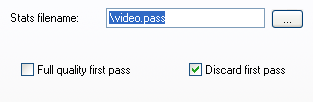 Here
you can click on the more... button to change the path of the Stats
filename if you want. But if you do, make sure you write that value down
because you'll have to set it for the 2nd pass as well.
Here
you can click on the more... button to change the path of the Stats
filename if you want. But if you do, make sure you write that value down
because you'll have to set it for the 2nd pass as well.
Also make sure the Discard first pass option is selected. Otherwise, the codec will create a pretty useless AVI file during the first pass (and writing that AVI also slows the process down).
Full quality first pass is not useful unless you want to create a best quality possible video in addition to the second pass output.
Then come back to the codec configuration.
For the 2nd pass you select Twopass - 2nd pass as Encoding type:
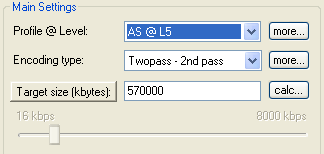 This
enables the Target size button. You can now enter a value in Kilobytes
and XviD should hopefully create an AVI that has just that size. If you click
on the Target size button, it will change to a Target bitrate
button, and you can now either enter a desired bitrate manually, or use the
slider to set a target bitrate.
This
enables the Target size button. You can now enter a value in Kilobytes
and XviD should hopefully create an AVI that has just that size. If you click
on the Target size button, it will change to a Target bitrate
button, and you can now either enter a desired bitrate manually, or use the
slider to set a target bitrate.
Also click on the more... button to the left of the Encoding type selection.
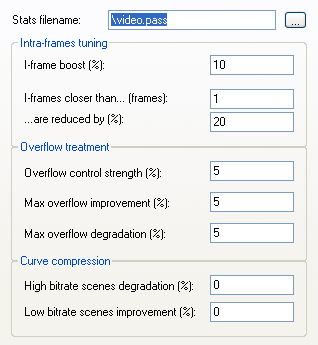 If
you had previously changed the Stats filename for the first pass, make sure
you enter the same value here now.
If
you had previously changed the Stats filename for the first pass, make sure
you enter the same value here now.
I-frame boost can be used to give an I-frame more bits than calculated in the bitrate curve.
Then we have the I-frame bitrate reduction options. The first one set the threshold for when the reduction is applied, and the 2nd value sets the reduction factor. In our example, I-frames than are closer than 1 frame (so there won't be any), would be reduced by 20%.
Overflow control strength % indicates the overflow distribution percentage per frame within the limits of the max overflow improvement/degradation, in other words how much of the overflow/underflow to be compensated can be compensated within a frame.
Max overflow improvement and Max overflow degradation indicate how much the codec can compensate during undersized and oversized sections of the video. The higher those values, the faster an overflow / underflow will be corrected (but it also means that no bitrate is preserved for other scenes that might need it more). If you're getting high fluctuations in quantizers (noticeable by fluctuations in image quality), try reducing those values to 20-30. This might hurt size predictability though.
Curve compression controls how the bitrate curve is being scaled. High bitrate scene degradation indicates how many bits are "shaved off" high motion scenes, and Low bitrate scenes improvement is the same for low motion scenes.
Then press OK 3 times again, then press F7 to save the AVI, give it another
name as for the first pass and also check Add operation to job list and defer
processing. Then press F4 to bring up the joblist.
All you have to do now is press Start and both passes will be performed after each other without requiring any manual actions from your part. Once the encoding process has finished you can now close both VirtualDub and GKnot.
>> BACK
This document was last updated on December 30, 2004