
AC3 to AC3 using BeSweet
You'll need the following software for this guide:
In the DVD and TV backup world, there's one audio tool you should be familiar with, and that is BeSweet. No other tool is as suited for the tasks at hand. BeLight is one of the many GUIs available for BeSweet, and is the most up-to-date so I'm going to use it in this guide.
Step 0: First time setup
Copy both BeLight and BeSweet to the same folder.
Step 1: Encoding
To add files to be encoded, simply drag and drop them from Windows Explorer to the input are in BeLight:
The easiest way to get on the way is to use one of the existing encoding presets:
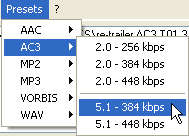 Select
one, then press the Start Processing button and you're under way.
Select
one, then press the Start Processing button and you're under way.
If you prefer more control, you can of course configure BeSweet just the way
you want it. First of all, you can configure all the codec
agnostic settings. Once you have done that, select the AC3 tab to
configure the AC3 encoder. The first choice you have to make is set the number
of channels of the output:
 If
your source only has 2 channels, Stereo is the obvious choice here. If
your source has 5.1 channels and you want to keep all the channels, you have
to select 5.1.
If
your source only has 2 channels, Stereo is the obvious choice here. If
your source has 5.1 channels and you want to keep all the channels, you have
to select 5.1.
In the Bitrate section, you can then configure the bitrate.
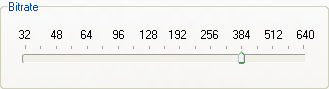 5.1
AC3 is normally encoded at 384 kbit/s, whereas 2.0 AC3 normally uses 192 kbit/s.
Going below 256 kbit/s for 5.1 AC3 will result in significant quality degradation,
and the same applies when going to 128 kbit/s or lower for 2 channel audio.
5.1
AC3 is normally encoded at 384 kbit/s, whereas 2.0 AC3 normally uses 192 kbit/s.
Going below 256 kbit/s for 5.1 AC3 will result in significant quality degradation,
and the same applies when going to 128 kbit/s or lower for 2 channel audio.
All the remains to be done now is press the Start Processing button. BeLight
has a nice progress bar to keep you up-to-date with the progress of the encoding
session:

>> BACK
This page was last updated on January 15, 2006