x264 guide
The latest version of GordianKnot new supports a 4th codec: x264 - the first open source implementation of an MPEG-4 AVC / H.264 codec. x264 is just as much integrated as every other codec, so if you've ever used GKnot before, you'll feel right at home.
You will need the following software for this guide:
DVD Decrypter
GordianKnot
Rippack
GordianKnot
Codec pack
x264 codec
Step 0: First time setup
You will only have to perform this step once.
Install the GordianKnot Rippack, then install the GordianKnot system pack. When installing the codec pack, only select the codec you really want to include.
After installation start Nandub and VirtualDubMod manually one time and click OK to every warning that might appear after startup. You can find the link to both applications in your start menu under Programs - Gordian Knot - Apps.
Then start up Gordian Knot and click on the options tab. Then configure the x264 codec by clicking on the buttons for First Pass and Second pass.
![]()
Let's do the first pass first.
In the first screen there's nothing you have to change.
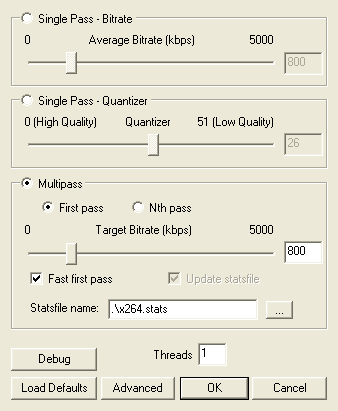 Make
sure Multipass is checked (this enables multipass encoding), and check
both First pass and Fast first pass. The latter speeds up the
first pass without doing too much harm to quality.
Make
sure Multipass is checked (this enables multipass encoding), and check
both First pass and Fast first pass. The latter speeds up the
first pass without doing too much harm to quality.
If you have a HyperThreading, multi-core CPU or two physical CPUs, you can increase the number of threads to 2. If you have a dual core chip with hyperthreading (Intel's latest extreme series has that), you can even increase the number of threads to 4 (but the advantage of HT is rather doubtful - HT can even hurt in certain situations and is no equivalent to a real dual core CPU).
Then press Advanced to configure x264's features.
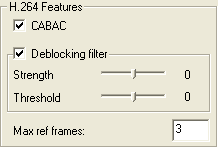 Checking
CABAC makes use of the CABAC entropy encoding in the bitstream.
Checking
CABAC makes use of the CABAC entropy encoding in the bitstream.
Checking Deblocking filter enables the in-loop deblocking filter. You can define the amount of blurring applied to a block edge using the Strength slider, and use the Treshold to decide when deblocking is applied. The lower the values, the lower the deblocking strength and negative values don't mean that the deblocking effect is reversed ;)
Max. reference frames indicates how many previous frames can be referenced by a P-/B-frame. This value can go up to 16, but anything above 5 doesn't really help and only slows down encoding. 3 is probably the most reasonable value.
The B-frame configuration has been put into a separate groupbox in newer releases:

Max consecutive indicates how many B-frames will be used. You can use up to 15 consecutive B-frames, but using 2-3 is the most sensible choice. Use as references allows a b-frame to reference another b-frame. This setting should be activated when using more than 2 consecutive B-frames. Checking Adaptive activates adaptive use of B-frames. Without this feature, x264 will always use put as many B-frames in a row as configured in the Max consecutive field. If you activate Adaptive, x264 can decide to use less b-frames in a row where it makes sense. Finally, using the Bias value, you can increase / decrease the probability that B-frames are being used, without violating the Max consecutive constraint.
In the More Encoder Settings you can configure keyframe intervals.
 Max
IDR-keyframe interval indicates the maximum distance between two IDR frames.
Similarly, Min IDR-keyframe interval indicates the minimum distance between
two IDR frames. Now you might wonder what IDR frames are: And IDR frame is what
has been traditionally known as an I frame. In AVC you can also have I frames
inside a GOP, which are not seekable, since the long time references introduced
in AVC could result in a P frame after the I frame to reference a P frame before
the I frame. An IDR frame, just like an I frame in MPEG-1/2 and MPEG-4 ASP,
starts with a clean slate, and all subsequent frames will make reference to
the IDR frame and subsequent frames. Non IDR I frames should be rare, but since
they cannot be ruled out, enforcing a minimal IDR interval can help improve
compression in some high motion scenes.
Max
IDR-keyframe interval indicates the maximum distance between two IDR frames.
Similarly, Min IDR-keyframe interval indicates the minimum distance between
two IDR frames. Now you might wonder what IDR frames are: And IDR frame is what
has been traditionally known as an I frame. In AVC you can also have I frames
inside a GOP, which are not seekable, since the long time references introduced
in AVC could result in a P frame after the I frame to reference a P frame before
the I frame. An IDR frame, just like an I frame in MPEG-1/2 and MPEG-4 ASP,
starts with a clean slate, and all subsequent frames will make reference to
the IDR frame and subsequent frames. Non IDR I frames should be rare, but since
they cannot be ruled out, enforcing a minimal IDR interval can help improve
compression in some high motion scenes.
Using Scene Cut Threshold you can modify x264's scene change detection to be more or less sensitive. Scene change detection is useful as it forces the use of an I-frame at a scene change, leading to better looking cuts in the video.
The Sample AR fields can be used to enforce the size of a decoded pixel to a certain value. Leave this at 1:1 for non anamorphic video.
Then you can configure the Ratecontrol..
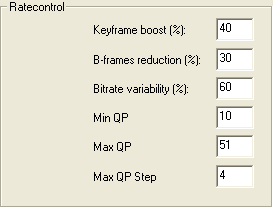 Keyframe
boost indicate how much of a "bitrate bonus" a keyframe gets.
Keyframe
boost indicate how much of a "bitrate bonus" a keyframe gets.
B-frames reduction indicates how much bitrate is deducted from a B-frame as compared to the previous P-frame.
Bitrate variability indicates how much the bitrate can fluctuate over the whole movie. Setting this to 0 would result in a pure CBR stream, 100% would result in perfect CQP. So, you can consider it to be a "quantizer curve compression".
Min QP can be used to enforce a minimium quantizer, as well as Max QP to enforce a maximum quantizer. A quantizer of 10 corresponds roughly to a quantizer of 0.8 in the MPEG-2 ASP scale (but since ASP only uses whole numbers, consider it an equivalent of quantizer 1)
Max QP step indicates how much the quantizer can change between two consecutive frames.
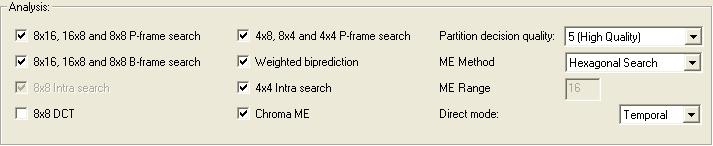 In
this section you can configure how x264 divides a frame into macroblocks to
perform motion estimation. Unchecking the P-frame search or B-frame search options
will speed up encoding but result in lower quality.
In
this section you can configure how x264 divides a frame into macroblocks to
perform motion estimation. Unchecking the P-frame search or B-frame search options
will speed up encoding but result in lower quality.
If you check 8x8 DCT, this will also enable 8x8 Intra search. 8x8 Intra blocks are a feature of the MPEG-4 AVC high profile and will increase quality but slow down encoding.
Weighted biprediction enables weighting of b-frames to help fades.
Chroma ME enables the use of the chroma (color) components for motion estimation and helps quality.
The Partition decision quality allows you to control the precision of the motion estimation process. Note that regardless of the setting, QPel motion estimation is always used. 5 should always be used for high quality content, and you can set it to 6 for even higher quality (but noticeably slower encoding - RDO is equal to using VHQ in XviD).
ME method indicates in which direction the motion estimation search is performed. You should leave this to Hexagonal Search as the more exhaustive methods only slow down encoding with no noticeable quality gain. If you decide not to follow this advice, you can also configure ME range if you select a more exhaustive me method. The higher the range, the more pixels will be analyzed, which is paid by slower encoding time.
Finally, Direct mode indicates how motion vectors for B-frames are derived:
Spatial uses neighboring blocks in the same frame, which may result in
a higher PSNR, whereas Temporal makes use of neighboring frames - which
many people perceive as higher quality.
Then press OK to get back to the main screen and OK again to get back to Gordian Knot.
Then press the Second pass button and make sure the settings correspond to what you set for the first pass. The only difference is that the Multipass field, you now check Nth pass.
Now as previously mentioned, you'll make those settings once and they are then used for each encoding session. But of course you can always change the defaults, or use special parameters just for a specific movie. In that case you can manipulate the codec settings just before you start encoding (and they will only be applied to the movie you're about to encode).
Step 1: Basic GKnot Setup
This step will teach you how to set up GKnot for a perfectly good looking rip.
Step 2: Encoding video
Only a few more steps and GKnot will automatically encode video and multiplex audio for you without any further manual interaction.
Step 3: Splitting (if required)
If you created a movie for more than 1 CD and didn't use the autosplit feature, you have to split it up now.
This document was last updated on January 28, 2006