Mimicking Seamless Branching with Scenarist by OxP
@Note by Doom9 04/10/2005: I have changed the title of this guide to "mimicking..."
because Scenarist cannot create real seamless branching titles. Real seamless
branching would mean that upon multiplexing, the different branches would be
stored in an way so that the player can jump parts to be skipped (for instance
when playing the theatrical release) without stuttering. Since players have
a limited buffer, the amount of video that can be jumped is only about 30 seconds,
which is insufficient for your average seamless branching title, and hence a
more complex arrangement of the video data is needed. Scenarist is unable to
do this.
This method was developed to accurately recreate DVDs that are seamlessly branched.
Most seamlessly branched DVDs are those that contain both the Theatrical and
Special Editions of a movie. Terminator 2, The Abyss, Independence Day, and
Stargate to name a few such titles. This method will allow you to sustain both
version of the film. Seamlessly Branched DVDs do not just contain two copies
of the film, but rather share similar parts of the film, but at points, deviate
from each other for certain portions. So effectively the VOB s contain the movie
only once. This is one method, that is a workaround to Scenarist's inability
to properly do seamless branching. There is another method that I am working
on that should reduce the manual labor, but will include much mathematical calculations
if you like even close to accurate chapter points. Though, here, a good deal
of them will be completely accurate without any effort.
Though, you must realize that not all movies that have both the theatrical
and director's cuts or special editions need to be done the way described in
the guide. One such film is Stigmata. You must analyze the IFO. For example,
a title that has two PGCs, as follows, does not need to be done this way, but
rather, just have the longer one encoded. PGC 1 with VOB IDs: 1,2,3,4,5,6,7,8,9,10
and PGC 2 with VOB IDs: 1,3,4,5,6,8,9,10. As you can see here one of the PGCs
has all of the VOB IDs So you can encode normally, following the IfoEdit and
CCE guide. Then deviate slightly at the Scenario Editor. Where you would follow
my method. So if you have such a title, follow this
guide and then continue to Step 4 of this guide and look at the procedure
for the Scenario Editor.
You will need the following software for this guide
IfoEdit
ImgTool
IfoUpdate
ScenChap
SubRip
ChapterXtractor
Scenarist
DVD Decrypter
DVD2AVI
CLI
Table of content
1: Preparation
2: Encoding
3: Subtitles
4: Re-author
5: Merge the Scenarist files into your project
6: Make the disc regionfree
7: Remove User option prohibitions
8: Final sector adjustments
9: Burn the DVD
Step 1: Preparation
The DVD I chose to demonstrate seamless branching is Terminator 2: Ultimate
Edition. This DVD has a Theatrical, Special, And Extended Special Editions on
one disc. The film is rather long and contains a good deal of audio tracks,
including DTS.
Here are the files on the DVD:
16,384 VIDEO_TS.BUP
16,384 VIDEO_TS.IFO
1,017,856 VIDEO_TS.VOB 167,936 VTS_01_0.BUP
167,936 VTS_01_0.IFO
235,182,080 VTS_01_0.VOB 1,073,739,776 VTS_01_1.VOB 1,073,739,776 VTS_01_2.VOB
1,073,739,776 VTS_01_3.VOB 730,079,232 VTS_01_4.VOB 1,073,739,776 VTS_01_5.VOB
1,073,739,776 VTS_01_6.VOB 1,073,739,776 VTS_01_7.VOB 674,893,824 VTS_01_8.VOB
20,480 VTS_02_0.BUP
20,480 VTS_02_0.IFO
9,168,896 VTS_02_0.VOB 17,981,440 VTS_02_1.VOB 18,432 VTS_03_0.BUP
18,432 VTS_03_0.IFO
1,017,856 VTS_03_0.VOB 40,800,256 VTS_03_1.VOB 18,432 VTS_04_0.BUP
18,432 VTS_04_0.IFO
1,017,856 VTS_04_0.VOB 83,349,504 VTS_04_1.VOB 18,432 VTS_05_0.BUP
18,432 VTS_05_0.IFO
1,017,856 VTS_05_0.VOB 54,767,616 VTS_05_1.VOB
VTS_01 is the main VTS on this dvd, the title has the extras on another disc,
so no extras to re-encode, but the main VTS is huge, 6.67GB. CCE will be used
to re-encode the film, but there is a catch, its not any old DVD, its a seamlessly
branched DVD. Rip all of the files, except the main movie VOB s , which in this
case are VTS_01_1.VOB through to VTS_01_8.VOB .
Step 2: Encoding
DVD Decrypter
We will now look at the VTS_01 in DVD Decrypter that we did not rip earlier.
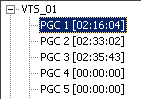 As we can see on the left VTS_01 has 6 PGCs. This VTS has
3 long PGCs. Normally we need to rip each PGC and encode them separately,
but this is a seamless branching title so we act differently. The first thing
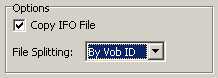
that needs to be done in this case is to switch to splitting by VOB ID. Go
to Tools->Settings...->IFO Mode->File Splitting. Change it to Split
By VOB ID. As seen in the picture below.
As we can see on the left VTS_01 has 6 PGCs. This VTS has
3 long PGCs. Normally we need to rip each PGC and encode them separately,
but this is a seamless branching title so we act differently. The first thing
that needs to be done in this case is to switch to splitting by VOB ID. Go
to Tools->Settings...->IFO Mode->File Splitting. Change it to Split
By VOB ID. As seen in the picture below.
 Now each PGC needs to be ripped individually. As of now, DVD Decrypter does
not make it easy, and split the raw VOB s by VOB ID, but maybe one day. An
alternative to this is to use vStrip, which will not be explained here. If
you want to know more about DVD Decrypter there's a detailed guide explaining everything
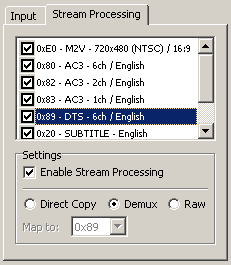
you ever wanted to know about the program. Before you rip each PGC I suggest
that you go to Stream Processing and Demuxing the audio tracks that you wish
to keep. You can do this step in DVD2AVI, but if you have a DTS track, like
in my case, you are forced to do it now anyway.
Now each PGC needs to be ripped individually. As of now, DVD Decrypter does
not make it easy, and split the raw VOB s by VOB ID, but maybe one day. An
alternative to this is to use vStrip, which will not be explained here. If
you want to know more about DVD Decrypter there's a detailed guide explaining everything
you ever wanted to know about the program. Before you rip each PGC I suggest
that you go to Stream Processing and Demuxing the audio tracks that you wish
to keep. You can do this step in DVD2AVI, but if you have a DTS track, like
in my case, you are forced to do it now anyway.
 The
first thing after you have ripped each PGC is to sort them out. What you need
in the end is a set of ALL the VOB IDs on the DVD. You may need to rename
some files to make a matching set and most likely only need a few VOB IDs
from some of the PGCs. This set is what you will be working with. If you also
demuxed audio files, then it is always a good idea to rename those as well.
You should delete any duplicate VOB IDs as they are useless. In the end you
should have a set that is approximately the size of the raw VOB s .
The
first thing after you have ripped each PGC is to sort them out. What you need
in the end is a set of ALL the VOB IDs on the DVD. You may need to rename
some files to make a matching set and most likely only need a few VOB IDs
from some of the PGCs. This set is what you will be working with. If you also
demuxed audio files, then it is always a good idea to rename those as well.
You should delete any duplicate VOB IDs as they are useless. In the end you
should have a set that is approximately the size of the raw VOB s .
You should encode VOB IDs in CCE. Though there are a few things I will mention
here to make this procedure easier. You DO need to encode each VOB ID and
hence create a d2v for each VOB ID and create an Avisynth script for each
one. This can be a pain, but there are commandline based tools that can help
reduce the amount of work tremendously.
Batch File
Here are some DVD2AVI switches, it's a good idea to look at the documents
so that you can really see how to fully control DVD2AVI:
Field Operation: -FO=0 None -FO=1 Force Film Track Number: -TN=0 None -TN=1
First Track, etc.
Color Space: -CS=0 RGB -CS=1 YUV(required) Dolby Digital: -DD=1 Demux -DD=2
Demux All Tracks
Read the documentation of DVD2AVI-CLI for the rest of the CLI functions and
what they do. The following two lines should be pasted into notepad and saved
to a file with the the extensions *.bat or *.cmd. Here is the script, place
it in the directory of all your VOB files:
for %%x in (*.VOB ) do dvd2avi -FO=0 -CS=2 -TN=0 -DD=1 -IF[%%x] -OF[%%x]
-exit
for %%x in (*.d2v) do echo LoadPlugin("C:\LOCATION OF MPEG2DEC\mpeg2dec.dll")
> %%x.avs& echo Mpeg2Source("C:\WHERE YOUR FILES ARE\%%x) >>
%%x.avs
If you want to IVTC or any other custom commands, then follow the example
and add in extra lines using:
&Echo Your Command >> %%x.avs
For AMD machines with those who are using CCE 2.5 add this line to the end:
&Echo ResampleAudio(44100) >> %%x.avs
This is a basic script, if you are using vStrip, then add the vStrip command
to the beginning of this. I recommend using vStrip, as it is much simpler
to do this, but if you want DTS you do not have much choice, unless you figure
out how to get working DTS files that have been split by VOB ID. If you used
vStrip or you want to demux using DVD2AVI for any other reason, then make
sure that TN=1 and DD=2. This will demux all audio tracks.
Drag and drop all of your avs scripts or AVI files, depending, into CCE. Follow
the CCE guide for the first VOB ID and change all the settings accordingly.
Only one, unless you like doing extra work, in which case you can do them all.
Save the ECL file. Now open it twice in two different notepad windows. In one,
leave it at the first VOB ID, for the other, scroll down to the second one.
From here, you will see what values are different between the two. The VOB ID
1 ones being those that you want for all of them. So go to Edit and Replace
in the second window. Type in the wrong value for "Replace" and the
right value, from the first window to "Replace With". Then hit "Replace
All". Do this for all values that apply. This just saved you from editing
the values for each VOB ID.
IF you are lazy like me, you just set it to 5-6 pass VBR and let it go.(I don't
feel like editing every single VAF file and seeing if there are gray areas.)
Or you can change the ECL twice if you do wish to do so. First time put them
all to One Pass VBR. The second time, edit the ECL and choose Multi-Pass VBR
along with the number of passes.
One last note about CCE before you hit the Encode button. If you are a freak
about exact chapter points, open up ChapterXtractor and load your IFO file.
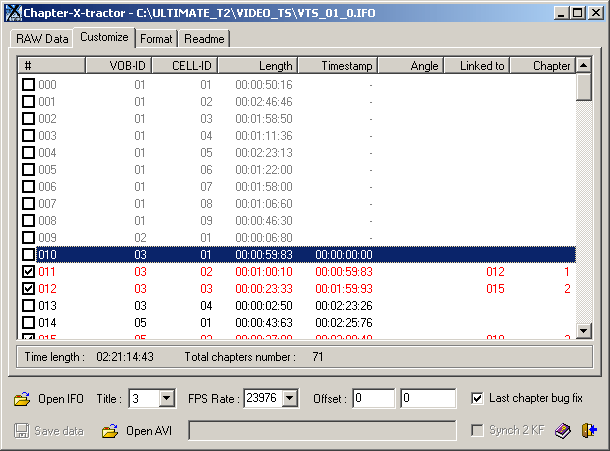 This
is an annoying part. The red values are the ones you care about, and are the
only ones you should input into CCE, if you like more work, then go ahead and
put them all in. What you need to do is look at each chapter RELATIVE to the
VOB ID. So, for this example, I took VOB ID 3. I selected all the cells preceding
it and right clicked on them. You must hit both Uncheck and Don't Use in timestamp.
Now goto Format.
This
is an annoying part. The red values are the ones you care about, and are the
only ones you should input into CCE, if you like more work, then go ahead and
put them all in. What you need to do is look at each chapter RELATIVE to the
VOB ID. So, for this example, I took VOB ID 3. I selected all the cells preceding
it and right clicked on them. You must hit both Uncheck and Don't Use in timestamp.
Now goto Format.
On the bottom right, where it says Format:, change it to %f and hit the button
directly to the right. Now you will see all the chapter points, but for this
particular VOB ID, we only care about the first two. Make sure that you change
the FPS Rate to 23976 if you chose force film or IVTC'd You must keep looking
at the FPS Rate as it can change on you when you are not looking. We take the
first two values and input those as the chapters in CCE for VOB ID 3. You proceed
to do the same thing for each VOB ID. You need to change Titles, located on
the bottom and find VOB IDs that were not in the first Title. When you are done,
you should have accounted for all the chapters in all the Titles.
You may now, after a hard days work, hit the Encode button. When encoding is
complete, you must do pulldown if you have an NTSC title, so, place pulldown.exe
in the directory where your encoded files are and create a new *.bat file with
the following:
for %%x in (*.mpv) do pulldown.exe %%x %%x.m2v
Step 3: Subtitles
If you want subs, good luck, its a lot of work. This of course depends on how
many VOB IDs you have in your film of course, but since its a seamless branching
title, I'm sure it has plenty. You need to select each VOB ID VOB file individually
from the list and make the subs for it. Keep track of what you are doing and
place things in different folders. With the latest SubRip, the amount of work
has greatly decreased, but all the same, it is a tedious job that I do not consider
worth the effort. Though, I will quickly explain how to do this.
Open up SubRip and open the directory where all of your VOB files are located.
Depending on the DVD, you may have multiple subtitle tracks that you wish to
keep. Check only one VOB file at a time, and proceed normally to rip it. So
you need to repeat the procedure 2-3 times per VOB if you want to keep 2-3 subtitle
tracks. In my case that would be 2x58 subtitle tracks. This is way to much work
for me, but for some subtitles can be extremely important.
Step 4: Re-author
I will not explain how to create a project, so check the IfoEdit and CCE guide
if you wish to see how to create a project. Once the project has been created,
there is a setting that needs to be changed if you have an NTSC movie. Go to
Settings->Default Settings->Assets. Change the second value to Drop Frame.
This saves you a bit of work. Drag and drop your video file(s) and audio file(s)
into the lower right part of the screen. Scenarist will then check the files
for compliance. You should have a lot of them.
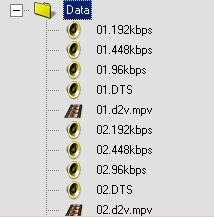 Here
you can see a part of my project. I have 60 m2v files, and a lot of audio files.
Sometimes, VOB IDs that are FBI warnings or just blank screens do not have audios
to accompany them. This is why I have 58x3 audio files.
Here
you can see a part of my project. I have 60 m2v files, and a lot of audio files.
Sometimes, VOB IDs that are FBI warnings or just blank screens do not have audios
to accompany them. This is why I have 58x3 audio files.
If you are reading this, I'm sure you know about dummy files, and if you don't,
then I suggest you take a look at the regular guide. You probably don't need
to make one, but rather take one of the existing AC3s you already have, its
quite probably that one of them is small enough for you to use.
Once you've imported all the files, click on the Track editor tab and drag and
drop the m2v video files to the track editor. You should now have a great deal
of tracks. This is what we will be making the PGCs from. In my example I have
60 video streams to be added. The last two were very short ones and when dropping
it I got the following window:
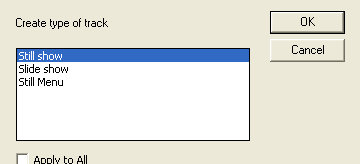 If you have a short PGC that has 00:00:00 length, then when
you add that VOB ID a menu will come up. Here choose still show.
If you have a short PGC that has 00:00:00 length, then when
you add that VOB ID a menu will come up. Here choose still show.
Once you've created all the tracks its time for lots and lots of fun. For each
track, which is a corresponding VOB ID, you must add the audio files that correspond
to it. This can take quite a while, especially if you have 2-4 audios for each
file, like in my case. Once you are done, you should take a rest from starring
at the screen. Don't bother putting in the languages of your audios, that's
just a silly waste of time :)
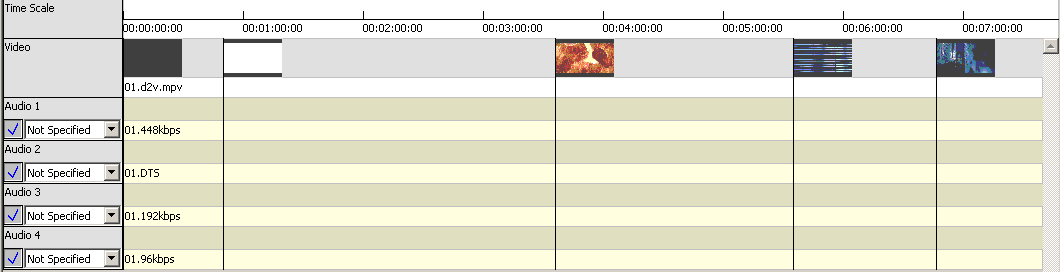
You should have something like this for each VOB ID when you are done. Though
you will not have the cell and chapter points as shown in the picture above.
To add chapter points, open up ChapterXtractor. Once again, we will follow a
procedure similar to the one used in CCE. The procedure is the same except for
two details. You will need to change the format to DVD Maestro Now, you will
need to copy the chapter points PER VOB ID as done with CCE, but in this case,
copy all the cell values, not just for the chapters.
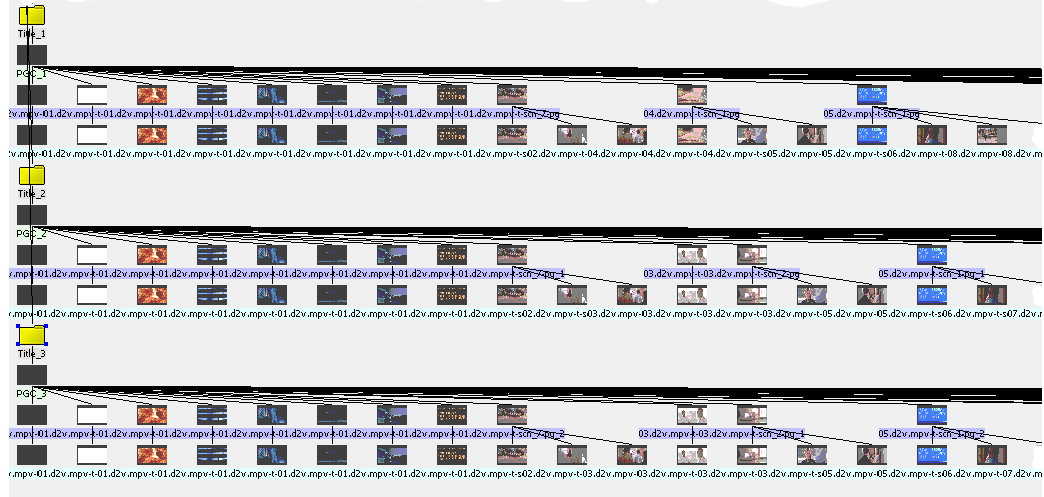
Keep the default names that will be proposed. Once you have 4 titles drag and
drop the tracks onto these title folders. Here, the seamless branching begins.
You have to do this the way that I describe, otherwise the VOB IDs will be messed
up, and no one wants that. Right click on each title that you created, depending
on how many PGCs your DVD has and create a PGC for each one. Now, open up IfoEdit
and look at the IFO. Scroll down to where you see cells, VOB IDs, and chapters.
You have to look back to this. Expand the first VOB ID, in the window in the
lower right in Scenarist. Now referring to the IFO, create a corresponding chapter
or cell for each "scene". Do this only for the first title and the
first VOB ID. You can create a chapter for a scene by dragging the cell onto
the PGC. To create a cell, drag the scene onto the the last program. The most
efficient way of doing this is to put the titles one on top of the other. After
you finish adding VOB ID 1 to the first Title/PGC add it to the second Title/PGC.
Go in order and only do one VOB ID at a time. IF PGC 1 does not contain VOB
ID 2, then DO NOT add VOB ID 3 to PGC 1 before adding VOB ID 2 to PGC 2. This
is a little confusing, but basically you need to go in order of PGC and then
in order of VOB ID. The reason for this is that if you do not do it in order,
Scenarist will create VOB IDs in the order you add tracks, if you just drag
all the tracks over and then delete them selectively, it will mess up the order
of VOB IDs and this is not recommended.
Once you are done with this, do not worry, there is very little work left :).
Once done you go to the Layout editor, select DVD Video as project type, select
an output directory (make sure there's enough space.. first Scenarist will multiplex
everything which will take as much space as your project already takes, then
it will create the VOB s and IFOs which till take as much space again).
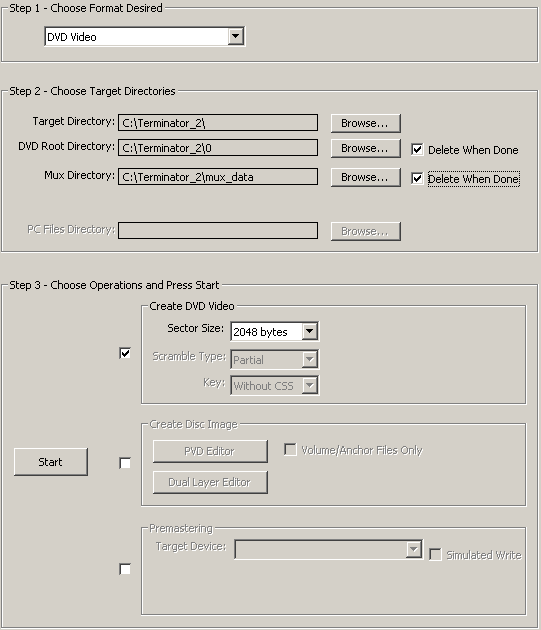
Last but not least check the checkbox on the right of Create DVD video and
set the sector size to 2048 bytes. Then press start to start the compilation.
This can take a good amount of time, so take a break from all your hard work.
After it is done, its a good idea to play the IFO in a software DVD player
to check and see that everything was done properly and each PGC is different.
Step 5: Merge the Scenarist files into your project
The work is pretty much done! Very little is left. Copy over the VOB files
that Scenarist created to the directory where the VOB s , IFOs, and BUP files
are located that were earlier ripped with DVD Decrypter.
Now start up IfoUpdate.
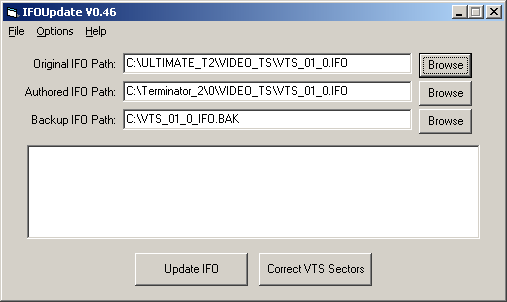 Now select the original IFO file (that would be VTS_01_0.IFO that you
ripped via DVD Decrypter), the Authored IFO file (that would be the VTS_01_0.IFO
that Scenarist generated) and provide a path and filename for the backup file
(in case something goes wrong you can take that file and overwrite the file
listed in Original IFO Path).
Now select the original IFO file (that would be VTS_01_0.IFO that you
ripped via DVD Decrypter), the Authored IFO file (that would be the VTS_01_0.IFO
that Scenarist generated) and provide a path and filename for the backup file
(in case something goes wrong you can take that file and overwrite the file
listed in Original IFO Path).
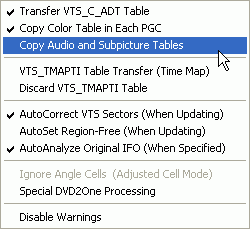 Here
you can choose the options you please. If you did subtitles, then copy the color
table in each PGC. If you wish to dump or transfer the Time Map you can do this
as well, though I don't recommend dumping it all together.. you can't seek through
the film in a software DVD player by dragging the bar if you do that. Now press
Update IFO.
Here
you can choose the options you please. If you did subtitles, then copy the color
table in each PGC. If you wish to dump or transfer the Time Map you can do this
as well, though I don't recommend dumping it all together.. you can't seek through
the film in a software DVD player by dragging the bar if you do that. Now press
Update IFO.
Repeat this process for every VTS_0x_0.IFO file Scenarist has generated for
you (that means no VIDEO_TS.IFO!!!)
Once this has been done you're basically ready for burning.
However, you may want to remove certain user prohibitions (as in not being able
to change the audio track via the appropriate button on the remote while watching
the movie), make the disc region free, or strip out subtitle and audio channels
that you have no included in the re-authored project. You can find all these
steps here. Enjoy your
brand new seamless branched DVD-R. By the time you are done, I'm sure that you
wished that you just bought an extra copy of the film. ;)
This document was last updated on 08/31/02