NuMenu4u Asset/Button stripping
guide
The VOB Preview screen is broken into 4 sections; the Asset
list, the Preview player, the AviSynth
Script Editor and the Bitrate calculations.
Asset List
 This
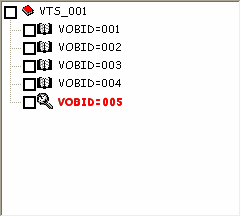
is the area that will show all of the VOBIDs for each VTS menu that has been
processed. Some information will also be written next to the VOBID, so you can
see exactly what you can do. There will be 1 of 3 icons visible. A closed book
represents that this VOBID has no buttons (like the VTS name), so is probably
an intro into a menu. An open book represents that this VOBID has menu buttons
present (like our example). A padlock represents a VOBID that requires CELLID
processing (in which the text will say Requires CELL Processing) or
it is being automatically removed (in which the case the text will say UnReferenced
-> Pre-Stripped). If in your VIP options setup, you have set to Automatically
Remove Warning/Intros from VIDEO_TS / VTS then non-menu VOBIDs will have
the following text written Removing Warning/Intro.
This
is the area that will show all of the VOBIDs for each VTS menu that has been
processed. Some information will also be written next to the VOBID, so you can
see exactly what you can do. There will be 1 of 3 icons visible. A closed book
represents that this VOBID has no buttons (like the VTS name), so is probably
an intro into a menu. An open book represents that this VOBID has menu buttons
present (like our example). A padlock represents a VOBID that requires CELLID
processing (in which the text will say Requires CELL Processing) or
it is being automatically removed (in which the case the text will say UnReferenced
-> Pre-Stripped). If in your VIP options setup, you have set to Automatically
Remove Warning/Intros from VIDEO_TS / VTS then non-menu VOBIDs will have
the following text written Removing Warning/Intro.
Any VOBID can be removed/reinstated by selecting
the checkbox (except UnReferenced material). Selecting the actual VOB
name will start playback in the Preview Player. The current selected VOBID will
show in red and have a magnifying glass next to it.
Preview Player
 The
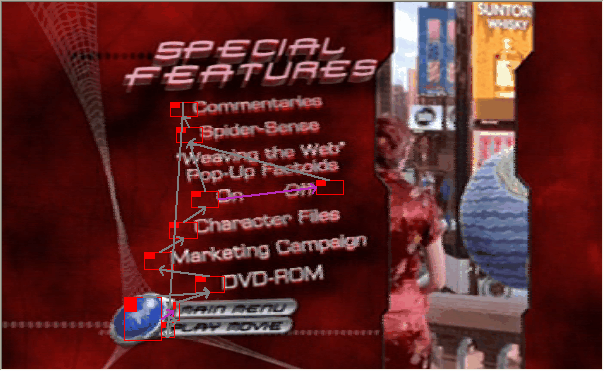
Preview Player will show the video and all subpicture buttons that have been
found. The correct CELL and Subpicture positions are honored. Most menus have
only 1 subpicture per Cell, however, some like Spiderman (R1) have multiple
subpictures that change every few seconds. In this case the player would seem
to flash a lot as each new subpicture is loaded.
The
Preview Player will show the video and all subpicture buttons that have been
found. The correct CELL and Subpicture positions are honored. Most menus have
only 1 subpicture per Cell, however, some like Spiderman (R1) have multiple
subpictures that change every few seconds. In this case the player would seem
to flash a lot as each new subpicture is loaded.
As each subpicture is loaded the menu buttons will be displayed. The button
routes will also be shown (UP, DN, LT and RT). Each route can be either displayed
or hidden. Change the four colored buttons to do this. In this example I have
disabled the UP and LT routes.
To turn off the routes completely press the button with the
arrow in it, and the tick will change to a cross and vice versa. When this button
is off none of the route buttons will be selectable.
Hovering the mouse over each button will display the actual
button command. Again to turn this off press the button with the E in it. As
above the tick will change to a cross and vice versa.
 These
are standard buttons for Play, Pause and Stop.
These
are standard buttons for Play, Pause and Stop.
 Here
we have Previous Cell, Previous Subpicture, Next Subpicture and Next
Cell. Depending on which Subpicture/Cell is playing will determine which
of these buttons are selectable. Use these to advance through the video at only
important intervals (i.e. a new Cell or Subpicture)
Here
we have Previous Cell, Previous Subpicture, Next Subpicture and Next
Cell. Depending on which Subpicture/Cell is playing will determine which
of these buttons are selectable. Use these to advance through the video at only
important intervals (i.e. a new Cell or Subpicture)
 The
Restore Button will repair any mistakes we make. Then we have the Show
Command and Show Routes buttons. Finally the four buttons representing
the four available routes.
The
Restore Button will repair any mistakes we make. Then we have the Show
Command and Show Routes buttons. Finally the four buttons representing
the four available routes.
A mouse click on any button in the Preview window will show this menu
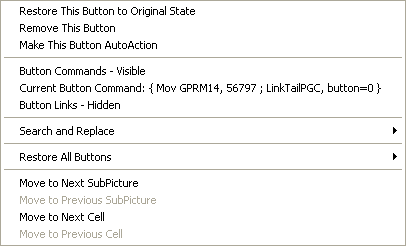 Restore
This Button to Original State will undo any changes made to the current
button.
Restore
This Button to Original State will undo any changes made to the current
button.
Remove This Button will delete this button from the
menu - the button will now turn green
Make This Button AutoAction will force the button
to be selectable without pressing Play on the remote - the button will now turn
magenta. If a button was already set like this originally then it will show
magenta on start up.
As with the above buttons, Button Commands - Visible /
Hidden will show or hide the Button Commands. Button Links - Visible
/ Hidden the same. Current Button Command is the actual button
command for the current button.
Depending on the current Cell / Subpicture will determine which of the four
bottom options is selectable (this is the same as the Previous Cell buttons
etc. above)
 Search
and Replace will show this sub menu. If you have changed or deleted a menu
button then this new state should be copied over to the other Subpictures /
Cells (If it is still present in these other ones). If you have changed just
one button then choose the former (THIS) or if several buttons the
latter (ALL), and then decide if you want this to be copied over This
Cell Only or This Entire VOB. Most menus change at the Cell boundary,
so copying This Cell Only is wise. The final option here is Pixel
Threshold (+ or -). This is for where the authoring house used multiple
Subpictures and altered the position of the buttons slightly. By default NuMenu4u
will search for any buttons in the same position and of the same size + or -
5 pixels. Here you can change this threshold.
Search
and Replace will show this sub menu. If you have changed or deleted a menu
button then this new state should be copied over to the other Subpictures /
Cells (If it is still present in these other ones). If you have changed just
one button then choose the former (THIS) or if several buttons the
latter (ALL), and then decide if you want this to be copied over This
Cell Only or This Entire VOB. Most menus change at the Cell boundary,
so copying This Cell Only is wise. The final option here is Pixel
Threshold (+ or -). This is for where the authoring house used multiple
Subpictures and altered the position of the buttons slightly. By default NuMenu4u
will search for any buttons in the same position and of the same size + or -
5 pixels. Here you can change this threshold.
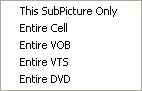 Restore
All Buttons will give you the choice of restoring the buttons back to their
original state. This can be for the current SubPicture Only, the Entire
Cell etc. Pressing the Restore button above will show this menu
also.
Restore
All Buttons will give you the choice of restoring the buttons back to their
original state. This can be for the current SubPicture Only, the Entire
Cell etc. Pressing the Restore button above will show this menu
also.
AviSynth Script Editor
To make any alterations to the AVS script type the new filter into the editor
and press the Test Temporary Script button. If you are happy with this then
press the Replace Actual AVS button. NB This cannot be undone automatically.
You can of course rewrite it manually and then Replace again.
Bitrate Calculations
Here the various boxes tell you what the new DVD or Menu size is going to be
if you re-encode and don't re-encode the video. The Total DVD Size
includes the title files in their present size. Altering the bitrate will show
you the new predicted sizes. You may well find that after removing warning screens,
foreign language screens etc., that the overall size has come down to a point
where the title files don't need to be processed. If this occurs and in the
VIP Options you had selected Create ISO Image then NuMenu4u will complete
but stop further processing with DIF4U and create an image file instead ready
for burning.
If you decide to use the original video instead of re-encoding pressing the
I've Changed my mind. Keep Original Assets will achieve this. Press again
to reverse.
Half Size Preview Window will reduce the Preview window by half. This
should never be needed.
Close VOB Preview to finish and Exit.