Full DVD Backup guide
This guide will teach you how to create a perfect backup of a DVD-9 retaining
every asset present on the original disc. It's possible to remove audio or subtitle
tracks and replace useless stuff like FBI logos by some blank video but in the
end we're not going to change the basic structure of the DVD and thus risk the
least amount of problems.
In this guide we're going to use four front-end tools that will make the whole
process a lot easier: DoItFast4U (DIF4U), BatchCCEWS (BCCE), ScenAid and NuMenu4u
(NM4U). DIF4U will rip and demultiplex VOB files for you. It'll launch NuMenu4u,
which re-encodes large menu files. Then DIF4U will continue using the reduced
menus, create DVD2AVI projects and AviSynth scripts to be imported into the
MPEG-2 encoding program and it will correct any delays the audio files might
have as compared to the video stream. ScenAid will then analyze the DIF4U output
and create the proper Scenarist project for you and will control BatchCCEWS
for encoding. Scenaid will also provide the correct handling of Angles and Chapter
placement in the video streams. Finally BatchIfoupdate will update your .IFO
files, and combine the remaining original files, the NuMenu4u files and the
Scenarist reauthored files into one folder. If you have VIP status then Muxman
can be used for authoring instead. This guide will cover authoring with Scenarist
or Muxman, use of the Advanced features of these tools and also the specialist
VIP options available.
You will need the following software for this guide:
DoItFast4U
BatchCCEWS
and a suitable encoder (Rejig, CCE, Procoder, QuEnc and HC Encoder are all supported)
NuMenu4u
ScenAid
ImgTool
BatchIfoUpdate
Sonic Scenarist or Muxman
0.15 (if you have VIP status)
Please Note: it is always recommended to use the latest versions of this software,
which at the time of writing are:
DIF4U (1.4.7- public & 1.4.8 -VIP)
BatchCCEWS 0.9.1.6k
NuMenu4u 2.0.22
Scenaid 1.7.0.5
BatchIfoUpdate 0.9.0.10b
Table of content
0: First time Installation/Preparation of all the required
tools
1: Preparation
2: Demultiplexing
3: Encoding
4: Reauthoring
5: Putting it all back together for Scenarist users
6: Problems & Burning
Step 0: Installation and first time Preparation
All the installations and setup guides have been put in
this guide
Step 1: Preparation
In this guide we're going to put the DVD-9 SPIDERMAN 2, R4 (DISC 1) having
a total size of 7.5GB onto a single DVD-R disc. This edition of the movie contains
2 language tracks, 2 commentary tracks, multiple subtitle tracks and a lot of
extras, including duplicate PGCs If that doesn't scare you then I suppose you
either don't know what the heck I am talking about and may be better off learning
the DVD-R basics first or you reauthor The Matrix
for breakfast in which case you most likely have no use for this guide ;) This
training day is going to take you very far into DVD-R land and you're going
to see things you have never seen before. But if you stick to the path you should
be getting where you want to go to.
To begin with here's the directory listing of the DVD:
18/09/2004  11:24 AM            30,720 VIDEO_TS.IFO
18/09/2004  11:24 AM        24,702,976 VIDEO_TS.VOB
18/09/2004  11:24 AM            30,720 VIDEO_TS.BUP
18/09/2004  11:24 AM           102,400 VTS_01_0.IFO
18/09/2004  11:24 AM       280,156,160 VTS_01_0.VOB
18/09/2004  11:24 AM     1,073,739,776 VTS_01_1.VOB
18/09/2004  11:24 AM     1,073,739,776 VTS_01_2.VOB
18/09/2004  11:24 AM     1,073,739,776 VTS_01_3.VOB
18/09/2004  11:24 AM     1,073,739,776 VTS_01_4.VOB
18/09/2004  11:24 AM     1,073,739,776 VTS_01_5.VOB
18/09/2004  11:24 AM        82,821,120 VTS_01_6.VOB
18/09/2004  11:24 AM           102,400 VTS_01_0.BUP
18/09/2004  11:24 AM            18,432 VTS_02_0.IFO
18/09/2004  11:24 AM            38,912 VTS_02_0.VOB
18/09/2004  11:24 AM         9,881,600 VTS_02_1.VOB
18/09/2004  11:24 AM            18,432 VTS_02_0.BUP
18/09/2004  11:24 AM            18,432 VTS_03_0.IFO
18/09/2004  11:24 AM            38,912 VTS_03_0.VOB
18/09/2004  11:24 AM        23,154,688 VTS_03_1.VOB
18/09/2004  11:24 AM            18,432 VTS_03_0.BUP
18/09/2004  11:24 AM            22,528 VTS_04_0.IFO
18/09/2004  11:24 AM            38,912 VTS_04_0.VOB
18/09/2004  11:24 AM       325,386,240 VTS_04_1.VOB
18/09/2004  11:24 AM            22,528 VTS_04_0.BUP
18/09/2004  11:24 AM            18,432 VTS_05_0.IFO
18/09/2004  11:24 AM            38,912 VTS_05_0.VOB
18/09/2004  11:24 AM       148,731,904 VTS_05_1.VOB
18/09/2004  11:24 AM            18,432 VTS_05_0.BUP
18/09/2004  11:24 AM            18,432 VTS_06_0.IFO
18/09/2004  11:24 AM            38,912 VTS_06_0.VOB
18/09/2004  11:24 AM       135,923,712 VTS_06_1.VOB
18/09/2004  11:24 AM            18,432 VTS_06_0.BUP
18/09/2004  11:24 AM            20,480 VTS_07_0.IFO
18/09/2004  11:24 AM            38,912 VTS_07_0.VOB
18/09/2004  11:24 AM       295,555,072 VTS_07_1.VOB
18/09/2004  11:24 AM            20,480 VTS_07_0.BUP
18/09/2004  11:24 AM            18,432 VTS_08_0.IFO
18/09/2004  11:24 AM            38,912 VTS_08_0.VOB
18/09/2004  11:24 AM        37,009,408 VTS_08_1.VOB
18/09/2004  11:24 AM            18,432 VTS_08_0.BUP
18/09/2004  11:24 AM            18,432 VTS_09_0.IFO
18/09/2004  11:24 AM            38,912 VTS_09_0.VOB
18/09/2004  11:24 AM        95,897,600 VTS_09_1.VOB
18/09/2004  11:24 AM            18,432 VTS_09_0.BUP
18/09/2004  11:24 AM            18,432 VTS_10_0.IFO
18/09/2004  11:24 AM            38,912 VTS_10_0.VOB
18/09/2004  11:24 AM        62,959,616 VTS_10_1.VOB
18/09/2004  11:24 AM            18,432 VTS_10_0.BUP
18/09/2004  11:24 AM            18,432 VTS_11_0.IFO
18/09/2004  11:24 AM            38,912 VTS_11_0.VOB
18/09/2004  11:24 AM        81,987,584 VTS_11_1.VOB
18/09/2004  11:24 AM            18,432 VTS_11_0.BUP
18/09/2004  11:24 AM            18,432 VTS_12_0.IFO
18/09/2004  11:24 AM            38,912 VTS_12_0.VOB
18/09/2004  11:24 AM        62,965,760 VTS_12_1.VOB
18/09/2004  11:24 AM            18,432 VTS_12_0.BUP
18/09/2004  11:24 AM            18,432 VTS_13_0.IFO
18/09/2004  11:24 AM            38,912 VTS_13_0.VOB
18/09/2004  11:24 AM        85,133,312 VTS_13_1.VOB
18/09/2004  11:24 AM            18,432 VTS_13_0.BUP
18/09/2004  11:24 AM            18,432 VTS_14_0.IFO
18/09/2004  11:24 AM            38,912 VTS_14_0.VOB
18/09/2004  11:24 AM        67,639,296 VTS_14_1.VOB
18/09/2004  11:24 AM            18,432 VTS_14_0.BUP
18/09/2004  11:24 AM            18,432 VTS_15_0.IFO
18/09/2004  11:24 AM            38,912 VTS_15_0.VOB
18/09/2004  11:24 AM        20,238,336 VTS_15_1.VOB
18/09/2004  11:24 AM            18,432 VTS_15_0.BUP
              68 File(s)  7,210,182,656 bytes
VTS_01 is obviously the main movie VTS set as it's the largest one. In this
guide I'm going to show how to transcode each video item, but in some cases
you might prefer to only encode the main movie. CCE can give you good video
quality using a bitrate of 2500 kbit/s or higher. If you add the bitrate of
the audio tracks you're going to keep to that and multiply this by the length
of the movie in seconds you have an approximation of the size of the main movie
(add about 100-150MB for the muxing overhead to get a more realistic result).
If you add the size of the extras (all VTSes besides VTS_01 in this case, and
don't forget about VIDEO_TS.VOB) and you're still below the size of a DVD then
you may not want to bother doing the extras as well.
The best way to begin is create an ISO
image of the DVD and mount this as a virtual drive. That way we'll always
have every file we need available right on our hard disk and won't have to insert
the original DVD again. It also saves us from embarrassment of accidentally
deleting a file you'd still need as all the files in the image are read only.
Step 2: Demultiplexing
Now we literally have to rip our movie to pieces. In less martial terms we're
going to separate audio, video and subtitles and process them independently
of each other.
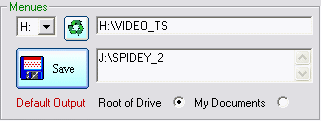
Now let's get started for real. The first thing you'll have to do is select
a working directory. This is the directory where all the demultiplexed files
will be stored (alternatively you can create a new folder, right click on it
in Explorer and select DoItFast4U into this directory).
 Create
folder for this VTS, if checked, will create a new folder and demux the currently
selected VTS into this folder. It's a per VTS setting so you can decide to put
multiple VTS sets into the same folder by un-checking this option for the VTS
you'd like to go together (they'll be placed in your working directory). Note
that if you followed the first time setup instructions above, this checkbox
will be set already and you shouldn't have to touch it. HDD Demux would have
to be used if you previously ripped the whole DVD to a directory on your hard
disk (not suggested!) in which case you'd have to select the directory containing
the ripped files as working directory. Then we have demux by VOB ID or Cell
ID. The latter should never be necessary.
Create
folder for this VTS, if checked, will create a new folder and demux the currently
selected VTS into this folder. It's a per VTS setting so you can decide to put
multiple VTS sets into the same folder by un-checking this option for the VTS
you'd like to go together (they'll be placed in your working directory). Note
that if you followed the first time setup instructions above, this checkbox
will be set already and you shouldn't have to touch it. HDD Demux would have
to be used if you previously ripped the whole DVD to a directory on your hard
disk (not suggested!) in which case you'd have to select the directory containing
the ripped files as working directory. Then we have demux by VOB ID or Cell
ID. The latter should never be necessary.
*Supplementary Information*
One of the biggest problems for a beginner is to determine whether a VTS needs
to be processed at the PGC level or at the VOBID level. Fortunately DIF4U is
pretty good at making this determination but it is good to know the details.
Basically to demux at the PGC level, at least one PGC or a combination of PGCs
must contain ALL the VOBIDs (without selecting a VOBID more than once). An example
to help: A VTS has 4 PGCs and has 5 VOBIDs:
PGC1 uses VOBIDs 1,2,3,4 & 5. PGC2 uses VOBID 2, PGC3 uses VOBID 3 and
PGC4 uses VOBID 5.
In this case DIF4U will select only PGC1 to process, because, PGC2, 3 &
4 can all be made from PGC1.
PGC1 uses VOBIDs 1,2,3 & 5. PGC2 uses VOBID 2, PGC3 uses VOBID 3, PGC4
uses VOBID 4.
In this case DIF4U will select PGC1 & PGC4, because PGCs 2 & 3 can be
made from PGC1.
PGC1 uses VOBIDs 1,2 & 3. PGC2 uses VOBIDs 1,2,3 & 4. PGC3 uses VOBIDs
1,2,3 & 5. PGC4 uses VOBIDs 2,3,4 & 5.
In this case no combination of PGCs uses all the VOBIDs without repeating at
least 1 VOBID. If this were done by PGC we would encode unnecessarily, so DIF4U
would select VOBID demux.
The next thing we're going to look at is the mandatory section:
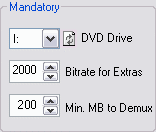 (Virtual)
DVD Drive is the drive letter of your mounted ISO image. Then you can select
a bitrate to be used for the extras contained on the DVD (do not go above
2000 or below 1500 for reasonable quality). Minimum MB to demux allows you
to not process VTS sets that are below a certain size (in this case if there
were a VTS set smaller than 200 MB you wouldn't bother processing it as the
possible space gain would be outweighed by the invested time).
(Virtual)
DVD Drive is the drive letter of your mounted ISO image. Then you can select
a bitrate to be used for the extras contained on the DVD (do not go above
2000 or below 1500 for reasonable quality). Minimum MB to demux allows you
to not process VTS sets that are below a certain size (in this case if there
were a VTS set smaller than 200 MB you wouldn't bother processing it as the
possible space gain would be outweighed by the invested time).
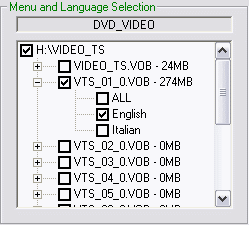
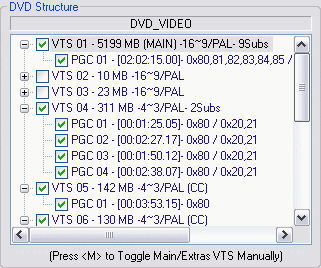 DIF4U will also give you a global overview of the disc, including available
VTS sets, PGCs, their lengths, audio track IDs, number of subtitles, subtitle
track IDs and aspect ratio.
DIF4U will also give you a global overview of the disc, including available
VTS sets, PGCs, their lengths, audio track IDs, number of subtitles, subtitle
track IDs and aspect ratio.
By default all VTS sets including all associated PGCs will be checked. If
a VTS set were smaller than the threshold we set above (200MB in our case)
it would be unchecked and hence not be processed at all.
If a VTS has multiple PGCs it is always worth confirming what PGCs need processing
or whether a VOBID demux is needed. Right click on a VTS will open that VTS
in IfoEdit, which by default will show the PGC layout and which VOBIDs are
used by each PGC. If you disagree with DIF4U then doublecheck! yourself, and
then select/deselect the PGCs as needed or in the case of a VOBID demux being
needed turn on Demux by Vob ID.
From this point on all our settings apply to the currently selected VTS set,
so come back to this selection and select the next VTS set when you're done
configuring. Below I'll illustrate my setup for the main movie VTS set (VTS
01).
The first thing to be done after selecting a VTS set is configure the audio
options:
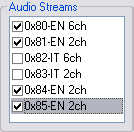 As
we were able to see in the previous screen shot, the main movie contains
6 audio tracks, 0x80, 0x81, 0x82, 0x83, 0x84, and 0x85, those being 6ch English,
2ch English, 6ch Italian, 2ch Italian and two more 2ch English (the commentary
tracks).
As
we were able to see in the previous screen shot, the main movie contains
6 audio tracks, 0x80, 0x81, 0x82, 0x83, 0x84, and 0x85, those being 6ch English,
2ch English, 6ch Italian, 2ch Italian and two more 2ch English (the commentary
tracks).
Because the title is fairly large and we need all space available only the
English audio is kept.
Then let's also configure the subtitles:
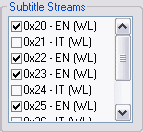 Here
I once again only keep those languages I actually understand. Subs won't take
much space on the final product, so it doesn't matter if you decide to keep
them all. The reauthoring slows down considerable though when importing and
muxing subs.
Here
I once again only keep those languages I actually understand. Subs won't take
much space on the final product, so it doesn't matter if you decide to keep
them all. The reauthoring slows down considerable though when importing and
muxing subs.
Then we have the optional switches:
 The
upper line deals with Subtitles. If your current VTS has angles then ensure
that Angles is selected. Raw Subs is always unselected,
but Subs should always be selected and if you are an NTSC user and
your movie has Closed Captions (this is also shown in the VTS window - denoted
by CC in the VTS name) then Captions should be selected also. The
lower line is there to inform DIF4U what the video type is for the current
VTS - assuming you know it. It is easier to let DIF4U determine this so make
sure that AutoDetect NTSC Video Type is selected (the lower line will be greyed
out), for NTSC and PAL users. (For PAL users further investigation will be
needed. This is covered later).
The
upper line deals with Subtitles. If your current VTS has angles then ensure
that Angles is selected. Raw Subs is always unselected,
but Subs should always be selected and if you are an NTSC user and
your movie has Closed Captions (this is also shown in the VTS window - denoted
by CC in the VTS name) then Captions should be selected also. The
lower line is there to inform DIF4U what the video type is for the current
VTS - assuming you know it. It is easier to let DIF4U determine this so make
sure that AutoDetect NTSC Video Type is selected (the lower line will be greyed
out), for NTSC and PAL users. (For PAL users further investigation will be
needed. This is covered later).
This is all you have to do for one VTS set. Now repeat this procedure for
all other VTS sets present on the DVD. The last thing to configure is the
number of passes for extras and the main movie:
 The
lower your bitrate, the more passes can be useful, but going beyond 5 is definitely
overkill. I'd say 3 / 4 will suffice in most cases, and in some you can even
go one lower, but this really depends on the source and your quality requirements.
The
lower your bitrate, the more passes can be useful, but going beyond 5 is definitely
overkill. I'd say 3 / 4 will suffice in most cases, and in some you can even
go one lower, but this really depends on the source and your quality requirements.
Now that we have configured everything let's rock. Press the Do It! button and
let DIF4U do it's thing.

If you're using NM4U, it will be automatically started and all paths will
be filled in:
In addition, you'll see the available disc menus listed:
In our initial setup of NM4U we chose English as our default language. So
when NM4U started up it preselected just the English version of the Menu.
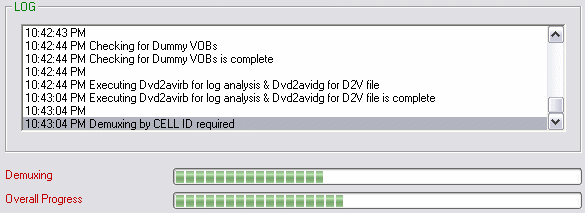
While NM4U is processing, you can watch its progress in the Log:
NM4U will completely reauthor the menus so don't be concerned that some encoding
and reauthoring is happening. This is all automated. If you are a VIP user
and have selected to Preview and Strip unwanted Video/Buttons then
go here for a detailed stripping guide.
Once NM4U completes, control will automatically be returned
to DIF4U.
If ReJig was selected
as the encoder in DIF4U, Rejig will be started and all of the video streams
encoded.
Once DIF4U has finished, you can manually start ScenAid.
Step 3: Encoding & Asset Processing with Scenaid
 Once
Scenaid has been launched, we need to select the directory that DIF4U has
demuxed all of our assets into. Following selection of this directory, ScenAid
will then scan and process our files, and create our Scenarist Script File
(.scp).
Once
Scenaid has been launched, we need to select the directory that DIF4U has
demuxed all of our assets into. Following selection of this directory, ScenAid
will then scan and process our files, and create our Scenarist Script File
(.scp).
If you had chosen to process your assets using Rejig in DIF4U, you can proceed
directly to step 4.
If you had chosen Generate script after scan (one-click run) then
the encoding would be automated so you can proceed directly
to step 4.
Now that Scenaid has completed its' scan it will now present a detailed breakdown
of each VTS. At this point we can decide if there are any VTSs that are wasted.
 Click
on each VTS# in turn and then select each PGC in turn.
Click
on each VTS# in turn and then select each PGC in turn.
 Each
will now show in the small preview window. If you decide that there is a VTS
that isn't needed then unselect all the PGCs in that VTS. If there is a specific
PGC that isn't wanted then deselect the PGC.
Each
will now show in the small preview window. If you decide that there is a VTS
that isn't needed then unselect all the PGCs in that VTS. If there is a specific
PGC that isn't wanted then deselect the PGC.
Removing any VTSs/PGCs will cause the MAIN Bitrate to increase and
force Scenaid to create a dummy asset in its place.
This guide is intended to keep the structure of the disc intact, but, I have
several discs where a VTS is just a black screen and is never used. Obviously
there is no need to keep this so unselect it. Also I don't care for trailers
of other movies so they are removed. Everything else is kept.
When finished if you feel the MAIN Bitrate is too low then alter
the Extras Bitrate to a lower figure and the MAIN Bitrate will increase.
 Pressing
the 'Save' button in Scenaid will force Scenaid into generating our script
file (.SCP if Scenarist is being used, .MXP if Muxman is being used). Scenaid
will now open BatchCCEWS and load up all of the files to be encoded.
Pressing
the 'Save' button in Scenaid will force Scenaid into generating our script
file (.SCP if Scenarist is being used, .MXP if Muxman is being used). Scenaid
will now open BatchCCEWS and load up all of the files to be encoded.
BatchCCEWS will show you a list of files to be encoded:
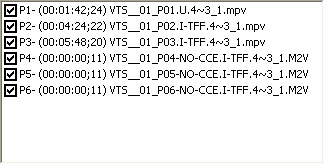
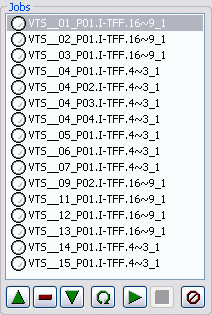 As
you can see, the jobs have the following names: VTS__XY_AB, where XY is the
VTS set number and AB is the PGC number. Behind the dot, I means interlaced
and P means progressive. In case of Interlaced, there will also be either
a -TFF or -BFF attached, representing the field order. Finally, you have the
resolution of the source - either 4~3 for 4:3, and 16~9 for 16:9.
As
you can see, the jobs have the following names: VTS__XY_AB, where XY is the
VTS set number and AB is the PGC number. Behind the dot, I means interlaced
and P means progressive. In case of Interlaced, there will also be either
a -TFF or -BFF attached, representing the field order. Finally, you have the
resolution of the source - either 4~3 for 4:3, and 16~9 for 16:9.
Right now, all jobs are marked with a white dot. Once you start encoding
(by pressing the triangle button pointing to the right - the same as a play
button on your DVD player), the file currently being encoded is marked in
light blue, and files that have been encoded are marked in green.
You can use the buttons below the Jobs to remove (-) a job, or move them
up and down using the triangles pointing up or down.
The omega button can be used to reset a job to pending status (useful if
a job has failed and you've corrected the failure case) and the last button
can be used to clear out the job list. While encoding, the stop button (a
red square) allows you to abort the encoding process at any time.
If you are an NTSC user then you can start encoding immediately (If you set
the option in Scenaid Start Encode on import, then this will be automatic.)
If you are a PAL user then you must now decide which video files are Interlaced
and which are Progressive and adjust the settings in BatchCCEWS accordingly
or if you just what a more detailed explanation of the settings then read
this guide.
Step 4: Reauthoring
Following encoding, Scenaid will then close BatchCCEWS and either:
- If using Muxman everything is now automated and on completion of Muxman
authoring, Scenaid will update and correct the IFO files. This takes about
30 minutes. All of the new Muxman files will then be amalgamated with the
remaining original files and any new Menu files. Everything will be put
together in the ../working dir/VIDEO_TS folder.
- If using Scenarist then follow Step 5: Putting
it all back together which explains the remaining procedures.
Now it's best to check out if your disc works. To
do that use a software DVD player like PowerDVD, and check everything is correct.
Step 6: Problems
A problem that sometime occurs is that the wrong audio track is playing.
If this should be the case, open the corresponding IFO file in IfoEdit, go
to the VTS_PGCITI section and select the appropriate PGC.
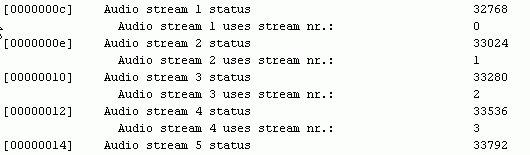
As you can see the audio stream status increases by increments of 256. If
instead of the first stream the 2nd one is being played set Audio stream 1
status to 33024 (and Audio stream 2 status to 32768) and save the IFO again.
Now press Update IFO.
If you want to remove certain user prohibitions (as in not being able to
change the audio track via the appropriate button on the remote while watching
the movie), or strip out subtitle and audio channels that you have not included
in the reauthored project. You can find all these steps here.
Once this has been done you're basically ready for burning.
I suggest you follow the guide by making use of an image file.
Finished!
Thanks to Zeul for the latest update to this guide, and to Doom9, Influenza
and Jel who contributed to the original guide that this is based upon.
This document was last updated on
April 12, 2009