 DVD Decrypter is used by
DIF4U and NuMenu4u for demuxing. To ensure no potential errors make sure that
in the Eject Tray After. section that Read is OFF
DVD Decrypter is used by
DIF4U and NuMenu4u for demuxing. To ensure no potential errors make sure that
in the Eject Tray After. section that Read is OFF  If you want to compress
the menus with NuMenu4u then make sure Re-encode Menus
If you want to compress
the menus with NuMenu4u then make sure Re-encode Menus  The first option you should check is Autocreate All Folders For this DVD.
This will ensure that each VTS set is put in its own directory and you can better
keep them apart. Of course, this is a preference which you have to be comfortable
with, but during the process so many files are created that I really think they
should be at least somewhat separated.
The first option you should check is Autocreate All Folders For this DVD.
This will ensure that each VTS set is put in its own directory and you can better
keep them apart. Of course, this is a preference which you have to be comfortable
with, but during the process so many files are created that I really think they
should be at least somewhat separated. If you are an experienced user you may want to Autoselect All Angles also.
Also check Autodetect and Uncheck Duplicate PGC's so that in case of duplicate VOB IDs in multiple PGC's, those are not extracted and processed multiple times.
AutoSwitch VTSes containing angles to VobID Demux should also be checked, because multi-angle VTS sets have to be processed by VOB ID.
Checking Autodetect Subtitles/Closed Captioning will automatically activate subtitle processing where subtitles are available.
Uncheck Autodetect Duplicate PGCs in reverse order reverses the order in which the duplicate PGCs will be kept. Normally if you have 2 duplicate PGCs the second PGC will be chosen to demux. With reverse order the first one will be checked and demuxed. I would leave this unchecked.
Now go to the PostPost Processing - Launch External App section:
 These options
are largely historical for when ReAuthorist was prevalent. We now use Scenaid
instead, but we want Scenaid to control the encoding so leave everything unchecked.
(Later builds of DIF4U will have an option to start Scenaid automatically)
These options
are largely historical for when ReAuthorist was prevalent. We now use Scenaid
instead, but we want Scenaid to control the encoding so leave everything unchecked.
(Later builds of DIF4U will have an option to start Scenaid automatically)
If you want to use ReJig as encoder, rather than the other previously mentioned
encoders then, you can check Rejig (Start Automatically). Rejig is
very rarely used nowadays, so again leave this unchecked.
Then make sure that in the Save Settings on Exit menu always is checked
so you won't have to make those settings again. Last but not least go into the
Other Options.
 The first two threshold settings should be left at their defaults, they decide
when a certain PGC won't be processed. CCE cannot encode very short clips very
well so it makes sense not to try in the first place. However, it makes sense
to alter the default setting of Don't Vobsub PGCs less than to 0 Min. Setting to 0 min will make sure that any subtitles found
are extracted so that Scenaid can use these to reauthor properly. In the case
of a DVD that BOV this is especially important.
The first two threshold settings should be left at their defaults, they decide
when a certain PGC won't be processed. CCE cannot encode very short clips very
well so it makes sense not to try in the first place. However, it makes sense
to alter the default setting of Don't Vobsub PGCs less than to 0 Min. Setting to 0 min will make sure that any subtitles found
are extracted so that Scenaid can use these to reauthor properly. In the case
of a DVD that BOV this is especially important. Flag as Main all VTSes within is very useful for DVD's that contain episodes. Such DVD's often have different VTS sets having roughly the same size, one per episode. This threshold will determine when VTS sets are considered as being part of an episode discs. The way it's set now, if a VTS set is 500MB or less smaller than the largest VTS set, it will also be considered as a main movie VTS set (thus it will be encoded using the main movie settings)
Don't correct delays less than indicates the cutoff for audio delay correction. Most people begin to hear audio displacement starting at 50-60 ms. If you're a perfectionist you would set this value to 0 ms to always perform a delay correction. Be advised though, this correction is only accurate to one AC3 frame which is more than 10ms by itself already.
Use Extras Bitrate on Main PGCs less than x minutes long can be useful if the main movie VTS set contains PGCs that contain extras - in that case if they are shorter than the threshold you set here, they'll be treated as extra, rather than like the main movie.
The audio options should be self explanatory.
 The
Stream Diagnosis settings allow you to select an alternative way to determine
attributesĀ of your video streams. Header flags uses the information
found in the first GOP to determine if a source is progressive or interlaced,
which works quite well especially for PAL movies. Frame Diagnosis is
more complex but can be more accurate than Header Flags especially for NTSC
content. So if you are a PAL user set Header Flags, and if a NTSC user
set Frame Diagnosis.
The
Stream Diagnosis settings allow you to select an alternative way to determine
attributesĀ of your video streams. Header flags uses the information
found in the first GOP to determine if a source is progressive or interlaced,
which works quite well especially for PAL movies. Frame Diagnosis is
more complex but can be more accurate than Header Flags especially for NTSC
content. So if you are a PAL user set Header Flags, and if a NTSC user
set Frame Diagnosis.
The other two options (Invert Field Order in Filenames and Suppress
Aspect Ratio in Subtitle Filenames) are historical and should be left unchecked.
Then we have the NuMenu4u Parameters: Re-encode menus greater than value
allows you to select after which threshold you want to re-encode menu files
using NuMenu4u. Re-encode menus using x for bitrate sets a bitrate for
the menus. Checking Pause before starting DoCCE4U/BatchCCE will pause NuMenu4u prior to encoding
so that you have the chance to modify settings and Convert Interlaced Menus
to Progressive Menus will convert any interlaced menus to progressive.
For CCE Encoding Use is for when encoding is started from DIF4U. Because
Scenaid will be doing this, this setting has no value to us.
After this we set the preferred encoding mode in Global Options, AVS Script
Editor. We can choose between
RoBa, Multipass VBR and Onepass VBR. Multipass VBR
is what we want, so press that.
Unless you write AviSynth scripts for breakfast leave the scripts at the default settings or see the Advanced section.
If you are a VIP member of DoItFast4U then see the VIP
area for additional options.
3) NuMenu4u
Although we are using Scenaid to create our script file for Scenarist to use,
we still need to reauthor the menus. This must be done before Scenaid is invoked
so that the correct bitrates can be set for the encoding. NM4U will breakdown,
encode, and then reauthor the menus before DIF4U continues. Although the array
of options is exhaustive, we will only concern ourselves with the necessary
ones.
By installing Scenarist first, upon first opening, you will prompted to scan
for installed versions of Scenarist. This is done automatically and must be
completed.
NuMenu4u also supports multiple language GUI. If you prefer a different language
for the GUI then select the language wanted from the GUI tab.
Now Open the Encoder tab
 Show encoder options
screen will present the encoder options.
Show encoder options
screen will present the encoder options. Depending on you're choice of encoder will dictate which Path to . you press. Here I chose CCE and then Encode with CCE is automatically set. For CCE always select the actual CCE executable, and for Procoder, EclPro. (NB make sure that EclPro has been configured before attempting any encoding)
If you want to use QuEnc then there are some additional QuEnc Options, which can improve the output at the expense of time.
Parse Video Stream to Confirm 16:9 will ensure that the video stream is actually 16:9 and not 4:3PS. This should be selected.
Process ALL Video assets will process any video segments that are too small to bother encoding with, to ensure that all the video attributes match between segments. This should be selected.
HC Encoder Options -> Profile. Set the setting here to Best. The other options are for experienced users.
Show Encoder Options Screen will present the following
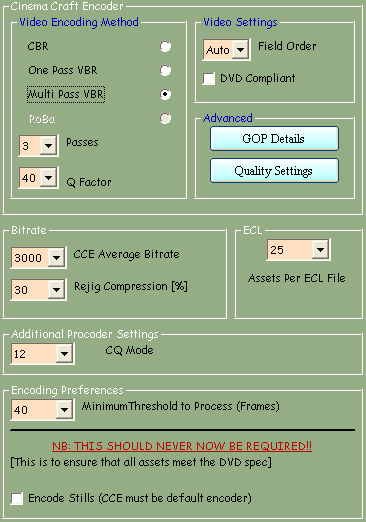 Video Encoding Method: By default,
Multi-Pass is chosen. You can then select the number of Passes and the Q factor to be used. If you want to learn more about
these CCE parameters, I suggest you have a look at the CCE
2.70 guide.
Video Encoding Method: By default,
Multi-Pass is chosen. You can then select the number of Passes and the Q factor to be used. If you want to learn more about
these CCE parameters, I suggest you have a look at the CCE
2.70 guide. Video Settings should be left as default, as the Auto settings will automatically determine the correct scanning order to be used.
Although it sounds like the opposite of what should be done, do not tick DVD Compliant
Advanced Settings are for advanced users, details can be found here.
Then select your Bitrate or if using ReJig, you have to enter a quality reduction factor rather than a desired bitrate. Personally I would not go below 65% with Rejig as the artifacts resulting from high compression can be excessive.
ECL: The ECL option defines how many assets are included with each ECL file, to control re-encoding. I would select the default option of 25 assets per ECL file. This number may need to be changed ONLY if you have problems with assets not being correctly re-encoded or CCE crashes when encoding or importing the ECL file.
If you are using Procoder for encoding then set you're preferred CQ Mode. The lower the number the better the quality.
Finally set Encoding Preferences:
Minimum Threshold to Process is the minimum # of frames a video segment must have to force encoding. 40 is about right.
Encode Stills should always be switched OFF. Because we set Process ALL Video assets previously there is no need to encode the stills - the loss of definition is large. Only use if even after all video assets have been processed, there are still discrepancies in the video attributes (NB this has never happened to date)
Now we set our Scenarist options
 NuMenu4u allows for various
options for Scenarist control. When used as a standalone application they are
useful. For our purposes NuMenu4u will be under the control of DIF4U, so we
want everything automated. So make sure that Import, Compile and Close
is selected. (NB if you have problems with Scenarist not being controlled correctly,
then setting the next option - Pause NuMenu4u. - will force you to
tell NuMenu4u when authoring has completed.)
NuMenu4u allows for various
options for Scenarist control. When used as a standalone application they are
useful. For our purposes NuMenu4u will be under the control of DIF4U, so we
want everything automated. So make sure that Import, Compile and Close
is selected. (NB if you have problems with Scenarist not being controlled correctly,
then setting the next option - Pause NuMenu4u. - will force you to
tell NuMenu4u when authoring has completed.)
You can also check Minimize Scenarist on Import and Minimize Scenarist
on Build , so in case you're still using the computer while NM4U does its
thing, you won't be bothered by windows popping up.
When we did our Scenarist scan at the very start, the available versions of
Scenarist will now be shown.
Now the Audio Options
 If you're audio is PCM then it will
be automatically encoded to AC3 with either BeSweet (included) or SoftEncode.
If you have SoftEncode available then selecting Convert Audio with SoftEncode
will force you to locate the path to the exe. You will then be prompted if you
would like to run a stability test (On some systems running SoftEncode from
c/l gives unexpected SoftEncode errors. The fix is to remove the registry settings).
Select yes to run the test and determine whether the Delete Registry Keys
is needed. (This requires CCE to be installed to function - if CCE
is not available then select NO and manually select Delete Registry keys
for SoftEncode)
If you're audio is PCM then it will
be automatically encoded to AC3 with either BeSweet (included) or SoftEncode.
If you have SoftEncode available then selecting Convert Audio with SoftEncode
will force you to locate the path to the exe. You will then be prompted if you
would like to run a stability test (On some systems running SoftEncode from
c/l gives unexpected SoftEncode errors. The fix is to remove the registry settings).
Select yes to run the test and determine whether the Delete Registry Keys
is needed. (This requires CCE to be installed to function - if CCE
is not available then select NO and manually select Delete Registry keys
for SoftEncode)
In the Audio drop down list choose the bitrate for the Audio Encoding.
Correct Audio Length, Correct AC3 Delay and Correct CRC Errors should
all be selected.
Now the AviSynth Options
Leave all the scripts as is (unless you know what you are doing), but if
you are a NTSC user you might want to select Perform IVTC.
![]()
Under the AviSynth tab there is also the option to convert the menus from one
format to another (PAL->NTSC / NTSC->PAL). This is not yet supported by Scenaid
so leave off. If you are interested in format conversion, you
can find additional information and discussions in the forum.
Now for the Subpictures tab
Sometimes the start time of the button in the menu does not match the start
time of the subpicture. This can lead to buttons missing from the menu. To stop
this set the options as follows

Now for the General Settings
 For
our purposes the important option here is Copy Unprocessed Menu and IFO
Files.
For
our purposes the important option here is Copy Unprocessed Menu and IFO
Files.
I don't care for parental control so selecting this option will force
NuMenu4u to try and remove this.
If your source is an actual DVD disc and not an ISO image then turn ON Use DVD Decrypter for copying.
 If you don't want to keep any
of the User Prohibitions then turn on Strip UOPs. Selecting this can cause the
menus to act strange so I always have OFF.
If you don't want to keep any
of the User Prohibitions then turn on Strip UOPs. Selecting this can cause the
menus to act strange so I always have OFF.
If you need to conserve as much space as possible then select Delete Temporary Files.
Pressing Show General Menu Settings will present

Menu Threshold will be overridden by DIF4U, but this would determine
the minimum size of the menu to force encoding.
Default Language will force NuMenu4u
to strip unwanted language streams from the Menu files. If the current selected
language is not available in the menu, then the existing one will be kept or
in the case of several languages, all will be kept. The remaining options on
this page are for experienced users.
If you are a VIP member then see here
for VIP setup, or here for
Advanced setup.
The remaining tabs have no use for us except the Recovery tab.
Pressing this will allow you to press Recover from a previous failure. This
will enable the same menu to be processed again, if you has chosen a bitrate
that was too low and the output wasn't good.
That's all for now, so close NM4U again.
4) BatchCCEWS
Although BatchCCEWS started life as a front-end for CCE it now supports Procoder,
QuEnc and HC Encoder. When Batch is first opened you will probably see this
error. This error message will pop up every time until an encoder has been selected.
Press OK. If you are using a CCE version less than 2.70 then close Batch, and
then in the BatchCCEWS install folder run EclCCE.exe. This will force you to
browse to the CCE executable.
Now open the settings page (File -> Settings)
Here we will configure the encoder wanted and other useful settings.
 To use CCE 2.7+ or CCE Basic
then select Use Direct CCE Executable and browse to its' location. The
CCE warning will now no longer appear.
To use CCE 2.7+ or CCE Basic
then select Use Direct CCE Executable and browse to its' location. The
CCE warning will now no longer appear. CCEFront is an external app that will use predictive algorithms to determine the correct bitrate to be used in order to achieve the requested file size. It is for use with One Pass Encoding with CCE. By default if the encoded file is Oversized then CCE will be rerun with a lower bitrate. To turn this OFF you would check Do not force Sizing Pass if Oversized. For our purposes this should be left OFF.
HC Enc PathName is for the HC Encoder path.
To use Procoder you must select ECLPro PathName (ensure it is configured first)
Quenc PathName is for the Quenc Encoder.
If you are short on space then Delete MPV after pulldown will delete the pre-pulldowned file.
If using CCE then Run CCE at Below Normal Priority and Hide CCE main window are useful.
Enable Logging will enable any issues to be quickly resolved.
We will let BatchCCEWS determine the bias setting.
Create VIF always should be turned on. This will greatly increase the import of the video into Scenarist.
If using Procoder, Quenc or HC Encoder (0.15 and earlier) then Segmented Encoding is required. Segmented Encoding will encode the video file in parts - each part is a chapter. (Accurate chapter positions are essential to avoid any authoring errors). The latest build of HC Encoder (0.15A) supports chapters so if you're preferred encoder is HC Encoder and you're build is 0.15A (or above) then you can turn this off.
Now to the main screen.
![]() Press
this button which will enable all of the options.
Press
this button which will enable all of the options.
 Under
Template you will see a list of Encoders. Select the desired encoder you
would prefer to use (for PROCODER, QUENC or HCENC) or if using CCE (all versions) set to Robshot-Bach. (NB the actual encoding method for CCE will be overridden by Scenaid).
If you are using One Pass VBR in DIF4U (not recommended) and you are using CCEFront for predictive bitrate then select ONEPASS(Predictive).
Set Force as Default.
Under
Template you will see a list of Encoders. Select the desired encoder you
would prefer to use (for PROCODER, QUENC or HCENC) or if using CCE (all versions) set to Robshot-Bach. (NB the actual encoding method for CCE will be overridden by Scenaid).
If you are using One Pass VBR in DIF4U (not recommended) and you are using CCEFront for predictive bitrate then select ONEPASS(Predictive).
Set Force as Default.
If you are using CCE then you may wish to set one of the matrices (Quantization
matrix). By default BatchCCE will set the matrix to Standard. Change this to MPEG Standard. (If you know what you are
doing and would like to set your own matrix then go here).
If you are using HC Encoder then in the HCENC Options change the drop
down list to Best.
Now that an encoder has been selected the Eclcce warning will no longer appear.
Finally press the Set Template to Default button and then close BatchCCEWS.
5) Scenaid
Last but not least, we have ScenAid: Start the program and select Options.
(NB if you have NOT set up NuMenu4u already then ScenaristScan will be called
to determine the versions of Scenarist installed).
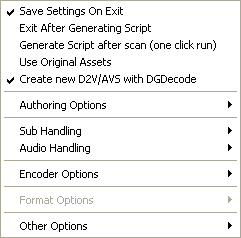 Generate Script after scan should
be switched OFF. If ON This would force Scenaid to scan the DIF4U directory
and create a Scenarist script file straight afterwards, and process any encoding.
For this guide we don't want this.
Generate Script after scan should
be switched OFF. If ON This would force Scenaid to scan the DIF4U directory
and create a Scenarist script file straight afterwards, and process any encoding.
For this guide we don't want this.
Use Original Assets can be used when no re-encoding is required.
Due to problems with DVD2AVI dropping frames we now use DGDecode instead. Manually
put DGIndex.exe and DGDecode.dll into the Scenaid install folder. Create
new D2V/AVS with DGDecode is now enabled. (NB if you're version of DIF4U
(1.4.8) supports DGDecode then turn this OFF). You will need to download the
DGMPGDec package from here
Now the Authoring Options
If you are a VIP member and want to use Muxman instead of Scenarist
then go here. (NB Muxman presently
does not support angles or seamless branching, so for these projects you must
use Scenarist)
 Because we want as much
automation as possible (until we are more experienced) then if you want Scenarist
to be minimzed whilst importing script file select Minimize Scenarist while
importing.
Because we want as much
automation as possible (until we are more experienced) then if you want Scenarist
to be minimzed whilst importing script file select Minimize Scenarist while
importing. Import Script into Scenaristwill automatically open Scenarist and import your created script, creating a scenario file in the process but won't close Scenarist - useful if you want to manually check the scenario that has been created.
Start Compile after Import will open Scenarist, import the script, and compile the project.
Import/Compile/Close will open Scenarist, import the script, compile the project, and close Scenarist. For a
beginner select this option.
If you have multiple versions of Scenarist installed then select you're preferred choice.
Script Pre/Post/Cell commands will recreate the command structure of the processed VTSs completely. Leave this ON, then if Scenarist throws a wobbly then you know that the final result will have an error in it.
Now the Sub Handling options
 Disable Importing of Subtitles will not import any demuxed substreams.
Ā Use Original Palette will match (as close as possible) the original sub colors Whereas Use Scenarist Palette will
Ā make all subs appear white, or yellow, depending on your selection.
Ā Enable BOV will create the highlight layer, the buttons and include the button commands for Button Over Video
Ā titles. Examples of BOV includes the 'White Rabbit' feature in The Matrix, and the 'Spidey Sense' in Spiderman 1.
Advanced Subtitle Options should be left untouched unless you know what you are doing. In any case the default options work very well and I see no reason to change them. Details can be found here.
Now for the Audio Handling options
 Add Silence ... (makes audio same length as video) will
pad the end of the audio stream. This is crucial to maintain audio synch in seamlessly
branched titles. It is therefore highly recommended for VOBID Demux. It
is not a requirement for PGC Demux (except for very rare situations),
and as it adds processing time you may wish to deselect this option. Please note,
that this feature is not a replacement for fixing the audio delay in DIF4U but
is a supplement to it.
Add Silence ... (makes audio same length as video) will
pad the end of the audio stream. This is crucial to maintain audio synch in seamlessly
branched titles. It is therefore highly recommended for VOBID Demux. It
is not a requirement for PGC Demux (except for very rare situations),
and as it adds processing time you may wish to deselect this option. Please note,
that this feature is not a replacement for fixing the audio delay in DIF4U but
is a supplement to it. Dummy Audio in VOBID Demux is for when the audio id's are not sequential in a VOBID demux. Leave this OFF unless you absolutely sure you need it.
Now for the Encoder Options
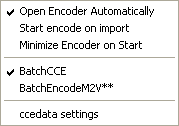 We want Scenaid to control
BatchCCEWS so Open Encoder Automatically should be on. If you are a
PAL user and you want to manually determine whether you're video is Interlaced
or Progressive then you will want to have Start encode on import OFF.
(Scenaid will not continue until BatchCCEWS is closed, so don't close it!!).
Being a PAL user myself I need to confirm the video type so Start encode
on import is OFF. NTSC users have no such worries so Start encode on
import would be ON and if wanted the encoder can be minimized by setting
Minimize Encoder on Start.
We want Scenaid to control
BatchCCEWS so Open Encoder Automatically should be on. If you are a
PAL user and you want to manually determine whether you're video is Interlaced
or Progressive then you will want to have Start encode on import OFF.
(Scenaid will not continue until BatchCCEWS is closed, so don't close it!!).
Being a PAL user myself I need to confirm the video type so Start encode
on import is OFF. NTSC users have no such worries so Start encode on
import would be ON and if wanted the encoder can be minimized by setting
Minimize Encoder on Start.
BatchEncodeM2V is no longer supported.
NB if you have selected to use Rejig as the encoder in DIF4U then Open
Encoder Automatically needs to be unselected.
Now for the ccedata settings
 We want to use the Scenaid Settings so select that.
You will need to set the number of Passes for CCE encodes also, and
the CCE Option also (RobShot-Roba etc.)
If you want to manually select a Bias setting then do so (NB if you
have selected Auto Detect Bias setting in BatchCCEWS then leave this
alone)
Quality is for the Quality Precision in CCE. Leave this as is to let BatchCCEWS
decide.
Other Options is for file associations
6) BatchIFOUpdate
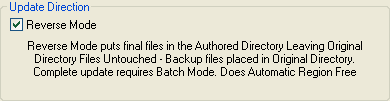 In the main screen select Reverse Mode - this will ensure that all of the unprocessed
VTSs and the new menu files (if using NuMenu4u) will be added to the Scenarist
output folder and not vice versa.
In the main screen select Reverse Mode - this will ensure that all of the unprocessed
VTSs and the new menu files (if using NuMenu4u) will be added to the Scenarist
output folder and not vice versa. 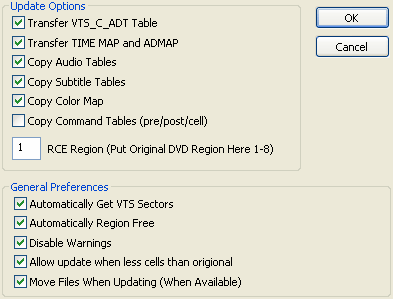 Transfer
VTS_C_ADT Table and Transfer TIME MAP and ADMAP must be checked
Transfer
VTS_C_ADT Table and Transfer TIME MAP and ADMAP must be checked
Copy Audio Tables should be set.
If you have set Scenaid to Use Original Palette then set Copy Subtitle Tables and Copy Color Map.
Copy Command Tables leave unselected unless you are not doing a full Scenarist automation and you want to make some changes to the command structure.
RCE Region should be region code of the original disc.
Select all the remaining options
OK to finish.