 The
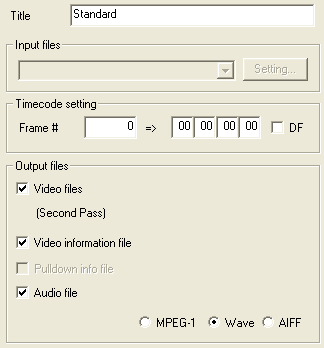
first thing to do is select a new name in the Title field. I'd suggest
something easily recognizable, like "first pass - progressive - 16:9"
for a first pass profile for progressive content.
The
first thing to do is select a new name in the Title field. I'd suggest
something easily recognizable, like "first pass - progressive - 16:9"
for a first pass profile for progressive content.CCE 2.70 guide
CCE 2.70 is the latest incarnation of the possibly fastest and highest quality MPEG-2 encoder (it does MPEG-1 as well but other encoders beat it at that). Cinemacraft seems to change the user interface with every minor release, and I recall writing guides for version 2.15, 2.50, 2.66 and 2.67 prior to this guide.
Release 2.70 restores the ability to write project files - an ability that was removed in 2.67, and which required a software like EclCCE to still be able to encode without additional effort. Also new is the ability to launch CCE from the commandline, giving an ECL file to be encoded as parameter.
When you first get started with CCE 2.70, I suggest you create a few templates. During subsequent encoding sessions, you'll no longer have to configure everything, rather you just select the appropriate template, select your source(s) and start encoding. To create a template, select Template from the menu, then select the Standard template.
The
first thing to do is select a new name in the Title field. I'd suggest
something easily recognizable, like "first pass - progressive - 16:9"
for a first pass profile for progressive content.
Then make sure the timecode is set to 00 00 00 00 rather than the default 01 00 00 00 (that would mean your video "starts" at 1h). Note that until CCE 2.67.0.16 this function did not properly work, so if you're using a version lower than 2.67.0.16, you'll have to manually change the timecode for each video you're encoding, after importing them.
Uncheck Audio file unless you want to use CCE as audio encoder. If you keep audio encoding enabled, you can also configure the audio encoder. There are arguably better audio encoders, but if you insist, just make sure that Mode is set to Joint Stereo and the sampling rate to 48'000 Hz.
Then we have the Video settings:
Here there are two ways to go at it. The first one is straight multipass encoding as described below. Use that if you want to achieve a certain size regardless of quality. Alternatively, you could perform an abbreviated first pass in constant quality mode. From that, you can determine which bitrate you need to achieve a certain quality. If the bitrate is lower or equal to what you can afford, you can be sure you'll get a movie in the quality you desire. If this test encoding pass shows that you cannot obtain the desired quality at the bitrate you can afford, then you'll have to make a decision: Can you live with a lower quality, or do you have to cut corners elsewhere. Some claim, that you can find a quality parameter that will work for all movies, but I'm highly skeptic of such claims. Yet, it you are willing, it's something to try out. Click here to read more about constant quality first pass.
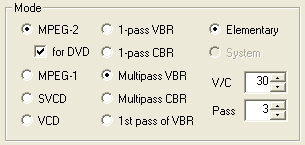 In
the first column, you can chose a profile for your output. To create a DVD,
you should check MPEG-2 and for DVD. The latter ensures that the output will
be DVD compliant. This involves automatic resizing of the source to the appropriate
resolution (if required) and converting the framerate as well.
In
the first column, you can chose a profile for your output. To create a DVD,
you should check MPEG-2 and for DVD. The latter ensures that the output will
be DVD compliant. This involves automatic resizing of the source to the appropriate
resolution (if required) and converting the framerate as well.
In the second column you select the encoding mode. This has an influence on the Bitrate section. In the CBR modes, you can specify a bitrate, in 1-pass VBR mode you can specify a minimum and maximum bitrate as well as the desired quality factor, and in multipass mode, you can additionally specify the desired bitrate. 1st pass of VBR is a special case of multipass VBR, which forces the creation of a source information file (.vaf - a file that contains the properties of the source, which is created during the first pass, and then used in subsequent passes to distribute the bitrate over the entire movie in function of its complexity).
In the third column, you can specify the output type. When creating content for DVDs, keep the output type to Elementary. System will enable muxing to mpg files, which can be useful for SVCD and VCD output. When a multipass mode is selected, you can configure the number of passes in the Pass field. In Multipass VBR mode, you can also configure the V/C option. This option can best be described as bitrate variability. The lower the value, the more is the bitrate allowed to fluctuate. The higher the value, the less fluctuation is allowed, with 100 creating a CBR stream.
I've previously mentioned the bitrate fields which you can find further down on the right side:
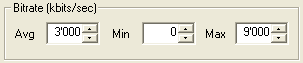
set the average (Avg) bitrate to your calculated bitrate, the Min bitrate to 0 and the Max bitrate to 9000. Theoretically, DVD allows a bitrate of up to 9800, but using the whole bitrate range could lead to problems during authoring, so using a lower value is safer.
Another new feature of CCE 2.70 is the ability to resize video:
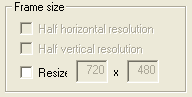 When
configured for DVD output, the first two options are blanked out. They'd allow
you to reduce vertical and horizontal resolution to half of the source.
When
configured for DVD output, the first two options are blanked out. They'd allow
you to reduce vertical and horizontal resolution to half of the source.
If you check Resize, you can force the video to be resized to a certain resolution. If your video does not have the proper resolution, and you have configured the output to For DVD and do not check Resize, CCE will add black borders around the video so that it will have the proper resolution. If you check Resize and enter the proper resolution, CCE will stretch the video instead of adding black bars. You can also configure which type of resizing is used: Hold down the Shift key when checking Resize:
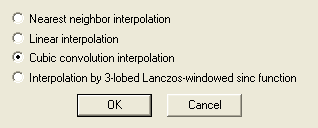 The
resizing options are ordered by complexity and quality. Lanczos delivers
the best quality, but takes the longest. Press OK to get back. And as a sidenote,
while it is practical to have this resizing feature, there's one catch: CCE
does not know which aspect ratio your video has, it will stretch to the desired
resolution no matter what. So, you could end up having a stretched video. I
therefore strongly suggest that if your video source does not have the proper
resolution, that you familiarize yourself with the basics
of aspect ratios and how you can properly stretch
a video to DVD resolution.
The
resizing options are ordered by complexity and quality. Lanczos delivers
the best quality, but takes the longest. Press OK to get back. And as a sidenote,
while it is practical to have this resizing feature, there's one catch: CCE
does not know which aspect ratio your video has, it will stretch to the desired
resolution no matter what. So, you could end up having a stretched video. I
therefore strongly suggest that if your video source does not have the proper
resolution, that you familiarize yourself with the basics
of aspect ratios and how you can properly stretch
a video to DVD resolution.
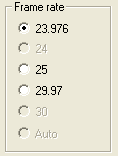
If you want, you can change the framerate of the source by checking one of the options in the Frame rate area. Note that if you check 23.976, CCE will automatically enable 2:3 pulldown to make it NTSC compliant. You can change this to 3:2 pulldown, but 2:3 is the default and that's how commercial DVDs are made.
Keep in mind though that changing the framerate forcibly isn't such a good idea - it'll speed up / slow down the video and may have undesired effects on audio as well. By default, CCE uses the framerate of the source, so this is really nothing you should change in a profile.
In case you select 29.97 fps, the Inverse 3:2 pulldown option will become
active:
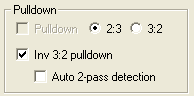 This
removes redundant fields from a 29.97 source that was telecined (as in movies
shot at 24fps, then put on DVDs). It cannot be used to turn real 29.97 fps content
(e.g. from a DV camera) into 23.976. If you check Auto 2-pass detection, CCE
will perform an additional VAF creation pass if it can automatically improve
IVTC that way. I personally cannot vouch for the results of IVTC in CCE, so
my suggestion for doing IVTC would be to use Decomb
instead.
This
removes redundant fields from a 29.97 source that was telecined (as in movies
shot at 24fps, then put on DVDs). It cannot be used to turn real 29.97 fps content
(e.g. from a DV camera) into 23.976. If you check Auto 2-pass detection, CCE
will perform an additional VAF creation pass if it can automatically improve
IVTC that way. I personally cannot vouch for the results of IVTC in CCE, so
my suggestion for doing IVTC would be to use Decomb
instead.
Then we have the Aspect ratio section:
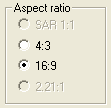 Set
this to 16:9 for 16:9 content (most DVD movies), and 4:3 for 4:3
content (most series on DVD, DVB and DV and analogue sources).
Set
this to 16:9 for 16:9 content (most DVD movies), and 4:3 for 4:3
content (most series on DVD, DVB and DV and analogue sources).
Then we have another section I'd keep my fingers off:
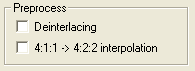 Checking
Deinterlacing will deinterlace the source, If your video source is NTSC
DV and get degraded output from CCE, you may want to check 4:1:1 -> 4:2:2
interpolation. In all other cases, leave this off as it could lead to quality
loss.
Checking
Deinterlacing will deinterlace the source, If your video source is NTSC
DV and get degraded output from CCE, you may want to check 4:1:1 -> 4:2:2
interpolation. In all other cases, leave this off as it could lead to quality
loss.
Now click the Advanced button to tinker some more:
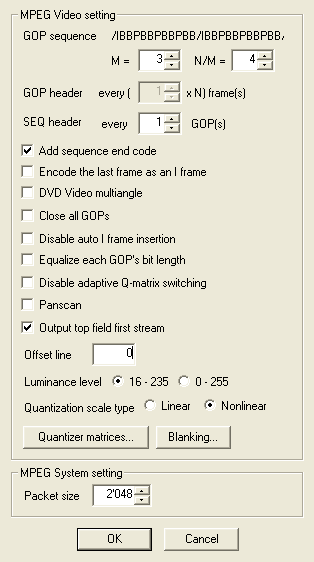 Change
the N/M parameter to 4 for PAL content and leave it it at 5 for NTSC content.
Change
the N/M parameter to 4 for PAL content and leave it it at 5 for NTSC content.
Make sure Add sequence end code is checked.
When encoding multiangle content, you should check DVD Video multiangle This will automatically check Close all GOPs, Equalize each GOP's bit length and Restrict auto I frame insertion which are also useful for multiangle content.
Encode the last frame as an I frame can force the last frame to an I-frame, but I don't quite get the usefulness of this feature.
If your DVD player has problems with CCE generated output, you can try checking Disable adaptive Q-matrix switching. By default, CCE adjust quantizer matrices to improve video quality, but not every DVD player might like that.
You can select Panscan, if you want a widescreen movie to be displayed in pan&scan format on 4:3 TVs.
Keep Output top field first stream checked unless you have a bottom field first stream (rare and normally only interlaced content).
The Offset line is a source of much confusion. It should always be set to 0, unless you're dealing with interlaced bottom field first content (in which case it should be set to 1). What it does is shift frames by the number of lines specified, thus switching bottom fields into top fields (CCE will always return top field first video). If you're unsure whether to set Offset line to 1, check the CCE FAQ which mentions a method how to figure this out.
Leave the Quantization scale type to Nonlinear.
If you can explain Quantization matrices to a person without a masters in signal processing, you can probably reconfigure quantization matrices on your own - if not, stay away from them.
If you press the Blanking button, you can configure cropping of the video source.
Finally, leave the Packet size at the default of 2048 and press OK to store your changes.
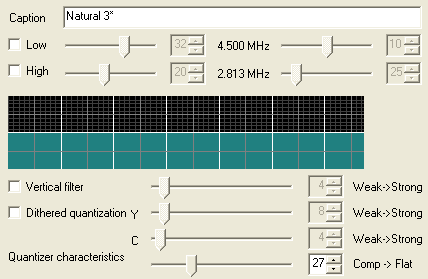
Last but not least we have the Picture Quality settings:
I can't sugarcoat this: If you want to understand every parameter properly, you might have to go back to college, so I won't go into every option (I'd have to take out my notes from the video processing class as well - it's not a subject that is too exciting unlike you like raw maths)

Simple settings allow you to chose from 3 predefined settings, resulting
in different input filter configuration.
Alternative we have the Detailed settings
Uncheck all filters for the best results and set the Quantizer characteristics to a value in the range of 27 - 30.
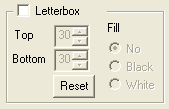 The
Letterbox function allows you to improve the IVTC by specifying how many lines
from the top and bottom can be discarded (black bars).
The
Letterbox function allows you to improve the IVTC by specifying how many lines
from the top and bottom can be discarded (black bars).
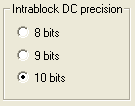 The
Intra block DC precision should be set to match the source - most DVDs
use 10 so set your template to use that value (you can still change it).
The
Intra block DC precision should be set to match the source - most DVDs
use 10 so set your template to use that value (you can still change it).
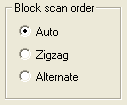 For
progressive content, set the Block scanning order to Zigzag, and
check the Progressive frame flag. For interlaced content, you'd set the
Block scanning order to Alternate and would uncheck Progressive
frame flag.
For
progressive content, set the Block scanning order to Zigzag, and
check the Progressive frame flag. For interlaced content, you'd set the
Block scanning order to Alternate and would uncheck Progressive
frame flag.
Last but not least, check Progressive frame if you're creating a template for
progressive material.
![]()
You can save your picture settings to a file and load them, separate from any template.
Press OK to get back to the Template window.
Then press the Save button to add the profile to the list of profiles,
or press Replace to replace the profile you're currently editing.
Now, select the the appropriate profile for the files you're going to encode from the templates list:
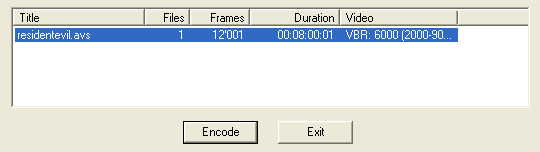
Then drag and drop your source files into CCE. The currently selected template applies to all files you add, so if you start adding files that need another template, select the required template, then continue adding files. If you double click on a file from the list, you can access it's properties and configure essentially what you've already seen when creating the template. When you're all done adding files and reconfiguring, press Encode.
Oh, one more thing: If you want to ensure that your chapters positions will be accurate, it can be advantageous to force keyframes at certain positions. To do this, go into the configuration screen of a video item (double click on it). The screen you'll see will seem very familiar - it's the same as when you configure a template. Note how the framerate has automatically been filled in. In addition, CCE will show you how large your file will get using the current settings:

If you hover over your input file, CCE will show you the properties of the source (resolution, and color space). Press Settings to configure chapter points.

Then double click on the file again the next window (it's largely useless really) until you get to this screen:
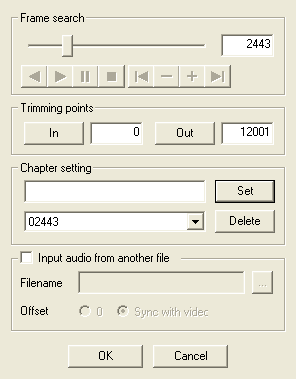 In
addition, you'll see a preview screen. Now you can use the slider to and player
controls to move around the video. To insert a keyframe at a certain position,
either enter it in the Chapter list field and press Set, or move
to the appropriate video position by either using the Frame search slider,
then press Set.
In
addition, you'll see a preview screen. Now you can use the slider to and player
controls to move around the video. To insert a keyframe at a certain position,
either enter it in the Chapter list field and press Set, or move
to the appropriate video position by either using the Frame search slider,
then press Set.
All defined chapters will be listed in the dropdown list to the left of the Delete button, and pressing the Delete button will delete the currently selected chapter position.
Note that even though CCE uses the term chapter, this doesn't automatically generate a chapter, it merely ensures that at the positions you've configured, a keyframe will be inserted, making it possible to have a chapter starting at this very frame. You'll still have to insert this chapter manually in a DVD authoring tool though.
As you can see, using this screen it's also possible to trim the beginning and end of the video by configuring an In and Out position for the video. The In and Out buttons can be used to set the beginning and end of the part of the video that is going to be encoded. Press OK 3 times to get back to the main screen.
Note that CCE has a couple more functions that are not part of this guide.
However, you can always refer to the CCE manual for more information on all
the options not described.
This document was last updated on August 10, 2005