 If
your Scenarist settings in Scenaid were Import/Compile/Close then Scenarist
will compile the project and close itself. Control is passes back to Scenaid.
Skip to Putting it all back together
If
your Scenarist settings in Scenaid were Import/Compile/Close then Scenarist
will compile the project and close itself. Control is passes back to Scenaid.
Skip to Putting it all back togetherScenaid will now open Scenarist, and Import our Script(.scp) file, creating a new Scenario in this process.
If you accidentally closed Scenaid, or incorrectly configured your options, you will have to manually import your script into Scenarist. For details on how to do this, please see this guide.
This will take a long while. If you're not using your PC, you'll see that Scenarist is busy importing various files and shows you the progress in a small part of the window in the lower left. As soon as you start using another program, Scenarist seems just to sit in the background and behave as if it had crashed. Don't be fooled though, it's still processing and if you listen to the noise and LED of your HD you know it's still active.
 If
your Scenarist settings in Scenaid were Import/Compile/Close then Scenarist
will compile the project and close itself. Control is passes back to Scenaid.
Skip to Putting it all back together
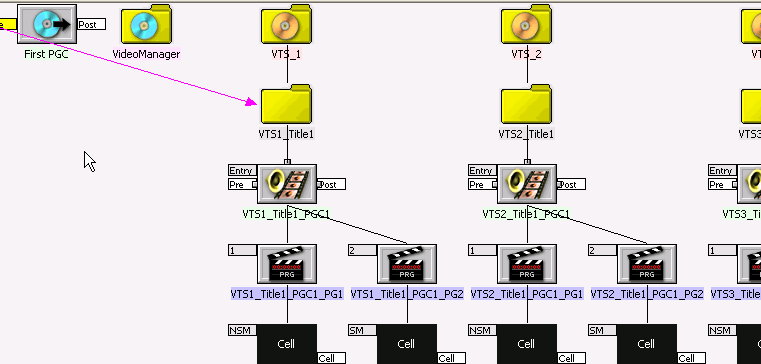
 If
Scenaid doesn't find a file (because it hasn't been encoded or because something
else went wrong), you'll notice a placeholder symbol. Such a track may contain
certain tracks but it doesn't contain video.
 A
track that is okay will look like this.
Just in case, you can go into each track (just double click on the gray rectangle)
and see if all audio and subtitle tracks are present.
You can also take a look at the scenario on the scenario tab and be glad this
is created automatically.

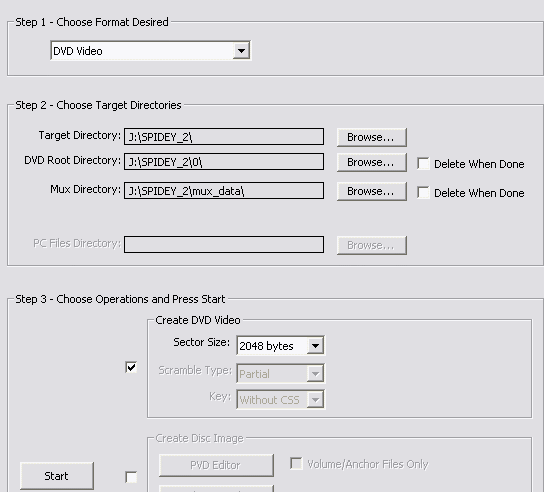
If everything is in order you can go to the Layout editor:

Target Directories should be filled out according your selections when you created the project.
All that remains to be done is check the first checkbox in the Step 3 - Choose Operations and Press Start section, then press Start and wait for completion.
Step 5: Putting it all back together
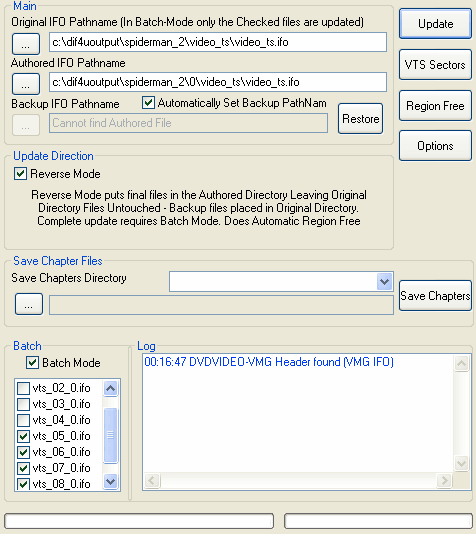
Now start up BatchIfoUpdate.
 Original IFO Pathname is the VIDEO_TS folder in the ../working dir.
In this example C:\DIFOUTPUT\SPIDERMAN_2\VIDEO_TS
The Authored IFO Pathname is located in the corresponding VIDEO_TS folder that Scenarist has created. In this example it is located in C:\DIFOUTPUT\SPIDERMAN_2\0\VIDEO_TS
By default BatchIfoUpdate is started in Batch Mode. Be tankful for this, as it saves us the tedium of individually selecting each corresponding .IFO that we wish to update. If the process above is followed, BatchIfoUpdate will automatically select the .IFO files which need to be updated, however you can manually deselect/select which files are updated in the Batch window.
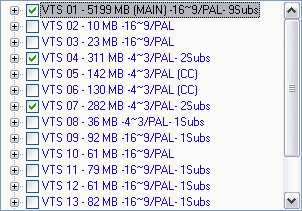
IMPORTANT: You only want to update the .IFO files that correspond to the VTSes that were demuxed/encoded. DO NOT update the dummy VTSes that Scenarist has created. What are the dummy IFO's that you don't have to update? If you have unchecked a VTS set in DIF4U, Scenaid will create an empty VTS set at its position so that you will not have to rename the output. If you removed a VTS in Scenaid then this IFO must be included (due to its small size Batch may not autoselect it).
Let me give you an example to outline this:

The movie I'm using to describe the procedure has multiple VTS sets. If I were
to uncheck VTS 02, 03, 05, 06, and VTS 08 through VTS 13, in DIF4U and do the
whole process again, the Scenarist output would contain a VTS 02/03/05/06 set
(files named VTS_0_*) which are very small. This is a dummy VTS that was only
created so that your reauthored VTS 04 and VTS 07 are "at the right place").
When you copy the files together, you'll notice that you'll already have VTS_02_*
files from the VIDEO_TS directory that DIF4U created, and will hence not copy
or update the VTS_02_* files that Scenarist has created to the common folder
when you run BatchIfoUpdate). Last but not least: NEVER!!! update the VIDEO_TS.IFO!!!.
Once you have confirmed which IFOs to update, then press the Update button
and press OK when asked for confirmation. (You have already set the correct
settings earlier)
Your SCENARIST output directory (in our example C:\DIFOUTPUT\SPIDERMAN_2\0\VIDEO_TS)
will now contain all of the correct files.
We can now Return