 Set
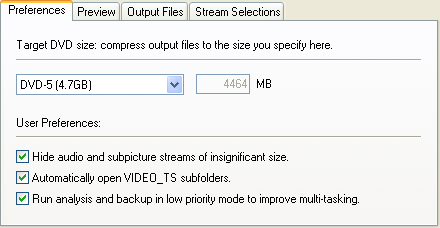
Target DVD Size to DVD-5 unless you want to store additional files on
the DVD, in which case you can select Custom from the dropdown list, then enter
a custom size.
Set
Target DVD Size to DVD-5 unless you want to store additional files on
the DVD, in which case you can select Custom from the dropdown list, then enter
a custom size.DVD Shrink 3.2 First time setup
Set
Target DVD Size to DVD-5 unless you want to store additional files on
the DVD, in which case you can select Custom from the dropdown list, then enter
a custom size.
Checking Hide audio and subpicture streams of insignificant size will spare you some grief trying to figure out where all those audio / subtitle streams came from in the global overview of some DVD discs so make sure it's checked.
Automatically open VIDEO_TS subfolders will save you a path selection click when using pre-ripped files. You won't have to select the VIDEO_TS folder but it's enough to select the folder that contains the VIDEO_TS folder (so for instance if you ripped a movie to like d:\dvd movies\VIDEO_TS, you'd only have to select d:\dvd movies\ as path in DVD Shrink and it would automatically open the files contained in d:\dvd movies\VIDEO_TS).
If you plan on using your PC during encoding, check Run analysis and backup in low priority mode to improve multi-tasking. But if you end up not using your PC this won't make things slower.
Then proceed to the preview preferences:
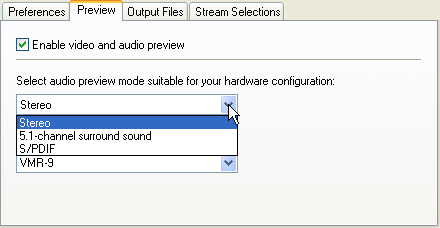 Make
sure Enable video and audio preview is checked so that you can preview
contents on the disc to find out what is what.
Make
sure Enable video and audio preview is checked so that you can preview
contents on the disc to find out what is what.
Then you can select a default audio configuration for the preview. If you have your stereo connected via S/PDIF select S/PDIF, if you have an analogue 5.1 output select 5.1-channel surround sound.
Then we have the DirectX video renderer. The default VMR-9 renderer allows other software (like a software DVD player) to access the video hardware at the same time, which can be rather CPU intensive. Thus, if playback becomes choppy or audio starts skipping during preview, select another renderer. Both VMR-7 and Overlay Mixer should be faster.
Then go to the Output Files preferences:
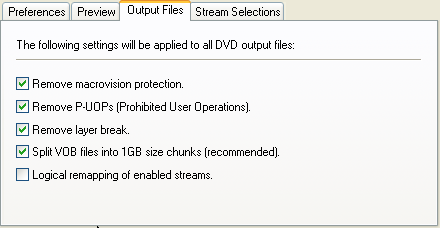 Remove
Macrovision protection disabled the Macrovision flag on the output.
Remove
Macrovision protection disabled the Macrovision flag on the output.
Remove P-UOPs removes prohibited user operations (P-UOPs force you to go back to the menu to change the language or force you to watch a trailer before the movie because the skip buttons have been disabled).
Remove layer break removes the small pause in between layers that you have on a dual layer DVD.
You most definitely want to leave Split VOB files into 1 GB size chunks checked because otherwise your output won't be DVD compliant and your standalone player might refuse to play the movie.
Logical remapping of enabled streams will remap audio and subtitle stream numbers in the IFO file. So if you have disabled stream number two, stream 3 on the original disc now becomes stream number 2, etc. That way, you shouldn't even notice that there are some streams mussing, but this doesn't always work.
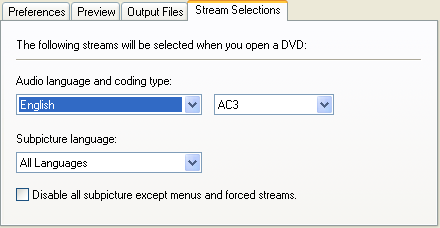 Here
you can set defaults for desired audio and subtitle changes. The way I have
set it up, I'll only get English AC3 audio channels, but subtitles in all languages.
Unfortunately, it is only possible to select one preferred language so far.
Here
you can set defaults for desired audio and subtitle changes. The way I have
set it up, I'll only get English AC3 audio channels, but subtitles in all languages.
Unfortunately, it is only possible to select one preferred language so far.
If you don't want any subtitles, check Disable all subpictures except menus and forced streams.
Finally, the File I/O settings:
 You
can try and check Enable overlapped I/O to increase the ripping performance
of DVD Shrink.
You
can try and check Enable overlapped I/O to increase the ripping performance
of DVD Shrink.
If you have Nero installed, Enable burning with Nero also comes in handy as DVD Shrink can automatically burn your backed up DVDs using Nero.
If you're working with DVD±RW media a lot, you might also want to check Always erase non-empty RW media without prompting.
Then press OK to get back to the main screen.
If you fancy different buttons, you can select Edit - Toolbar buttons and select a different set of buttons and / or change the font of the button text.
