DVD Shrink 3.2 - Joining multiple discs
If all you want to join multiple discs, you must press the Re-author button:
![]()
In the left part of DVD Shrink you'll now see a list of all titles available on the DVD. Select the main movie and drag and drop it to the left part of the window:
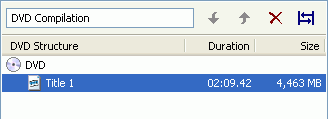
As you can see, the new DVD you're about to create now contains Title1 - the Main movie.
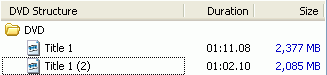
Now browse to the 2nd movie you want to put on your DVD±R (or turn the disc if you're joining a flipper) in the right side of the DVD Shrink window (the DVD browser tab) and select the 2nd movie / 2nd part of the movie. Note that for the join to work, both sources must be available to DVD Shrink at all time. Therefore, you either must have two DVD drives and must put each disc into a separate drive, or if you only have one DVD drive, you must rip one disc and mount it as virtual DVD drive. If you have a flipper disc, only the latter option is doable. Then drag and drop the main movie from the 2nd disc to the left part of the DVD Shrink window. Now as you can see we have two Title 1, both having roughly the same length and size.
Then click on the DVD folder and configure the audio and subtitle streams by selecting the Compression Settings tab on the right:
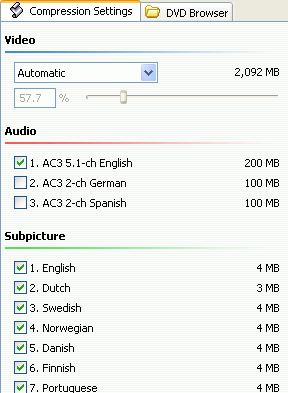 Disable
all audio and subtitle tracks you don't need as usual.
Disable
all audio and subtitle tracks you don't need as usual.
As the movie(s) still has to be compressed even when removing all but one audio stream, we can cut out parts of the movie, like the credits, to further reduce the size. To do this, press the Start/End button.
![]()
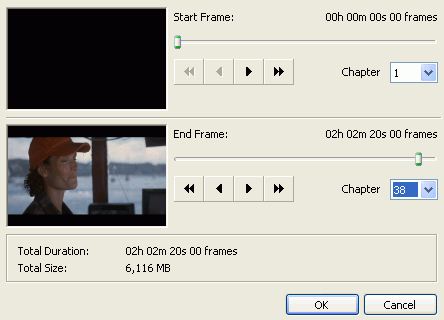 This
is pretty straightforward. You have two preview windows, the upper one indicating
your start position, and the lower one indicating the end position. On the right
of both windows you have some controls that allow you to set a start, respectively
end point for the movie.
This
is pretty straightforward. You have two preview windows, the upper one indicating
your start position, and the lower one indicating the end position. On the right
of both windows you have some controls that allow you to set a start, respectively
end point for the movie.
You can either use the slider to set a start/end position, or use the available chapter dropdown list to select the position.
The example shown in the screenshot would include chapters 1 - 38 in the output. The movie has 39 chapters and chapter 39 contains the credits so I excluded it.
Press OK to make your selection permanent.
Note that if you have joined a flipper, you'll still have a short interruption
in the middle. In the case of two movies on one DVD±R, there will be
the same interruption between the two movies.
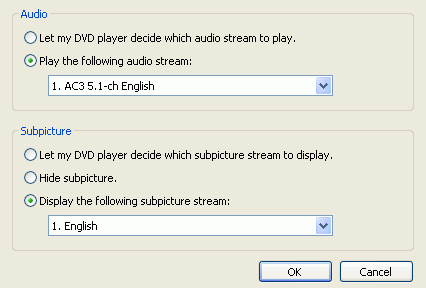
Last but not least, you can set the audio and subtitle channel that are active by default. To do so, right click on a title and select Set Default Streams...
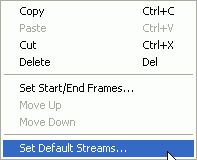
And then select a default track from the dropdown list:
 Press
Ok once you're done.
Press
Ok once you're done.
Now you're ready for encoding.
This document was last updated on
December 30, 2004