 If
you've ripped the DVD to your harddisk, select Hard Disk as source, if you have
an on-the-fly tool (or have ripped and mounted a DVD as virtual disc), select
the appropriate disc drive.
If
you've ripped the DVD to your harddisk, select Hard Disk as source, if you have
an on-the-fly tool (or have ripped and mounted a DVD as virtual disc), select
the appropriate disc drive.Instant Copy 8 guide
InstantCopy was one of the first compressed domain transcoders to enter the marketplace. It has already undergone a major revision and is the tool for which the most add-ons have been written. Furthermore, InstantCopy is constantly rated in the top spots when image quality is concerned. This is due to a two pass encoding scheme (so encoded content has to undergo a quality checking process and might be re-encoded if the quality isn't good enough) which is unique in such tools (to my knowledge). But this process also makes the program the slowest one on the market, so Pinnacle has added a new high speed encoding mode, where encoding speed is comparable to other tools, but where the quality checking process is no longer used, so the output might not always be as good.
You'll need the following software for this guide:
Pinnacle
InstantCopy 8
DVD Decrypter
Step 1: Rip the DVD
InstantCopy will refuse to process any DVD that is encrypted. Hence, any DVD to be processed with InstantCopy will first have to be decrypted. You can do this using either DVD Decrypter, or you can skip this step if you have an on-the-fly decryption software like Slysoft's AnyDVD or DVD Region-Free.
Step 2: Transcoding
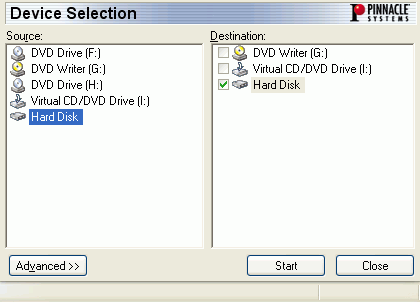
If you start up InstantCopy, you'll be greeted with the drive selection (note that I have disabled skinning for InstantCopy via the option in the InstantCopy - Tools folder):
If
you've ripped the DVD to your harddisk, select Hard Disk as source, if you have
an on-the-fly tool (or have ripped and mounted a DVD as virtual disc), select
the appropriate disc drive.
Select Hard Disk as destination unless you want to directly burn the result. Personally, I prefer to store the output on my harddisk first and properly check the output before burning it, but you might prefer a direct burn.
Before you start for the first time, also press the Advanced button.
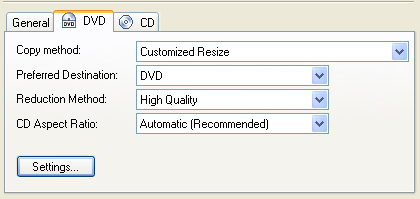
Since I selected Hard Disk as source and destination, I only have 3 tabs, you might have more when your source and / or destination is a DVD drive.
Make sure that the temporary path in the General tab is set to a place where you have enough space.
The rest of the interesting options are in the DVD tab:
Copy method allows you to select if you want to keep the main movie only (Main Movie Only) if you want to keep everything and not manually reconfigure (Automatic Resize), if you want to make a 1:1 copy (Direct, don't use that option, refer to the DVD5 -> DVD-R guide for a direct copy) or set Copy method to Customized Resize to manually control what content will be kept, and to be able to manually change the compression ratio for each movie item you're going to keep.
Set Preferred Destination to DVD. InstantCopy can also create VCDs or SVCDs but this guide is about DVDs).
The Reduction Method refers to the two different encoding modes I've mentioned in the introduction. High Quality is the slower two pass method with quality checking, High Speed is the faster one pass process. Not that this is only a default, you can still adjust the mode for each movie item or globally for any project you make (that is as long as you have set Copy method to Customized Resize). Note that if you set Reduction Method to Automatic, InstantCopy will use the High Speed method if an item is shrunk by 10% or less, above that compression ratio, High Quality is used.
Leave the CD Aspect Ratio to Automatic. If your output looks squashed (certain 16:9 disc contain authoring errors that incorrectly identify them as 4:3 discs), you'll have to redo your project and choose the proper CD Aspect Ratio manually.
Then press the Settings button.
 In
the Audio Streams and Sub titles tab, you can check any audio
and subtitle streams you want to exclude from your backup projects by default.
Personally, I think going the reverse way would be much more useful (and other
programs do it that way) so I have no use for those options, but if you want
to exclude anything but those you certainly want (then you'll have a problem
if none of those are present and you'll never get to see the ones that are present),
be my guest.
In
the Audio Streams and Sub titles tab, you can check any audio
and subtitle streams you want to exclude from your backup projects by default.
Personally, I think going the reverse way would be much more useful (and other
programs do it that way) so I have no use for those options, but if you want
to exclude anything but those you certainly want (then you'll have a problem
if none of those are present and you'll never get to see the ones that are present),
be my guest.
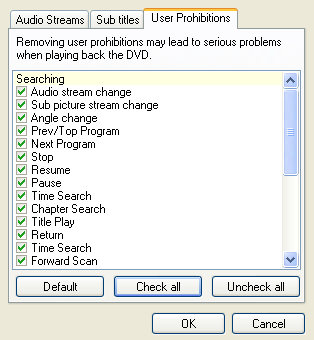
The User Prohibitions tab is useful again. Here, you can opt to disable any User Prohibitions that might be present on the original disc. User Prohibitions are options that the DVD standard offers, but are disabled on certain DVDs (that is done on purpose to upset you with stupid advertising at the beginning of the disc ;). Maybe checking everything is going a bit too far, but the Prev / Next buttons are prime candidates for re-enabling (because you'll need those to skip content you don't want to see).
Once you're done, press OK to get back to the main screen, then press Start to start processing.
InstantCopy will ask you for the source file first (this is your VIDEO_TS.IFO
file that you ripped in step 1). If you have selected a drive instead, you won't
be asked this question. The next question concerns the name and path of your
output. InstantCopy will split the output in 1 GB large .pdi files (which are
essentially split image files).
If you've not chosen Customized Resize, InstantCopy will go right to work now. Otherwise, you'll see the following screen:
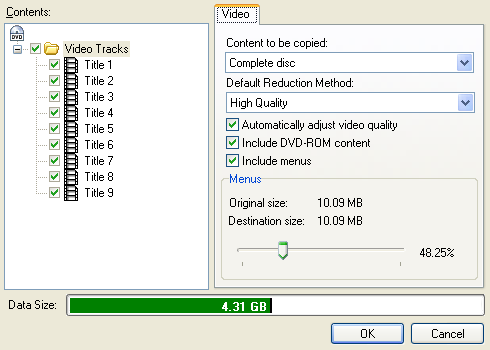 In
the Contents part of the window, you'll see all video tracks on the DVD,
and additional data content in separate folders (if there is any).
In
the Contents part of the window, you'll see all video tracks on the DVD,
and additional data content in separate folders (if there is any).
In the Video part, you'll see details of the currently selected folder (you select a folder or Title on the left). As it is shown right now, you can configure the entire output as one. If you select a Title, you'll see different options (we'll get to those in a second).
At the bottom you see the Data Size slider. It is quite straightforward: As long as the slider is green, your project should fit on a DVD±R/W disc, if it is red, your project will no longer fit.
Using the Content to be copied dropdown list, you can select if you want a main movie only project (Main Movie only), a project containing everything (Complete disc) or if you want to get rid of certain video items (User defined).
You can also override the global reduction method chosen in the advanced settings. Set Default Reduction Method to whatever method you prefer. This will apply to the project at hand, but you can still override the setting when you descend on a title level.
Keep Automatically adjust video quality checked. That way, even if you manually modify the compression factor for a title, the other title's compression factors are automatically updated and you won't have to worry about getting an oversized project.
Is suggest you should do is uncheck Include DVD-ROM content (unless you actually like that content.. I've looked at such content once and it turned out to be not interesting and very crash prone) to save some space for the video.
Unless you want to get rid of the menus (suggested only for a main movie only project), keep Include menus checked.
As you can see, by clicking on the Video Tracks folder, you can not only configure the project globally, you can also configure the Menus. If you look at the slider above the size bar, you'll see that the overall compression factor is 51.75% (100 - 48.25% .. the latter value represents the percentage of the original size). You'll also see that the Menu destination size is 10.09MB, the same as the original size. The slider in this screen seems to serve no purpose, because moving it doesn't change the menu's destination size (missing program code perhaps?).
Now click on a Title in the left part of the window:
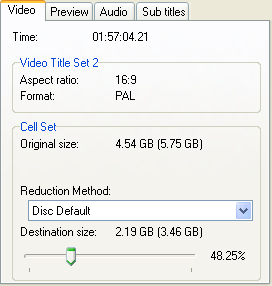 You'll
see information about the play time, aspect ratio, format and original size
of the item you've selected.
You'll
see information about the play time, aspect ratio, format and original size
of the item you've selected.
As you can see, you can set the Reduction method of each item separately. If you set it to Disc Default, the default you've configured a second ago will be taken (recall that we used High Quality).
Here you can actually use the slider to change the destination size. Move it to the left and you'll reduce the destination size, move it to the right to increase the destination size (and reduce the compression factor). Since we've checked the option to automatically adjust the video quality, the compression factor for all other items will automatically be adjusted when you move a slider.
When in doubt about the content of a title, just click on the Preview tab and preview the video.
The Audio and Sub titles tab allow you to see all available audio and subtitle streams of a Title, and to remove some if you don't like them.
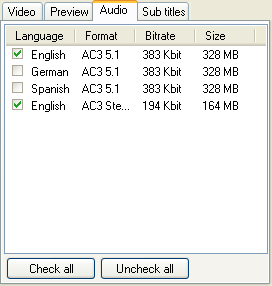 Here
you'll see the available audio channels of the first title (the main movie in
this case). I've decided to keep the English soundtrack and the director's commentary
track as well (note that the bitrate is slightly off.. the 5.1 tracks should
be 384 kbit/s and the 2 ch track should be 192kbit/s).
Here
you'll see the available audio channels of the first title (the main movie in
this case). I've decided to keep the English soundtrack and the director's commentary
track as well (note that the bitrate is slightly off.. the 5.1 tracks should
be 384 kbit/s and the 2 ch track should be 192kbit/s).
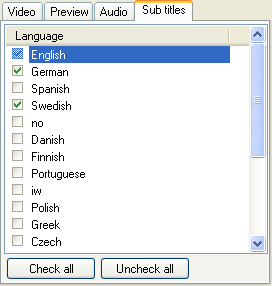
Do the same for the subtitles.
Now repeat this process for every title. If you don't want a title, simply uncheck its checkbox and it will not be included in the output.
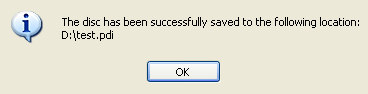
Once you're done configuring press OK to get started. Depending on the chosen Reduction Method, it will take 20-30 minutes (High Speed) or 1-2 hours (High Quality). Once InstantCopy is done, it'll remind you of where it stored the output:
Step 3: Burning the DVD
All that remains to be done now is burn the .pdi files InstantCopy generated. This can be done in DVD Decrypter.
Step 4: Advanced procedures
I've already mentioned it in the beginning: There are a lot of 3rd party tools for InstantCopy, both to make your life easier, and to give you more control over the process. The probably most useful utility for InstantCopy is the InstantCopy Hidden Settings Editor, which allows you to configure various internal parameters, like the amount of the movie to be analyzed, what movie items are not analyzed, it allows you to run multiple sessions in batch mode, and has a mode in which you can really launch InstantCopy as a one click tool and won't have to go through all the screens.
This guide was last updated on March 18, 2005