Spruce DVDMaestro
Maestro is one of the truly professional DVD authoring applications. As Scenarist
it's hard to get without a full DVD workstation (which basically would be a
high end computer that you can probably get on your own for a much lower price)
plus a high quality MPEG-2 encoder card with interfaces for studio grade input.
Maestro is often being considered as the more accessible application and whoever
has used Scenarist or even read its manual will have to agree that Scenarist
is a real bitch to learn. Maestro is much more straightforward and after studying
the manual you will be able to create a reasonable complex DVD project without
too much effort.
Still, DVD authoring is a complex thing to do so this walkthrough may come
in handy. As an example I'm going to re-author the R1 DVD Romeo Must Die. I'm
going to include both audio tracks (English and French, both DD5.1) and both
subtitle tracks, the animated main menu, all chapter selection menus and the
audio/subtitle selection menu. Adding the extra menus would basically be the
same operation so once you know the basis you should have no problem figuring
this out on your own (and the Maestro manual will help you,too).
You will need the following software for this guide:
Spruce DVDMaestro (no demo available and this is not a warez site so don't
bother asking)
ChapterXtractor
Subadjust
Subrip
MaestroSBT
Step 1: Preparing the sources
Probably the most time consuming of all steps. You need all your still menus
as 24bit bitmaps in the appropriate size (720x480 for NTSC, 720x576 for PAL),
all your AC3 streams having the right length, your animated menus encoded as
DVD compliant streams, your main movie and the subtitle overlay templates. Simplified,
menu buttons work like this in DVD authoring: You have a static or moving background.
Then you overlay a 4 color template over that background and you associate 3
colors including a transparency value to every color of the template. The 3
colors represent the 3 states a button can have: inactive, active and activated
(corresponds to pressing the enter button on your remote once a button has been
selected using the up/down/left/right buttons). Normally you won't show the
button areas when they're not selected but the background will contain some
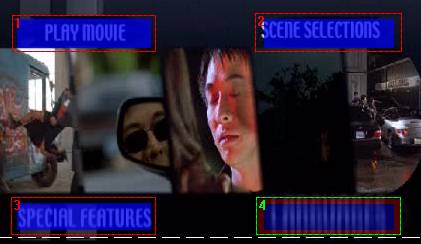
writing that tells you that there's a button. For instance on the main menu
you have "Start movie", "Chapter selection", "Languages"
and "Special features". If you're confused by that description just
keep on reading, there will be graphical examples that will show this again.
Last but not least you need the subtitles. Subrip
can output directly to the Maestro format so it's our first choice.
Step 2: Authoring the DVD
Start up Maestro. First you want to import your sources (called Assets in Maestro).
To do that, right click in the bottom right part of the screen (the asset window)
and select Import Media Assets.
 Select
all your .m2v, .ac3 and .bmp files. Subtitles are imported using a different
procedure.
Select
all your .m2v, .ac3 and .bmp files. Subtitles are imported using a different
procedure.
 Maestro will then check each and every of your assets and complain if something
is not okay. If there's something about a broken AC3 frame in the menu part
you should be able to ignore that.
Maestro will then check each and every of your assets and complain if something
is not okay. If there's something about a broken AC3 frame in the menu part
you should be able to ignore that.
Next we set some general options of our project. On the left part of your screen
you will see a CD and Untitled Project to the right of it. Click on it twice
slowly and you'll be able to change the name of your project.
 Then
right click on it and select properties.
Then
right click on it and select properties.
 Select
your TV system and parental control level. I set my menus to 16:9 so they will
show up the same on every TV. Forcing them to pan&scan could cut off a part
of the menu which I don't want.
Select
your TV system and parental control level. I set my menus to 16:9 so they will
show up the same on every TV. Forcing them to pan&scan could cut off a part
of the menu which I don't want.
In the replication tab you can also set the disc region. The default is Zone
1-6 meaning it will work in any player.
Now double click on Movie 1 below the project name that you set just a second
ago. Then drag and drop the main movie file from the asset window to the Movie1
window that opened when you double clicked on Movie 1. Then do the same with
your audio tracks.
 These
are the main parts of the Maestro Movie timeline. As you can see by default
the movie has one chapter and the first frame of it is being shown.
These
are the main parts of the Maestro Movie timeline. As you can see by default
the movie has one chapter and the first frame of it is being shown.
I've already added two audio tracks to the appropriate positions.
Click on an audio track, then right click and select Language from the popup
menu.
 In
the menu that will appear now you can select the language of your audio track.
Repeat that for every track.
In
the menu that will appear now you can select the language of your audio track.
Repeat that for every track.
Then right click on the Abc area below the Audio streams area and select Import
subtitles from the popup menu.
 Select
your .son file and let Maestro process import the subtitles.
Select
your .son file and let Maestro process import the subtitles.
Now that all the elements of the main movie are there let's set the aspect ratio.
2 screenshots above you can see the 4:3 at the bottom of the movie window. Double
click on it:
 Select
16:9 Letterbox from the list or leave it at 4:3 if your movie is 4:3. 16:9 Pan-Scan
won't do you any good unless you have a special MPEG-2 stream that contains
pan & scan motion vectors that would let the player to pan&scan on the
fly. This feature is almost never used on commercially available DVDs.
Select
16:9 Letterbox from the list or leave it at 4:3 if your movie is 4:3. 16:9 Pan-Scan
won't do you any good unless you have a special MPEG-2 stream that contains
pan & scan motion vectors that would let the player to pan&scan on the
fly. This feature is almost never used on commercially available DVDs.
Now let's set the chapters. If you load the main movie .ifo file in ChapterXtractor
you'll get something like this:
Then click on the Format tab and define a Maestro compatible format:

%hh:%mm:%ss:%cc is what Maestro expects. Once the conversion has been made,
copy and paste all lines to Notepad. Then add $Spruce_IFrame_List on top and
insert an empty line between that keywoard and the first timecode. Here's an
example of a finished chapter list file:
$Spruce_IFrame_List
00:00:00:00
00:03:42:50
00:10:01:43
Save this as chapters.chp. Make sure you set the Save as type: to All Files
or the extension .txt will be added as well.
To import the chapterlist click on the movie timeline:

But first let's configure the Chapters. To do that right click on this timeline
and select properties:
 Set
Auto-Name to Index based and the next time you create a chapter it will be named
Chapter X where X is the last currently existing chapter plus one. If you prefer
another name prefix than just Chapter you can set it here, too.
Set
Auto-Name to Index based and the next time you create a chapter it will be named
Chapter X where X is the last currently existing chapter plus one. If you prefer
another name prefix than just Chapter you can set it here, too.
Then right click on the timeline and select import chapter list and select your
chapterlist.
 Here
you can see the result of our action. At the appropriate point in time a chapter
marker will be set and the frame in question will be shown.
Here
you can see the result of our action. At the appropriate point in time a chapter
marker will be set and the frame in question will be shown.
The next step is creating our menus. To do that double click on Menu 1 in the
project overview on the left side of the screen:
Note
that you can easily rename a menu by clicking on it twice (but slowly, as you
would in explorer).
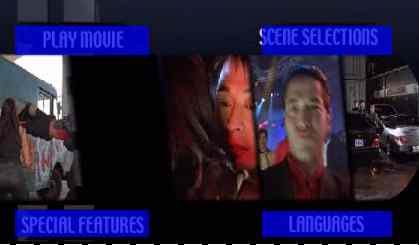
This will open a new menu authoring window. In the beginning that window will
be empty. Drag and drop your main menu video file into the white area of that
window.
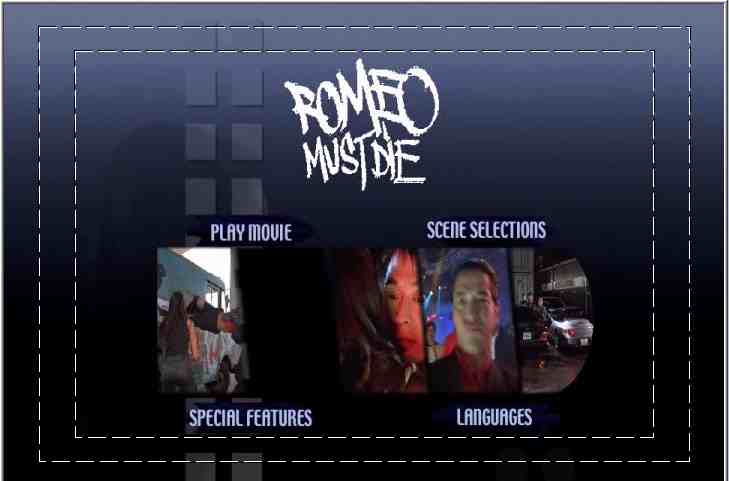
This is my main menu. As you can see I need 4 buttons. Now we come back to
the way menus are being done in DVD authoring. What I need is a template file
that matches the 4 button areas. Here's how that file looks:
 This
is only a small part of the whole bitmap file, the rest is basically white.
If you overlay this file over the image shown below you will see that the black
parts will over the writing. This is exactly what we need.
This
is only a small part of the whole bitmap file, the rest is basically white.
If you overlay this file over the image shown below you will see that the black
parts will over the writing. This is exactly what we need.
Every part in a menu that is selectable needs to be covered by the subtitle
overlay image. And you can have a maximum of 4 different colors in that subtitle
overlay file. There also must be no overlap between two buttons.
Now let's see what happens if I drag and drop my subtitle overlay file on the
menu screen:
 Not
perfect but you can see where we're going here. Apparently the default color
mapping maps black to a slightly transparent blue. We can of course change this
as we like later on.
Not
perfect but you can see where we're going here. Apparently the default color
mapping maps black to a slightly transparent blue. We can of course change this
as we like later on.
For now let's draw the buttons. Left click on the image, keep the button pressed
and you'll see that you'll be drawing a rectangle on the screen. Draw such a
rectangle over each button.
It doesn't matter if the rectangles aren't perfectly accurate as long as they
do not overlap or are outside the safety zone that's being shown by the two
white rectangles on screen.
 Here's
the result after drawing the buttons. As you can see the buttons get a number
automatically which will help us identify them later on.
Here's
the result after drawing the buttons. As you can see the buttons get a number
automatically which will help us identify them later on.
Now let's have a look at the global menu options:
 Button
preview tells you what color you will see, the selection color (what you will
see on screen if a button has been selected) or the action color (what you will
see when you press enter on the remote).
Button
preview tells you what color you will see, the selection color (what you will
see on screen if a button has been selected) or the action color (what you will
see when you press enter on the remote).
View Layer indicated what layer you will see, you can select either background,
Subpicture (that's the overlay template) or both.
Also set the aspect ratio of your menu accordingly.
Now let's have a look at the colormapping:
 As
you can see, Red in the subpicture overlay file is mapped to a back color. The
slider represent transparency settings. 15 means opaque, 0 means completely
transparent.
As
you can see, Red in the subpicture overlay file is mapped to a back color. The
slider represent transparency settings. 15 means opaque, 0 means completely
transparent.
As we only have 2 colors for the main menu overlap we only have to configure
black and white. As you can see I set the subpicture color associated to black
in the subtitle to blue but transparent so you won't see the buttons as long
as they're not activated, which is good as we have the writing on the menu background
already. Then when a button is selected I have a almost transparent dark blue
color and when a button is being pressed I have a half opaque gray color.
For the white I've only set the subpicture color to completely transparent.
As there are no buttons in the white area I don't have to worry about the Button
selection and Button action color. But just to demonstrate what the Subpicture
color has for effect let's move the Subpicture slider for Color Map 4 to the
left:
 As you can see the background turns red and would be completely red if I moved
the slider all the way to the right.
As you can see the background turns red and would be completely red if I moved
the slider all the way to the right.
 You
can have Maestro auto-set a reasonable configuration by going to the Advanced
tab and select auto assign. Then come back here and let's review what has been
done.
You
can have Maestro auto-set a reasonable configuration by going to the Advanced
tab and select auto assign. Then come back here and let's review what has been
done.
The Navigation part is what interests us. Number 1 is in the middle which means
that we're looking at the settings for button 1. Pressing up or down on the
remote will go to button 3, pressing left and right to the button 2. Scroll
up to see which button is where and you'll see that this isn't bad ad all.
 Then
go to playback control. Here you can set how the menu behaves. As this is is
a motion menu we want it to loop. Move the slider to the point where all the
menu options are visible to set the start point for the highlighting.
Then
go to playback control. Here you can set how the menu behaves. As this is is
a motion menu we want it to loop. Move the slider to the point where all the
menu options are visible to set the start point for the highlighting.
This works as follows: The first time the menu will start playing from the
beginning. Once it reaches the point of the slider the highlight buttons will
be shown (in other word, the subtitle overlay template will be activated and
you can navigate the menu, before that you can't do anything). Once the menu
has reached the end it will start playing again from the point of the slider
so you'll be able to make a menu selection immediately.
Last but not least don't forget to drag and drop the appropriate menu soundtrack
file to the menu. Then your main menu is done.
Now let's create the language selection menu. This menu has the following options:
Select the audio track, select the subtitle track or deactivate subtitles. As
usual you need a subtitle overlay mask that matches the writing on the menu.
This time we have a still menu so set the End state in the playback control
part to Still.
You can add a new menu by right clicking on the menu folder on the left part
of the screen and select Add new menu.
The give the new menu a name and double click on it to bring up the menu creation
window, then drag and drop the appropriate background image to the menu creation
window.
Then drag and drop the subtitle overlay file onto the menu, set up your color
mapping, then select the first button.
Now to go Buttons tab and associate the English audio file to it.
 In
my case this is the first audio stream. Then select the first button and associate
the 2nd audio file to it.
In
my case this is the first audio stream. Then select the first button and associate
the 2nd audio file to it.
Then select the button for English subtitles and that time check Set Subtitle
to rather than Set Audio to. Set the stream to 1 and check On. For the French
subtitle button we do the same but select subtitle stream 2. Finally, the button
to switch off the subtitles is set to Set Subtitles To 1 but On is NOT checked,
which effectively disables the subtitles.
 Last
but not least you may want to be able to return to the main menu so define a
button, select it, then right click over it. From the dropdown menus you select
Menus -> Menu1 (which is my main menu) -> Menu1: Button1.
Last
but not least you may want to be able to return to the main menu so define a
button, select it, then right click over it. From the dropdown menus you select
Menus -> Menu1 (which is my main menu) -> Menu1: Button1.
This will return you to the main menu and button 1 will be selected by default
(this would be the button to start playing the movie). You can set it to any
button or no button at all.
Now let's create the chapter selection menus. Create a new menu as usual and
bring up the menu creation screen and drag and drop your source bitmap there.
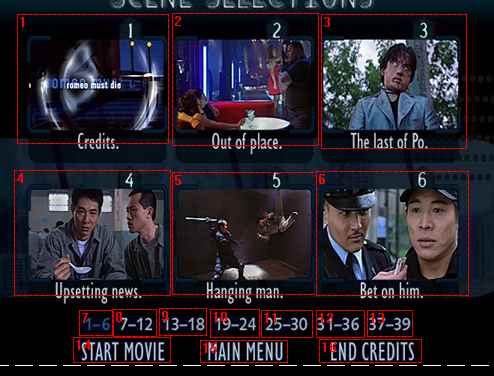 As
you can see this menu is slightly more complicated as it has 15 buttons in total.
As
you can see this menu is slightly more complicated as it has 15 buttons in total.
After having drawn all the button select one of the scene buttons, right click
on it, select Movies -> Movie1 -> Movie1:Chapter1, and repeat this for
every other chapter (of course you will want to link them to the appropriate
chapter rather than to chapter 1).
Then link the Start Movie button to the first chapter, too, and the End credits
button to the last chapter. Also link the main menu button to the main menu
as we did before in the audio menu.
As we don't have the other chapter selection menus yet you cannot yet link
these buttons. I created a button for 1-6 as well, so it will be visible which
chapter page is being shown at the moment but that button will not be mapped
to any action.
Now let's have a look at the subtitle overlay image for this case:
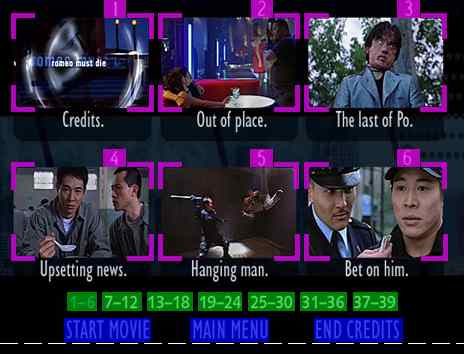 As
you can see I opted for several different colors in this case.
As
you can see I opted for several different colors in this case.
You can clearly see which parts of the screen will be highlighted. Now let's
have a look at the colormapping:
 The
4th subtitle color would be white of course which is set to be transparent for
every case. The red part is to select an actual chapter and shown in pink
on the screen but later on I turned that off. So when a chapter is selected
there'll be a gray border around it, and when you activate it it will be a green
border, both not fully opaque. The 3 buttons at the bottom will be blue and
gray as usual and the chapter page selection button will be slightly green.
The
4th subtitle color would be white of course which is set to be transparent for
every case. The red part is to select an actual chapter and shown in pink
on the screen but later on I turned that off. So when a chapter is selected
there'll be a gray border around it, and when you activate it it will be a green
border, both not fully opaque. The 3 buttons at the bottom will be blue and
gray as usual and the chapter page selection button will be slightly green.
After creating this first menu you will create more chapter selection menus.
As they will contain mostly the same buttons, just different mappings there's
a way to duplicate a menu. From the project overview window you will select
the first chapter menu, right click on it and select duplicate menu.
 This
will create a 1 to 1 copy of the menu you've just created. Now double click
on the new menu, drag and drop the new background to it and assign all buttons
accordingly.
This
will create a 1 to 1 copy of the menu you've just created. Now double click
on the new menu, drag and drop the new background to it and assign all buttons
accordingly.
Then repeat procedure for every chapter selection menu. Of course you can also
delete buttons from duplicate menus.
Once you've created all the chapter selection menu you can now link them among
each other as shown before when I linked the language menu to the main menu.
Then you will also want to link the other buttons of the main menu to link
to the first chapter of the movie, the language menu and the first chapter selection
menu respectively.
Then we have some more assigning work to do. Right now our disc doesn't start
anywhere. I want the disc to start with the main menu. To do this double click
on the command sequences folder on the left part of the screen.
 I
set First Play to the Main menu so that the disc will display the main main
upon insertion. I also set the Title menu button to the main menu. As you can
see there's lots of configuring to do. You can configure almost any key in any
situation.
I
set First Play to the Main menu so that the disc will display the main main
upon insertion. I also set the Title menu button to the main menu. As you can
see there's lots of configuring to do. You can configure almost any key in any
situation.
If you right click in this screen and select Show advanced sources you can
configure even more but most of this is not really necessary.
Here's another example showing our buttonmapping for a chapter selection menu:
The last thing we want to do is restrict user interaction. For instance, it
makes no sense that the user can press the audio button during a menu, or we
want that the only menu that can be called during playback is the main menu,
etc.
To do this for the main movie select it from the left part of the screen, then
right click on it and select properties.
 I
disabled a bunch of things that I think are not very useful during the main
movie playback.
I
disabled a bunch of things that I think are not very useful during the main
movie playback.
Here you can also see how Disney did the annoying audio change blocker. Just
select Audio Stream Change and you will have to return to the main menu to change
the language.
Then repeat this step for every menu but there you should be even more strict.
I basically checked everything but the Root Menu call and for the main menu
I deactivated everything.
Before you compile your project you may want to preview it.

To preview press the rightmost button from the list shown below. If you don't
have a hardware card or Maestro compatible software DVD player installed you
will not get any movie playback preview but you can still test the menu navigation.
 These
are the main controls. Movie Navigation, stream selection and Menu Navigation
will be disabled if you have no playback facilities, but press the first play
button and your menu will shown.
These
are the main controls. Movie Navigation, stream selection and Menu Navigation
will be disabled if you have no playback facilities, but press the first play
button and your menu will shown.
And you can change menus by clicking onscreen on the appropriate button.
 In
the advanced part of the preview you can see more options. For instance you
can verify here if selecting a different audio track via a menu really has some
effect, or if you can enable and disable subtitles via the menu.
In
the advanced part of the preview you can see more options. For instance you
can verify here if selecting a different audio track via a menu really has some
effect, or if you can enable and disable subtitles via the menu.
Once you've verified that everything works as desired you can compile the project
by pressing the barcode button (2nd from the left) from the following buttonbar:
You'll see the results of your compilation in the small part of the screen
at the bottom left. Once compilation has finished press the CD button to create
an image of your DVD that you can burn in your DVD burning software. Depending
on your hardware Maestro can also directly burn that image to a disc. It it
also possible Burning the compiled
files.
Thanks to The Incredible Bulk for submitting a basic Maestro tutorial that
I used as the basis for this guide. Credits for discovering the chapter list
format go to Eyes'Only.
This document was last updated on 09/07/02