
DVB to DVD-R guide
DVB, or Digital Video Broadcast, is on the way to become the standard for standard resolution digital TV. It is available in 3 subvariants: DVB-C (C for cable), DVB-S (S for satellite) and DVB-T (T for terrestrial). DVB-S is probably the most widely used, because it doesn't require cable to your home, and no terrestrial broadcast antennas as DVB-T does. DVB-T has just recently been introduced in countries like the UK and Germany but other countries are planning to change their analogue terrestrial broadcasts to DVB-T as well. DVB is also known on other continents, but mostly as satellite TV. In countries like the USA or Japan, digital TV is often realized via ATSC, and mostly relies on terrestrial antennas, though it is also available via cable and satellite.
Since most (or all) of toady's TV only have an analogue tuner, you need an external device called settop-box to receive DVB broadcasts. You connect these boxes to your satellite (or cable plug or the house antenna), and from there to the TV. Alternatively, you can buy a DVB card for your PC. These cards often have analogue video and audio outputs so you can connect your PC to your TV. The advantage of a PC based solution is that you'll have direct access to the content that is being broadcast. Since DVB is digital and uses the same audio and video compression formats (MP2 and AC3 for audio, MPEG-2 for video) and even the same resolution as a DVD, it is actually quite easy to do something with the content that is being broadcast. It is also possible to stream the digital video stream from a settop box, or to record it there (if your settop box has a built-in HD) and later transfer it to your PC. Obviously, you could also simply capture the analogue output from the settop box, but where would the fun in that be? If it is digital it should stay digital. That being said, let's get down to business. For now, we're going to stick to PC based hardware but if I can find any volunteers for settop box guides we'll go in that direction as well.
You'll need the following software for this guide
A DVB viewing and recording software
PVAStrumento or ProjectX
MPEG2Schnitt (that's German
for MPEG2Cut)
DVDPatcher
IfoEdit
DVDFab
Steps 1 - 4: Recording, Demuxing and Cutting
These steps are the same regardless of the output you're going to create (be it DVD, DivX or SVCD) so I have placed them all on a common page.
Step 5: Patching the video file (optional)
Not all DVB sources use the same horizontal resolution. Certain stations broadcast using lower resolutions, which are not DVD compatible. Your DVB software or hardware player will stretch the stream (for instance a 528x576 stream) to the proper playback resolution (720x576 for a PAL stream). While we cannot stretch an MPEG-2 video stream without re-encoding (only a playback device can do that, and obviously the decoded video data is stretched, not the original MPEG-2 data), we can trick DVD authoring tools into believing they're dealing with a proper DVD resolution. To do this, start up DVDPatcher and select your .mpv file. Then set the Horizontal Size to 720 and press Patch now!
DVDPatcher will come up with another window listing what will be changed, press Start to get the process started. Note that after importing your video files into a DVD authoring tool, you'll have to patch the video file back to its original resolution. And not every DVD authoring program requires this trick. For instance, the tools used in this guide do not require this step.
Step 6: Author the DVD
Obviously, there are many possibilities for this step, but for now we'll use the only freeware solution, IfoEdit. You can of course also use a commercial program. You'll find a list of DVD authoring guides here.
Once you've started up IfoEdit, select DVD Author, Author new DVD.
![]()
This process is very straightforward:
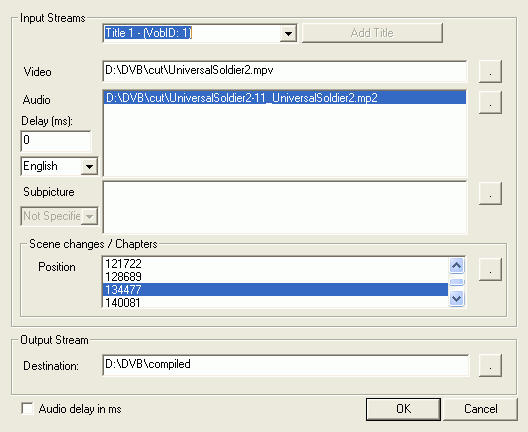 Press
the first single dot button to select your video stream, the 2nd button to select
your audio file(s). Then select each audio stream and set the appropriate language
from the dropdown list on the left.
Press
the first single dot button to select your video stream, the 2nd button to select
your audio file(s). Then select each audio stream and set the appropriate language
from the dropdown list on the left.
You won't have any subtitles so you can skip those.
Now for chapters. If you want chapters, you might want to reopen your cut video stream in MPEG2Schnitt and find some suitable chapter positions. Write down the frame number of those positions, then add them to a file called CellTimes.txt, one position per line. Here's a short example:
5626
11592
17771
22502
Then create those chapters by pressing the 4th single dot button and selecting your CellTimes.txt file.
Finally set an output path and press OK to start the authoring process.
In the end, your Destination directory will contain something like this:
02.02.2004 22:05         6'144 VIDEO_TS.BUP
02.02.2004 22:05         6'144 VIDEO_TS.IFO
02.02.2004 22:05        51'200 VTS_01_0.BUP
02.02.2004 22:05        51'200 VTS_01_0.IFO
02.02.2004 22:03 1'073'739'776 VTS_01_1.VOB
02.02.2004 22:04 1'073'739'776 VTS_01_2.VOB
02.02.2004 22:05   341'684'224 VTS_01_3.VOB
               7 File(s) 2'489'278'464 bytes
As you can see, this doesn't fill a DVD-R. In fact we could just add a second movie. You would process the 2nd movie just like the first one. Here are the contents of my 2nd movie: In case there's no room for a 2nd movie you can skip ahead to burning.
02.02.2004 22:13         6'144 VIDEO_TS.BUP
02.02.2004 22:13         6'144 VIDEO_TS.IFO
02.02.2004 22:13        43'008 VTS_01_0.BUP
02.02.2004 22:13        43'008 VTS_01_0.IFO
02.02.2004 22:11 1'073'739'776 VTS_01_1.VOB
02.02.2004 22:13 1'025'511'424 VTS_01_2.VOB
               6 File(s)  2'099'349'504 bytes
In total, that's below 4.37 GB and will thus fit on a single DVD. If you're slightly above DVD-R size, you could just use a one click tool to shave off some MBs to make the whole thing fit on a DVD. As long as the compression factor remains small (say below 15%), the quality loss won't be too visible.
Then, you have to rename some of the files. I took my 2nd movie and renamed it so that it looks like this:
02.02.2004 22:13         6'144 VIDEO_TS.BUP
02.02.2004 22:13         6'144 VIDEO_TS.IFO
02.02.2004 22:13        43'008 VTS_02_0.BUP
02.02.2004 22:13        43'008 VTS_02_0.IFO
02.02.2004 22:11 1'073'739'776 VTS_02_1.VOB
02.02.2004 22:13 1'025'511'424 VTS_02_2.VOB
In other words, I renamed every VTS_01 file to VTS_02. Now copy every VTS_01 and VTS_02 file to a common directory (and forget about VIDEO_TS.BUP and VIDEO_TS.IFO, you won't need them).
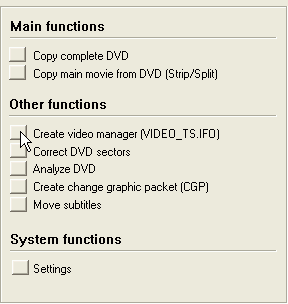
Then start up DVDFab and select Create video manager (VIDEO_TS.IFO).
 Then
select the directory where you copied all your files to, and press Continue.
Then
select the directory where you copied all your files to, and press Continue.
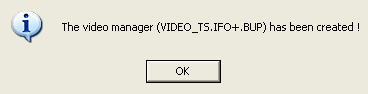
It will only take a second, then DVDFab will show you this message. As the message says, the missing VIDEO_TS.IFO and VIDEO_TS.BUP files have now been created.
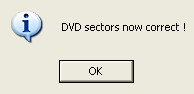
Back in the main screen, select Correct DVD sectors and press Continue (the
path will already be selected unless you have closed DVDFab in the meantime).
Now all that remains to be done is burn the DVD.
This document was last updated on April 14, 2009