DVB Basics
Step 1: Select a recording software
The first step is grabbing broadcast content and bring it to your harddisk. I obviously don't have every DVB card available so I stick to what I have: the TechniSat SkyStar2, a DVB-s card. This card is well supported and is quite cheap, but does not have an on-chip MPEG-2 decoder, so if you still have a Pentium 1, you might want to stay away from this card. Note that as time progresses and I find volunteers, guides for more cards will be added.
The SkyStar2 comes with a software called DVBViewer. DVBViewer is a full-featured DVB viewing and recording application, which is quite easy to use and will do just fine for starters. However, it is limited in a couple of ways, most notably (and that's not mentioned), it cannot record AC3 audio. While AC3 is not the standard format (yet), being able to record content that is broadcast in Dolby Digital (or even Dolby Digital 5.1) is a distinctive advantage. DVBViewer is also not capable of recording multiple audio streams at once (useful if a station broadcasts content in the original language as well as a dubbed stream). I'll only treat the basics of DVBViewer (searching for channels, recording), but there is an excellent English manual available at the DVBViewer site which I consider a must-read if you want to explore the full power of this software. DVBViewer supports recording separate elementary stream (video and audio separately), as well as MPEG-2 PS (program stream, a regular .mpg file) and PVA.
If you want AC3 capabilities for free, and/or have a different card, you might want to consider ProgDVB. It isn't as well-featured as DVBViewer, but it does its job and it's completely free. ProgDVB can record ES, PS and PVA.
Another option, and one I'm really fond of (in fact I made it my default DVB program despite it having some quirks that I hope will be ironed out one day) is DVBPortal. For me, it proved to be the fastest application in terms of channel switching (and being a member of the male gender I also like to zap around ;), and it can record multiple audio streams at once. It also supports AC3 and it is free. DVBPortal can record in the TS (Transport Stream) format.
Yet another option, though not a free one, is MyTheatre. MyTheatre has probably the longest list of supported hardware, ranging from cheap DVB-S cards like the Skystar2, to more expensive DVB-S cards like the Hauppauge Nexus card, but a variety of DVB-C and DVB-T cards are also supported. MyTheatre's recording format depends on the card used: mpg is always supported, pva requires a card that supports this recording format. AC3 recording is possible, but dual language broadcasts are not.
For a huge list of existing applications and card compatibility, please refer to this site.
Now, before you make your decision let's have a look at the possible recording formats: Most DVB recorders support the PVA format. PVA contains an MPEG-2 program stream, but contains additional timing information which can be used by special software to ensure that your audio and video will be in synch even when you have transmission errors. Therefore, I strongly suggest that you stay away from elementary streams and program streams. If you have perfect reception and never have any video breakups you can try PS, but bad things always happen when you least expect them.. TS streams are what is actually being broadcast. They contain all the information sent by a specific TV channel. In other words, if a channel is using multiple audio channels and you want to capture more than one at the same time, TS is the way to go. Note that the actual editing of the captured content (cutting out commercials), will remain the same regardless of the format.
So, use PVA for single audio channel recordings and TS for multiple audio channel recordings (or in case of DVBPortal you don't really have a choice).
Step 2: Record a DVB stream
Having selected a suitable software it's now time to get started. As previously announced, I'm going to treat DVBViewer, ProgDVB and DVBPortal. I'll mention channel search, special installation notes and how to capture but won't go into details of other operations the softwares support. If you have MyTheatre, read this guide instead.
If you have a Nebula DVB-T PCI card, check out this guide for recording instructions.
Step 3: Demultiplex the DVB stream
Now that you have either a PVA or TS file, it is time to extract the elementary streams (audio and video). You have two options here: PVAStrumento and ProjectX. PVAStrumento is easier to use, and should usually work fine, but ProjectX has proven to be more stable in my tests, and gives you about every option you could possibly desire (maybe one day I'll try to cover them all).
If you're wondering why the heck you're capturing to a single file, then split up the captured content in video and audio, I suggest you revisit step 1. We're not only demuxing in this step, we're also ensuring that our audio and video stay in synch even in the presence of transmission errors.
Step 4: Cut out commercials
Don't you love it when your favorite movie is interrupted by commercials? Well, we're gonna get rid of them now. Start up MPEG2Schnitt.
Select File - Open video/audio and select your demuxed video file (normally that's a .mpv file). Don't worry about the audio, MPEG2Schnitt will automatically open associated audio files as long as they have the same name (for instance movie.mpv and movie.ac3). The example shows just one MP2 audio stream but the procedure is the same for multiple audio files and or AC3 audio.
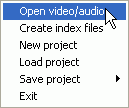
 In
the left part of the window, MPEG2Schnitt will show a lot of information about
your source.
In
the left part of the window, MPEG2Schnitt will show a lot of information about
your source.
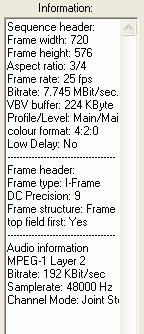
In the center, we have, big surprise, the vide preview and right below it, a
list of our sources:
 Now
in case you have multiple audio files of one format, MPEG2Schnitt might now
have added them all, so right click in that window and select add audio,
then add your additional audio stream.
Now
in case you have multiple audio files of one format, MPEG2Schnitt might now
have added them all, so right click in that window and select add audio,
then add your additional audio stream.
At the bottom of the window, we have the controls:
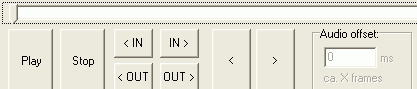
First we have a slider which you can use to move around in the video stream. Then we have Play and Stop buttons, which have obvious functions. The < IN and IN > buttons jump to the previous / next I frame, the < OUT and OUT > buttons jump to the previous / next P frame. While the distinction between the frame types is not a must to know (if you want to know check out the glossary), it is important to know that a video must begin with an I frame, but can end with a P frame, hence the naming of those buttons. Use the slider, then the IN buttons to move the I frame that is closest to the start of your movie, then press the In button:

Then move the slider to the right, until you locate the first block of advertising. Then use the slider and OUT buttons to locate a suitable position to cut the video stream without getting any of the annoying advertising inside your video. Press the Out button to mark the end of the first cut, then press New to add this part of the movie to your Cut list. The cut list is shown to the right of the video preview. As you select your in and out position, the timecode of the selected cut points, along with the length of the part you're going to cut is shown to the right of the buttons. You can also use the go to In and go to Out buttons to go to the start and end of the current cut. Then repeat this position for the other parts of the movie.
Also note that the < and > buttons can be used to move one frame forward / backward, but keep in mind that you must cut at a I or P frame (but in fact MPEG2Schnitt won't let you press the In and Out buttons if the current video position is not appropriate).
In the end you'll have a cutlist like this:

If you want to edit an existing cut, click on it, then the Modify button at the bottom will become active. Change your in and / or out position, press Modify and the selected cut will be changed accordingly. Or if you want to delete a cut, right click on and select Delete selected marks.
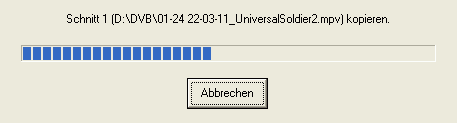
It's now time to cut for real.
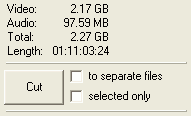 Just
above the Cut button, you'll see the properties of your output. Our project
will only be 2.17 GB so there's plenty of room for another movie on the same
DVD.
Just
above the Cut button, you'll see the properties of your output. Our project
will only be 2.17 GB so there's plenty of room for another movie on the same
DVD.
Now if for some reason you'd rather want each cut to get a separate file, you could check to separate files, or if you want to extract just one cut, select the appropriate cut from the Cut list, then check selected only and press Cut.
Normally, you'd just press Cut without using any of those options.
The cutting operation will once again take a while, but in the end you'll have
one mpv file containing just the movie, and the appropriate audio files.
>> BACK