 Check
Subpicture Stream and select the appropriate substream ID, check Demux complete
title set then press OK and wait.
Check
Subpicture Stream and select the appropriate substream ID, check Demux complete
title set then press OK and wait.DVD Authoring in IfoEdit
It has finally happened: IfoEdit is the first freeware program to be able to multiplex elementary audio and video streams and create a fully compliant DVD disc out of it. If you're only using your favorite DVD authoring program to create 1 video movies without menus IfoEdit is perfect for you. It can multiplex any DVD compliant MPEG-2 streams, DVD compliant audio streams (AC3, LPCM, MP2 and DTS), DVD subtitle streams and you can create your own chapters. Considering that a lot of DVD authoring programs have limitations when it comes to the number of audio streams, audio format, number of channels in audio streams and subtitles, IfoEdit's feature set is pretty impressive indeed.
Just a warning: IfoEdit does not like MPEG-2 video streams containing rff flags (in other words: progressive 23.976fps NTSC streams), so you shouldn't use it for that kind of content.
But let's get down to business: You'll need the following software for this guide:
IfoEdit
Vobedit
Any MPEG-2 encoding program which can create DVD compliant output
Imgtool
Table of content:
1: Rip the DVD
2: Encode the main movie
3: Extract the subtitles
4: Author the DVD
5: Final sector adjustments
6: Burn the disc
First you have to copy the main movie of your DVD to your harddisk. DVD Decrypter is best suited for that task.
Now it's time to use your favorite MPEG-2 encoder to create a DVD compliant MPEG-2 stream. My favorite program is CCE but you can also use TMPG or ReMpeg2 any many more (thought I don't have guides for those).
First you'll have to decide which subtitle streams you are going to keep. DVD Decrypter has generated an information file when you ripped the disc, now it's time to open it. It will be named just like the VOB files you ripped. For instance, if your VOB files are named VTS_01_1.VOB, VTS_01_2.VOB, etc. the info file will be named VTS_01 - Stream Information.txt. Open it in any text editor.
Every stream will be listed, starting with subtitle streams, then audio streams and last but not least video streams. In my case the beginning of the file looked like this:
0x20 - Subtitle - English / LBA: 62029 / PTS: 00:02:20.760 / Delay: 140480ms
0x21 - Subtitle - English / LBA: 35356 / PTS: 00:01:14.160 / Delay: 73880ms
0x80 - Audio - AC3 / 6ch / 48kHz / DRC / English / LBA: 7 / PTS: 00:00:00.280
/ Delay: 0ms
On each line you'll find a 0xXY string which indicates the substream ID. As you can see the languages are listed so you won't have to guess which subtitle stream to take. The same file will also list all audio channels including their respective delay values.
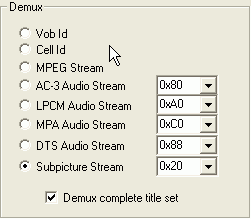
Start up VobEdit and load the first of your ripped VOB files, then press the Demux button.
Check
Subpicture Stream and select the appropriate substream ID, check Demux complete
title set then press OK and wait.
Repeat this procedure for every Subtitle stream you want to keep. As for the
audio streams, normally when you use DVD2AVI you should already have the appropriate
streams ready, but when you have some DTS streams you'll also have to use VobEdit
to demux the appropriate stream.
Alternatively you can have VobEdit demux all available audio streams or all
available subtitle streams at once.
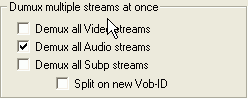 In
order to do that, all you have to do is check Demux all Audio streams or Demux
all Subp streams respectively and you'll see that the upper part of the Demux
window where you can select streams one by one will be disabled. Using one of
these options VobEdit will also process the complete titleset, not just one
VOB file.
In
order to do that, all you have to do is check Demux all Audio streams or Demux
all Subp streams respectively and you'll see that the upper part of the Demux
window where you can select streams one by one will be disabled. Using one of
these options VobEdit will also process the complete titleset, not just one
VOB file.
Step 4: Author the DVD
Now it's time to put it all together again. Start up IfoEdit and load the IFO file that belongs to your movie. Then select VTS_PGCITI in the upper part of the IfoEdit window and select the PGC that belongs to the main movie (its the PGC that you ripped in step1;).
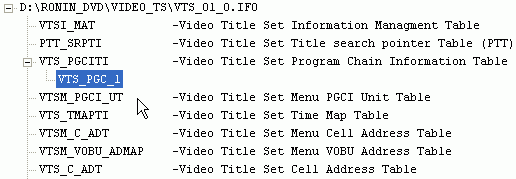
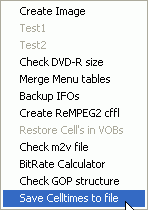
Then select Save Cell Times from the Tools menu.
 This
will save all chapter positions to a text file so you won't have to enter them
manually.
This
will save all chapter positions to a text file so you won't have to enter them
manually.
Then close IfoEdit and start it again. This time do NOT load any IFO file or
the DVD Authoring functionality will be disabled. Then select Author new DVD
from the DVD Author menu.
![]()
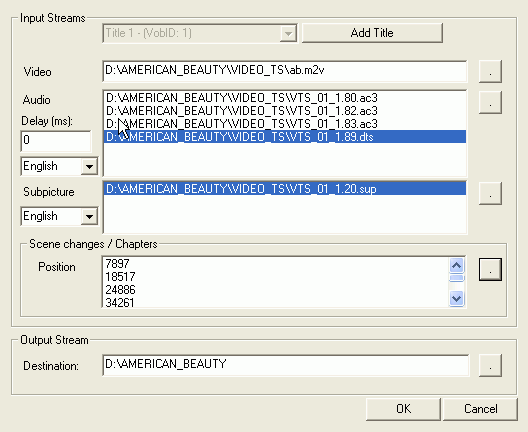 The
procedure here is pretty straightforward. First you select the video stream,
then you select your audio stream(s), then the subtitle streams, then the chapter
positions which you can import from the file we have previously created and
last but not least the destination directory (that's where your new VOB/IFO/BUP
files will be written to)
The
procedure here is pretty straightforward. First you select the video stream,
then you select your audio stream(s), then the subtitle streams, then the chapter
positions which you can import from the file we have previously created and
last but not least the destination directory (that's where your new VOB/IFO/BUP
files will be written to)
For each element you have to press the . button to get to the window that will allow you to load a file.
In case your audio files have a delay (DVD2AVI puts the delay into the filename - as you can see my files have DELAY 0ms in the name so they don't have a delay) select the appropriate audio stream and the Delay (ms) value on the left of the audio streams will be active. There you have to put the appropriate value.
Before you press OK you should also assign the appropriate language tag to each audio and subtitle stream. Just select a stream and you'll see that the language dropdown box on the left of the audio / subtitle list is active and you'll be able to pick the appropriate language from the list.
Press OK to start the DVD authoring process. This will take a while so go get
some coffee.. IfoEdit will also show a log window during the process so that
you can see what's going on and if there should be a problem you can take the
information from the log and post it in the IfoEdit
forum to get help.
Once IfoEdit has finished the process you'll have a set of VTS_01_X.VOB files, a VTS_01_0.IFO/BUP and a VIDEO_TS.IFO/BUP file. Both IFO files will be shown in the upper part of the IfoEdit window. Now open your old IFO file (the one DVD Decrypter ripped) in IfoEdit (which is already running;) and go VTS_PGCITI and select PGC1 again:
Then select Copy Colors from this PGC from the Subtitle Color menu (that's the rightmost menu).
![]()
Then select the new VTS_01_0.IFO file that IfoEdit generated for you and select Paste Colors into this PGC from the Subtitle color menu.
![]()
And last but not least press the Save button to save the imported color codes.
When asked if you want to overwrite the existing IFO/BUP files answer yes.
Now all you have to do is burn the DVD.
This document was last updated on 11/09/02