 To
change the look, change the 4 colors under GUI Appearance (it requires
HTML style RGB hexadecimal colors), or press the Grey button (imho it
looks much better in grey). Then let's start the real work.
To
change the look, change the 4 colors under GUI Appearance (it requires
HTML style RGB hexadecimal colors), or press the Grey button (imho it
looks much better in grey). Then let's start the real work.QuEnc Guide
What's QuEnc? Another one of Nic's pet projects. Based on ffmpeg, QuEnc is an easy to use MPEG-2 encoder that is completely free, yet yields amazingly good quality (no, it doesn't beat CCE SP, but there's a $1900 price difference between the two). It's also quite fast for an MPEG-2 encoder, but since it's a full encoder, not a compressed domain transcoder, you won't get your DVDs done in 20 minutes. QuEnc, being a very simple program, only supports AviSynth input. But since many people use AviSynth anyway, that's not really a problem, is it? And if it is, you'll learn how to tackle it in this guide.
You'll need the following software in this guide
QuEnc
AviSynth
DGIndex (if your source is
MPEG-2)
Step 1: Create a DGIndex project
DGIndex allows you to frameserve a video file into another application that cannot open MPEG-2 files natively. Now create a DGIndex project for later frameserving.
Step 2: Create an AviSynth script
If you've never created an AviSynth script, and the word script scares you, don't be afraid, it's easier than you think. The first thing to do is open up Notepad. Then copy and paste the following two lines:
LoadPlugin("C:\PROGRA~1\GORDIA~1\AviSynthPlugins\dgdecode.dll")
mpeg2source("D:\THE_MATRIX_REVOLUTIONS_D1\VIDEO_TS\matrix3.d2v")
This is a basic script that frameserves your DGIndex project to an application opening the AviSynth script. Save this file as movie.avs, and open it in your media player. Sure enough, you'll watch your movie, just without audio. If it doesn't work, the path in the first line is probably not correct. It should point to the dgdecode file that comes with DGIndex. If you experience discoloration, try adding .convertToYV12(interlaced=true) to the end of the second line. If that doesn't help, you can try adding a 3rd line containing "SwapUV()".
In case you have to perform IVTC (you found that out in the DGIndex step), you'll need a more complex AviSynth script involving decomb. You can read all about Decomb here. And make sure you remove any Resize line from the script when you get back!
Until now I've assumed your source had DVD resolution (720x480 for NTSC, 720x576 for PAL). If this is not the case, let's stretch the video to the proper resolution, shall we. If we're dealing with a non DVD resolution DVB stream, it will still have the proper vertical resolution, so all we have to do is stretch it horizontally. You can do this by adding the following line at the end of your AviSynth script:
BicubicResize(720,480,0,0.5)
Replace 480 by 576 if your source is PAL.
And what if your source is an AVI? Then the AviSynth script will look completely different. It'll start with
AviSource("c:\movies\somemovie.avi")
But that's not all. Your AVI will most likely not have DVD resolution so we have to stretch it.
Step 3: Encode
If you start up QuEnc, you might feel a little off track. The reddish look is not everybody's thing, but you can change that by pressing the Advanced Options button right away.
To
change the look, change the 4 colors under GUI Appearance (it requires
HTML style RGB hexadecimal colors), or press the Grey button (imho it
looks much better in grey). Then let's start the real work.
Force Closed GOP should not be used unless you're encoding content for a multiangle DVD (and only the multiangle bits would require that option). Keep the GOP Size at 12 (DVD standard) and eep the Max B-Frames at 2 (our champion CCE SP does it like that, and they CCE makers know what they're doing).
Scene Detection will activate scene change detection and place an I-frame at a new scene. This can be useful if you want to have a chapter start at a cut in the movie.
Activating "Extreme & Slow" Settings will trade in longer encoding time for more quality (a long of encoding time ;).
Then we have the aspect ratio. If your source is a 16:9 DVD, keep this at 16:9 Aspect Ratio, otherwise set it to 4:3 Aspect Ratio.
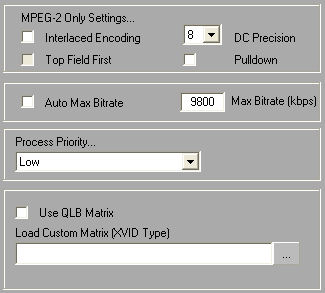 If
your source is interlaced, and you want to keep it that way, you can check Interlaced
Encoding. This will also activate the Top Field First flag. Top Field First
is the default for interlaced video, but if you get very screwy looking output,
you'll have to change that.
If
your source is interlaced, and you want to keep it that way, you can check Interlaced
Encoding. This will also activate the Top Field First flag. Top Field First
is the default for interlaced video, but if you get very screwy looking output,
you'll have to change that.
When dealing with 23.976fps NTSC content, you should check Pulldown so that 2:3 pulldown is automatically applied to make your output DVD compatible.
The DC Precision indicates the precision of DC components in the quantizer matrix. The higher the value, the more values a DC component can take. This can have an effect on quality. Most DVDs use 10, so I suggest you set it to 10 as well.
Then you can specify a Max Bitrate manually, or check Auto Max. Bitrate. The latter will automatically adjust your maximum bitrate in function of the audio (QuEnc now encodes audio).
If you like to use your computer while encoding, set the Process Priority to Low.
You can also specify your own quantizer matrix, or use the QLB quantizer matrix be checking Use QLB Matrix.
Finally, we have the MPEG-2 Mux Profile that you have to set to DVD in order to get DVD output. QuEnc can now also create SVCDs, so if you want an SVCD, set it to SVCD (keep in mind this is a DVD guide, so the resizing you have to do for SVCD is not explained here). If your AviSynth script has audio, you can also configure the audio compression used by selecting either MP2 or AC3 from the Audio Codec, and specify an Audio Bitrate for the audio encoder. You can disable multiplexing by selecting NO MUX from the MPEG-2 Mux Profile dropdown. If your source has no audio, multiplexing will also be automatically disabled.

Then press Apply to get back to the main window.
 The
first thing you'll have to do here is select the Source AVS File. Press
the ... button and select your AviSynth script. No, once again, AVI input
is not possible! The Destination M2V File will automatically be filled
in, using the same path and name as the source file but you can obviously change
that if you like. If your AviSynth script also contains audio, you'll get an
mpg audio, that is QuEnc's built-in audio encoder will be activated and you'll
get a multiplexed output of the stream type you have configured in the advanced
options.
The
first thing you'll have to do here is select the Source AVS File. Press
the ... button and select your AviSynth script. No, once again, AVI input
is not possible! The Destination M2V File will automatically be filled
in, using the same path and name as the source file but you can obviously change
that if you like. If your AviSynth script also contains audio, you'll get an
mpg audio, that is QuEnc's built-in audio encoder will be activated and you'll
get a multiplexed output of the stream type you have configured in the advanced
options.
Then check MPEG-2 if it's not already checked. Set the Bitrate to your desired bitrate. If you haven't calculated the bitrate yet, here's a quick and dirty way how to do it: 9800 - total audio bitrate. As an example if you have 1 2.0 kbit/s AC3 track (192kbit/s), 2 5.1 kbit/s AC3 tracks (384kbit/s each) you'd get to a max bitrate of 9800 - 192 - 2*384 = 8840 kbit/s. If you're wondering what bitrate a certain audio track has you can use a software DVD player and activate the information screen they usually have.
Check Use VBR (otherwise the video will have a constant bitrate - not a good thing for what we're doing), as well as High Quality.
Use Trellis Quant can also help improve quality, but slows down encoding. Finally, check 2 Pass Encoding to perform two encoding passes.
Now all that remains to be done is press Encode.
Step 5: Authoring
Now you can use whichever tool you prefer to author your DVD.
Alternatively, yuo can use QuEnc's simple DVD authoring facility: Enter the Advanced Options again, and press Author DVD.
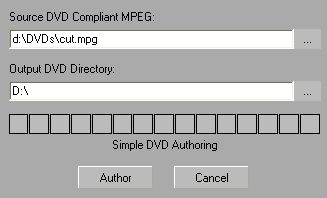 In
this window, you can select a DVD compatible mpg or VOB file, select the output
path, and create a simple DVD with no menus and chapters by pressing Author.
In
this window, you can select a DVD compatible mpg or VOB file, select the output
path, and create a simple DVD with no menus and chapters by pressing Author.
This document was last updated on January 4, 2009