Dreambox : How to
1 Introduction :
For many years, I've been into TV broadcasting via satellite.
I started out with analogue TV in D2MAC format. For a couple of years now, the
satellite world has been changing and switching over to digital broadcasts in
the DVB-S format. The first satellite receiver (Set top Boxes, AKA demod) generation
had to be rented from satellite TV channel providers. Such hardware "featured"
low quality components, with very slow zapping speed, quite ugly OSDs, no digital
audio output, poor reception sensibility, low quality MPEG2 decoding and a locked
firmware, that only your provider could update (whenever they felt like it).
A few low priced digital receivers also appeared, but they were often not (entirely)
compatible with the special services satellite TV providers offered (e.g. Electronic
Program Guide AKA EPG, Pay Per View AKA PPV°etc.).
The second generation of satellite receivers was equipment
like the Xsat 310/410 and the Aston Xena series, which opened the door to the
Of-The-Shelves Set Top Boxes (STB), independent from providers, compatible with
official decryption cards. Such devices would allow you to reconfigure the position
of each channel, manage favorites from your PC and even flash firmware with
a serial cable.
Today, we can get the 3rd generation of settop boxes. The Dreambox
is one of the popular 3rd generation boxes. Based on a powerful IBM PowerPC
(not PC !) with an MPEG1/2 hardware decoder, this box is FULLY open, with an
open source Linux operating system. The Dreambox not only offers high quality
video and audio, but also has a variety of connections to the outside world:
Ethernet, USB, PS2, Compact Flash and two Smartcard readers. The box can handle
any dish configuration, an unlimited number of channels or satellites, has a
very fast channel scan, allows for direct digital recording, etc. To receive
encrypted channels, you need the proper decryption card from the appropriate
organization and a PCMCIA CAM which supports your card. Alternatively, you can
load a firmware that enables the built-in smart card readers to handle your
decryption card. As the Dreambox is more a computer than a consumer electronic
device, it can hang some time and it takes a bit of time to learn how to use
its full potential.
1.1 Target audience of this tutorial
The goal is to provide you with a guide to have your Dreambox
fully running with a first software image, and set up multiboot, allowing you
to test different software combinations. This includes a working network, and
channel setup (both free to air and encrypted ones).
1.2 Equipment Needed
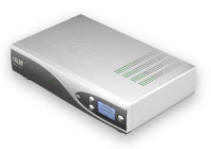
A Dreambox !
The first Dreambox DM7000 revision suffered from several hardware problems,
solved in the 2nd revision of the V1 (except for a limited power supply).
The v2 is a modified V1 revision2 (2 extra capacitors have been added to
the power supply). Both revisions have a blue LCD display.
V3 has a new PCB that includes corrections for the power supply, plus perhaps
other minor, undocumented changes. V3 has an Amber LCD and a serial number
3xxxxxxxx.
I personally bought a box from a German site (Dreambox MK4) but cannot find
any documentation about this version. It seems it just a revision 3 unit. |
 |
- A Harddisk to integrate into the Dreambox : Not Mandatory. I personally have
no disk. Harddisks create more noise and use more power. You can begin without
a harddisk and buy one later anyway. Be aware though that you cannot use every
type of disc.
- A USB memory stick 128 Mb : Highly recommended if you have
no harddisk, and mandatory to use this guide. I use a Dane-Elec one, USB2.0,
which causes no major compatibility problems. Just be wary that several USB
key have write protection turned on by default, and need to be unlocked under
Windows with a special software provided by the manufacturer.
|
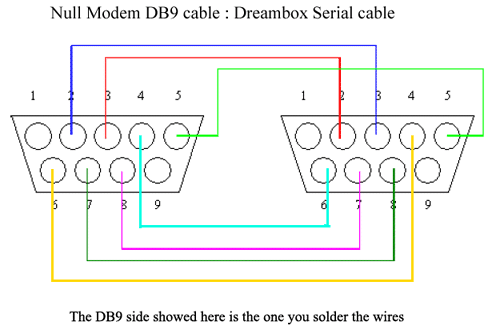
- A Null modem serial cable is highly recommended. It
allows you to still access the Dreambox if flashing fails or if you kill
the network.
You can buy such a cable at a store, or you can build one on your own.
Use a good shielded cable that is not too long. The cable shouldn't be
longer than 2 meters, recommended is 1 meter.
|
 |
- A PC with a 100 mbit/s Ethernet card. You can connect your PC directly
to the Dreambox using a crossover Ethernet cable, or connect both PC and Dreambox
to a hub/switch using regular Ethernet cables.
2 : Installation
2.1 Dish Positioning
This step is only necessary if your satellite dish has not
been set up yet. It is a quite involved procedure, so you might want to get
somebody who has already installed a satellite system before to help you, or
buy an installation and mounting package from the place you got your setup from.
If you think you're up to doing it by yourself, here's
how.
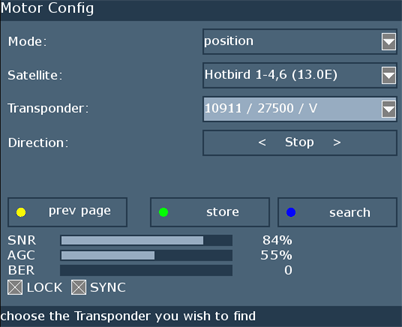
2.2 Satellite & Channel Configuration
I assume that your dish is now installed and working. At the
first boot of your Dreambox, you have to choose your language, Time Zone and
then your dish configuration: Basic (one LNB/One dish), Medium (several LNB/Dishes
with DiseqC switching), or complex (a motorized unit). Then you need to add
at least one satellite.
Now it's time to scan at least one satellite for channels. The Dreambox has
an impressively fast scan, based on a XML file containing all transponders available
on the chose satellite. Keep in mind that it is normal if some transponders
do not have any digital channels, as several are still used for analog broadcast,
or temporary feeds. Press the blue button to access next page :
 |
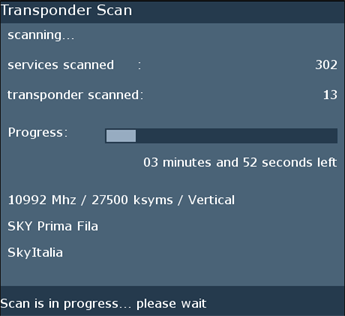
Press the blue button, then select automatic scan, then the
progress screen will be shown: |
 |
2.3 Network Configuration
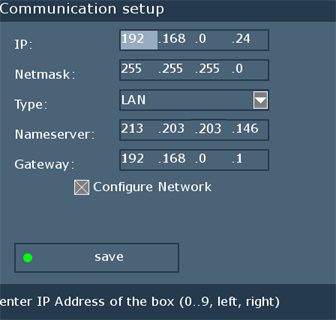 |
Now, it's time to configure the network. Press the small dream
Button on the remote, then select Setup - Expert Setup -
Communication Setup.
I suggest to use 192.168.0.24 for the Dreambox as more and more OS images
have this value built-in. Set the Gateway to the IP address of your local
Internet gateway (usually 192.168.0.1 if you have a router or do Internet
connection sharing from your primary PC). Set the Netmask to 255.255.255.0.
Note that if you use a residential gateway (DLS or cable router), then
your IP addresses will be in the 192.168.1.x range and you have to assign
the appropriate IP to your Dreambox. The netmask stays the same, but the
gateway will usually be 192.168.1.1.
The Name server to be used is the one you use for your PC, once connected
to Internet.
|
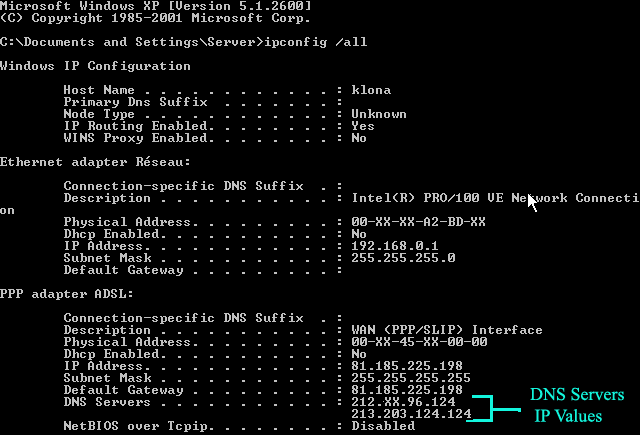
If you are currently not connected to the Internet, establish a connection
now and then go to the Start Menu, select run, then type “command”
for windows 98 computers and “cmd” for windows 2000 & XP. Then
type "ipconfig /all" to get a listing of the configuration of all
your network interfaces. Note the two DNS Servers as marked in the screenshot.
Also, make sure that the IP address for your Ethernet card is in the same subnet
(192.168.0.x) as the Dreambox and that other computers in your network can access
the Internet. This requires either a hardware router (that's most definitely
the best solution and also gives you some additional security), or an active
Internet connection sharing (search google for more information on Internet
Connection Sharing). Having done that, your Dreambox can now access the Internet
to download updates. To check if everything is working properly, try pinging
the Dreambox:
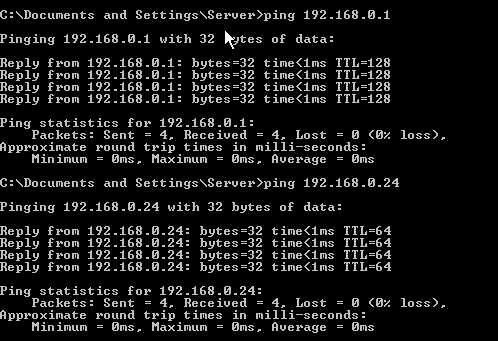
If pinging 192.168.0.1 (in this case your PC) does not work, your PC is not
configured properly. If you have a software firewall running, try disabling
it for a test, and make recheck your network settings. If pinging 192.168.1.24
(your Dreambox) does not work even though your Dreambox is turned on and you've
properly configured it, check the cabling.
3 : Operational basics
3.1 Basic Communications
Once the network is all set up, we will initiate a and an ftp session. Telnet
is the old fashioned way to access a remote computer. It only supports commandline
applications. To establish a Telnet connection, go to the start menu, select
run and type "telnet 192.168.0.24". When asked for a login, it's root
and the password is Dreambox.
To establish an FTP connection to your box, use your favorite FTP client or
the commandline FTP Windows provides (it's the same procedure as with telnet,
but instead of "telnet 192.168.0.24" you type "ftp 192.168.0.24".
Both login and password are the same as for telnet).
3.2 Editing channel lists and favorites
It is now time to import the list of satellites and channels we have previously
created. The best way to do this is using DreamboxEdit.
Install this software and launch it. Then click on the FTP icon, and enter a
directory to save your channels and favorites. Then click on Receive Files
from Dreambox, and after a few seconds, all your channels are listed in
DreamboxEdit. In the rightmost part of the window, you can create and sort your
TV and radio favorites, and add channels by dragging and dropping selections
from the leftmost part to the center partfrom. Sorting is available as well,
by any criteria you like.
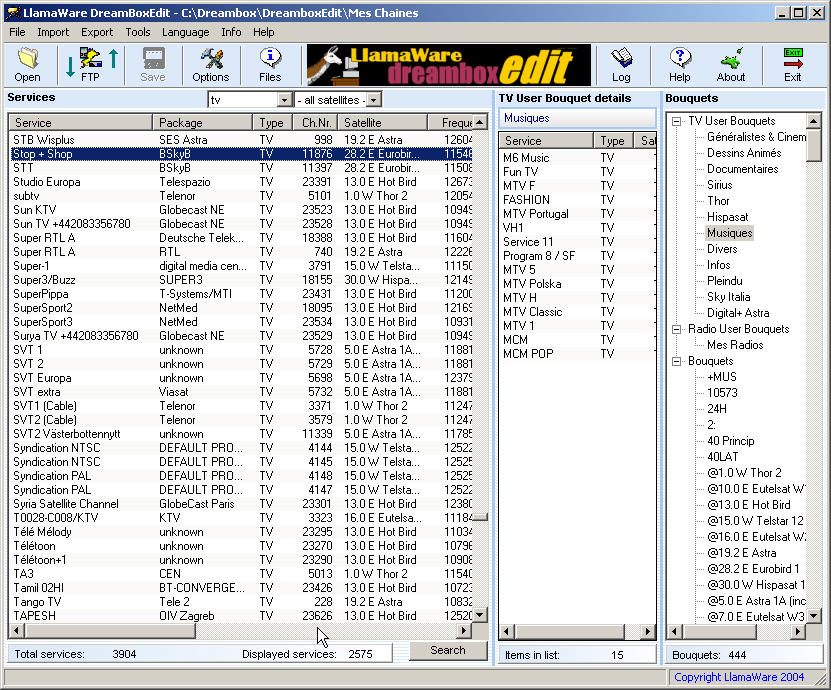
To send your changes back to the Dreambox, click on the FTP icon, then click
on send to Dreambox. After the upload is complete, click on reload
settings on Dreambox, and all the changes will be visible on your Dreambox.
 |
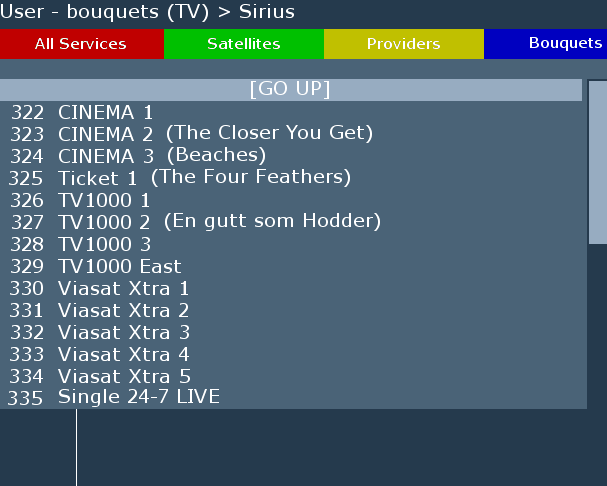
To access your Favorites, just press the up or down arrow on the remote,
then the blue button, then navigate and then OK. To move between channels
of the selected User-bouquets, just press left or right. Here's an example
of a list of favorites:
|
 |
3.3 Flashing
an image
It's time now to start working with "images". I refer to a piece
of software that contains the operating system and applications to watch TV,
record, etc. On other equipment (Divx standalone player, other set-top-boxes,
DVD burner etc. ) we speak about firmware, but in the Dreambox world, the term
image is commonly used. A Dreambox image contains the Linux operating system
for the hardware, and applications to watch and record TV.
You can download the latest official image from the Dreambox
manufacturer website. The most recent version as this guide is written,
is v1.07.4, and should your Dreambox have a lower version, you should definitely
upgrade as the multiboot plugin 1.3b requires this version. To flash the image,
you can use the dreamUp software (available from the manufacturer) using a serial
cable(safe but slow), via LAN (not recommended) or using the root.cramfs method.
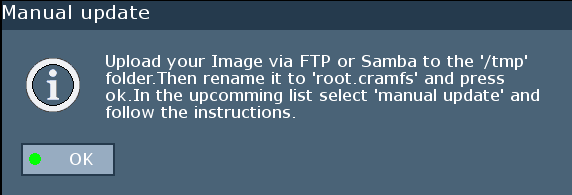
The last method, the author's preferred one, involves uploading the image to
the /tmp directory on your Dreambox via FTP, then rename it to root.cramfs,
then go to the setup menu of your Dreambox, select Software Update, then
manual update.
Make sure you use the proper image, or you risk turning your Dreambox
into electronic junk that has to be sent back to the manufacturer. To erase
all personal settings of the previous image in the flash memory (don't do this
when multi-booting from an USB stick), press the up and down buttons on the
Dreambox when the boot logo is on screen. A "Flash erase" message
will appear on the LCD, then the Dreambox will reboot. If your Dreambox should
freeze during the process, press the 3 buttons on it to reset the device, or
just remove the power cable.
Now you're basically ready for recording. If you're interested
in setting up a multiboot environment (to be
able to switch from multiple firmware images), and see
an example of a custom image installation, just follow the links in the
text.
6 Digital Video recording & playing
back
6.1 Recording on
Dreambox' HDD or PC's HDD
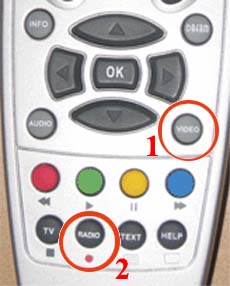
All you have to do to start recording is press the two buttons
shown below:.
In case you have the on screen display enabled, you'll see
a flashing red case once the device is recording. When the device is recording,
you can use the timeshift feature: Press the yellow button to pause playback
(recording will continue), then press the green button to resume when you're
back from making more popcorn (or whatever). However, the timeshift feature
is not working perfectly yet. The author found the timeshift feature to be working
properly on the Gutan fat image.
To play back recorded streams, go the file mode, select your
file and press OK to play it.
6.2 Playing back on PC
Installing the Elecard
decoder should enable you to view the .TS files in your favorite media player.
Alternatively, you can use VideoLAN.
VideoLAN is really easy to use, stable and has no problems reading TS files.
6.3 Playing back
on DVD Player
As digital TV uses the same compression format as DVD, what
is more logical than to put your TV recording on a DVD? The process involves
cutting out the commercials, and author a DVD. Doom9 has written a nice
guide on the subject.
6.4 Other Formats
You can obviously convert your recordings into any other formats.
If you want to create an SVCD I suggest Doom9's
DVB to SVCD guide, for DivX/XviD conversions I suggest Doom9's
DVB to DivX/XviD guide.
6.5 Broadcasting
over the LAN
It is possible to broadcast video over the LAN using DreamTV.
It is also possible to use VideoLAN or Wingrabber for this purpose. A guide
on this subject is forthcoming.
6.6 Playing DivX and other formats on the
Dreambox
The Dreambox hardware is not capable of handling more complex streams than
MPEG-2. However, it is possible to have your PC do an on-the-fly
DivX to MPEG-2 conversion and stream this to the Dreambox. This requires
a powerful PC, and the quality will be sub-par as DivX to MPEG-2 conversion
always results in a visible loss of quality.
7 Conclusion
7.1 Tips & tricks
To reboot the Dreambox, press the 3 buttons on the front of
your Dreambox.
The Dreambox can play MP3 and Ogg Vorbis audio files, and create
a slideshow from images located on the Dreambox harddisk, USB memory stick or
Compact Flash cards. These plugins are available on many images through Internet
download, directly from the Dreambox menu. If you put a CompactFlash card into
the Dreambox, it will automatically be mounted as /hdd ont he boot time, so
be careful when activating a swapfile.
Pressing the blue button while watching TV will give you some information about
the encryption used, and give you the option to choose the appropriate emu.
Certain images will store the selected emu for each channel.
If you point your webbrowser to the IP address of your Dreambox
(192.168.0.24 in our case), you can change channels remotely and access EPG.
7.2 Final words
Well, I spent quite a bit of time writing this all down and
I hope you'll find this guide useful and easy to follow. I'd like to thank people
who create Dreambox images like Gutan, RUdream, MisterX, SandBox, Hybrid, Hydra,
NedKelly, SF team, DBF, Ahaustria, Neutrino, PeterPan and others. Thank you
for making the Dreambox such a wonderful toy. Many thanks also to all EMU coders.
I'd also like to encourage you to donate to people who provide
tools for the Dreambox for free.
Thanks to people of the Sat-Industry
Forums and Dreambox Net Australia
to help me getting started with the Dreambox.
Congrats to the SandBox Team, who runs a
French site & forum & created the great sandbox image.
Special thanks to Doom9 to clean up my frenglish
style and for his great reference site.
|
This Guide shall not be published without my explicit authorization.
So far, Doom9 and
and Klona's Place are
the only authorized publishers.
|
Written by Klona on 17/02/2004,
Version 2.2 built on 03/04/2004 |