 Then
set action to to PVA and press Go! to start the conversion.
Then
set action to to PVA and press Go! to start the conversion.DVB to SVCD guide
DVB, or Digital Video Broadcast, is on the way to become the standard for standard resolution digital TV. It is available in 3 subvariants: DVD-C (C for cable), DVB-S (S for satellite) and DVB-T (T for terrestrial). DVB-S is probably the most widely used, because it doesn't require cable to your home, and no terrestrial broadcast antennas as DVB-T does. DVB-T has just recently been introduced in countries like the UK and Germany but other countries are planning to change their analogue terrestrial broadcasts to DVB-T as well. DVB is also known on other continents, but mostly as satellite TV. In countries like the USA or Japan, digital TV is often realized via HDTV (ATSC), which relies on cable.
Since most (or all) of toady's TV only have an analogue tuner, you need an external device called settop-box to receive DVB broadcasts. You connect these boxes to your satellite (or cable plug or the house antenna), and from there to the TV. Alternatively, you can buy a DVB card for your PC. These cards often have analogue video and audio outputs so you can connect your PC to your TV. The advantage of a PC based solution is that you'll have direct access to the content that is being broadcast. Since DVB is digital and uses the same audio and video compression formats (MP2 and AC3 for audio, MPEG-2 for video) and even the same resolution as a DVD, it is actually quite easy to do something with the content that is being broadcast. It is also possible to stream the digital video stream from a settop box, or to record it there (if your settop box has a built-in HD) and later transfer it to your PC. Obviously, you could also simply capture the analogue output from the settop box, but where would the fun in that be? If it is digital it should stay digital. That being said, let's get down to business. For now, we're going to stick to PC based hardware but if I can find any volunteers for settop box guides we'll go in that direction as well.
You'll need the following software for this guide
A DVB player and recording software
ProjectX (if you can't record
in PVA format)
PVAStrumento
2.0.23a
PVACut
DVD2AVI_PVAview
DVD2SVCD 1.2.1 b3
CCE SP
or TMPG
or Canopus
ProCoder.
Steps 1 - 2: Recording
These steps are the same regardless of the output you're going to create (be it DVD, DivX or SVCD) so I have placed them all on a common page. Do not perform steps 3 and 4 (demuxing using ProjectX and cutting using MPEG2Schnitt)!
Step 3: Converting the video to PVA (optional)
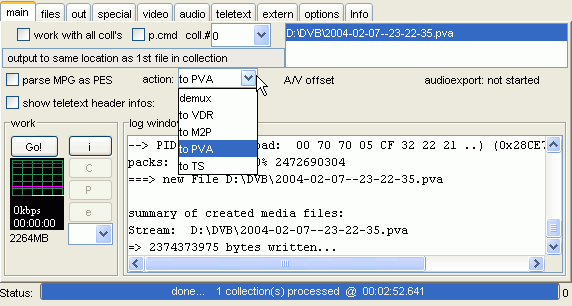
If your DVB recording software does not support PVA output, you'll have to convert the video to PVA format before you can proceed to cutting. ProjectX can convert both .mpg and .ts files to .pva. Start up ProjectX, then right click in the file area (that's where you see a D:\DVB\2004-02-07--23-22-25.pva in the next screenshot), select add and select your .mpg or .ts file.
 Then
set action to to PVA and press Go! to start the conversion.
Step 4: Cutting the video
DVD2SVCD can only handle PVA input. So far, I haven't found a program that takes elementary streams and puts them into a PVA file again, so we'll have to resort to a rather old PVA cutting tool called PVACut. PVACut also requires DVD2AVI_PVAview (place both in the same directory) to show you a preview of your video (without that you'd be blind when selecting the cutting positions).
After starting PVACut for the first time, press the Setup button:
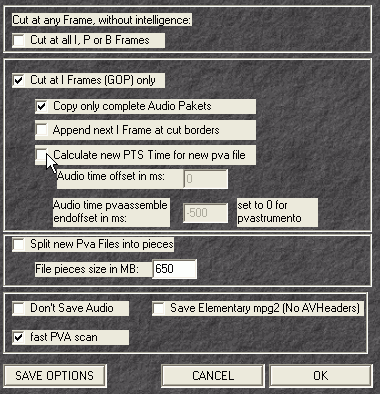 Make
sure Cut at all I, P or B Frames is not checked, then check Calculate
new PTS Time for new pva file.
Press SAVE OPTIONS to save those settings, then OK to get back to the main window.
Now press New Source PVA and select your PVA file. Then it's time for some
cutting action.
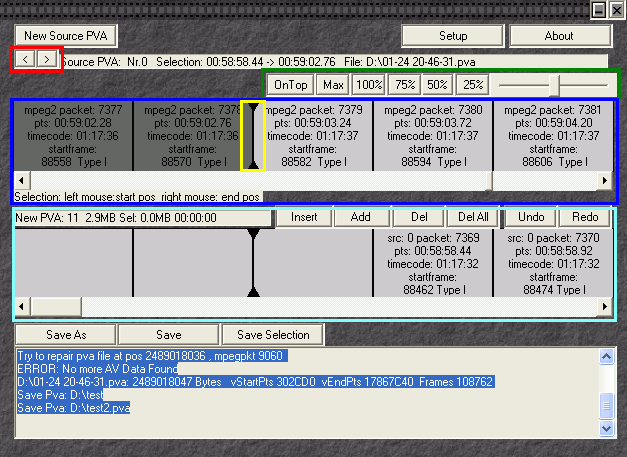
You wouldn't be the first to not quite understand how PVACut works. First we have the two buttons marked red, which can be used to switch between multiple PVA sources.
The buttons marked green control the appearance of the preview window. OnTop forces the preview to always remain a top, and it's a good idea to have this feature enabled. The other buttons control the size of the preview window, and the slider can be used to play the movie forward/backwards in different speeds.
The part marked in dark blue represents source GOPs, one rectangle for each GOP. Two rectangles will always have rounded edges (shown in the yellow box), that's the position shown in the preview window. You can now use the left mouse button to click on a GOP to mark it as the first GOP in a selection. Then use the slider to move to the position of the first ad, and press the right mouse button to mark the end of the first movie segment.
Then press the Add button to add this segment to the output. Repeat this procedure for each movie segment, but be careful before adding another segment: The preview does only cover the source, so if you accidentally add too much or too little, it will be very hard to correct without starting from scratch. The part of the window marked in light blue contains all the GOPs of your output video. As for the source video, you can use the mouse buttons to mark an in and out position, and use the Del button to delete the market GOPs.
Once you're done, press Save As to save the movie without ads to a new file.
Step 5: DVD2SVCD
Start up DVD2SVCD. It starts with the about tab that gives you a very basic guide. Maybe that's all you need. If not, let's get started. The first thing to do is go to the Misc. tab and set the Input file type to DVB (pva). Then select the Conversion tab.
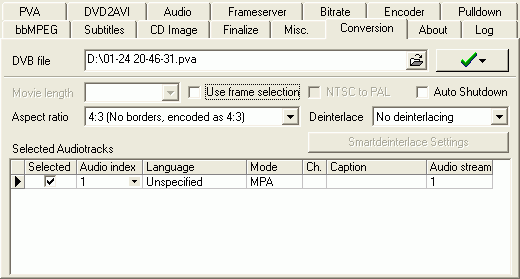 Press
the Folder button and select your PVA file.
Auto Shutdown should be straightforward. If you check it the program will shut down the PC once the conversion has been completed.
If your video is interlaced, select a deinterlace mode from the dropdown list: If
you need a quick and dirty deinterlacing select SeparateFields/SelectEvery or
VerticalReduceBy2. Telecide is a more thorough operation and will give you the
best results. Smartdeinterlace and Blendfields are not really suggested.
Now you're basically done and you could press the GO button, select Rip and
convert, sit back and relax and wait for the process to be finished. If you're
running DVD2SVCD for the first time you may want to go
through all the settings and make sure everything is properly set. If you
can be bothered you could also set
the name of the disc each time you make a new project.
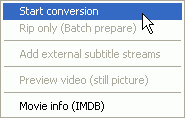
Once you've selected Rip and convert DVD2SVCD will switch to the log tab which shows you what's being done at the moment:
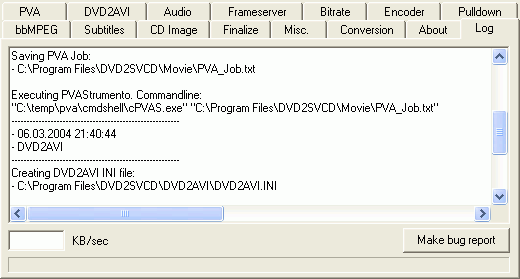
When everything is OK press OK. Now DVD2SVCD will automatically go through all the steps. At the end you should have a number of CD image files (.bin/.cue).
If the process should abort at some point, go to the Misc. Settings tab, press the Crash recovery button and select your project file (DVD2SVCD project file.d2s). DVD2SVCD will then start the first unfinished task and everything after that.
Note that from this point on you can disregard all references to the save-to directories when using DVD2SVCD unless you want to change to change them to something else.
Step 6: Burning
Select one of the following options:
Step 7: Troubleshooting
There's an excellent live Q&A for DVD2SVCD and you can get help via the DVD2SVCD Forum after having read the Q&A.
This document was last updated on March 30, 2006