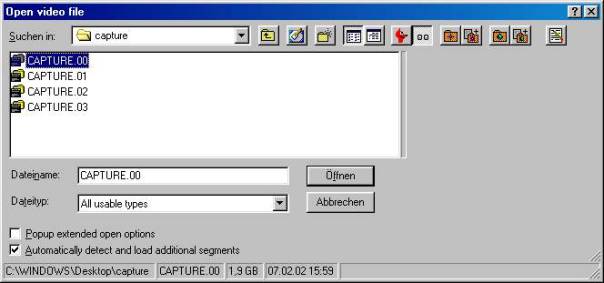
After we've finally captured the video, we will proceed to the task of cutting out unwanted parts (e.g., commercials, but also any unwanted scenes). Furthermore, we will apply different filters and adjust them to each situation. Therefore we load the video into VirtualDub: File -> open Video File. Now you have to browse to the folders where you saved the spill drives. There you have to open the files capture.00.avi (or whatever it is titled, important is the "00"); the subsequent files will be loaded automatically.
Depending on the size, source, type and quality of your video
there are different filters you can choose. There are many filters available on the net and you are free to try all of them.
The basic filters are already included in VirtualDub and Donald Graft has
a huge collection of his own and third party filters on his homepage
also has a nice collection.
Before being able to use any new filters you'll have to copy them into
the 'plugins' subfolder of VirtualDub and restart the program.
The most important will be covered here, so that you'll get the idea of
how to use filters and can go on searching the net to find filters that
best fit your needs.
The order in which you use the filters (called the filter chain)
is important though!
There are different kinds of chroma artefacts which can be visible in your capture of a vhs recording
For details, have a look at Removal of chroma artefacts.
Your capture can contain temporal noise in the form of small dots (spots) and streaks found in some videos. A common cause of this is dirty VHS heads, but it can also be in the broadcast material itself. At the time of writing this page, there exists no good (free) VirtualDub filter which can remove those artefacts :(
As stated in the introduction (section 3), an analogue signal is transmitted on field basis. During the capture process 50 fields are combined to 25 frames (for PAL), and 59.94 fields to 29.97 frames (for NTSC). This is called interlaced video. It can be trully interlaced (which means 50/59.94 different fields), or progressive "broadcasted" as interlaced (which means that half of the frames are duplicated). This will show up as a progressive stream after capturing (it might have a phase shift though, or the fields may be in the wrong order).
You have to decide whether you want to deinterlace or not. You should take into account the following considerations:
You should do this first before any smoothing, cropping or resizing. First you have to determine what kind of interlacing effect your source has. Note this is different for every broadcaster, and sometimes broadcasting. This implies you have to do this procedure every time you captured something. There are several cases:
PAL:
1) progressive, phase shifts and or fields in a reversed order (= swapped fields)
2) trully interlaced
3) bad NTSC to PAL conversions (blended fields)
Right click on the right (target) clip and select "2x size" to enlarge the clip, and move the slider frame by frame (in a small range of frames, but with a lot of movement). If you hardly see any horizontal lines, it means we are dealing with case 1. If you see horizontal lines we are dealing with case 2. To find out whether you have blended fields (thus when dealing with case 3), install and select the ViewFields plugin, and the fields will be put on top of each other. Enlarge the target clip and scroll through the fields. If you see blended fields (also called ghosting) it means you are dealing with case 3. If you are done with this, remove the Viewfields from your filter chain.
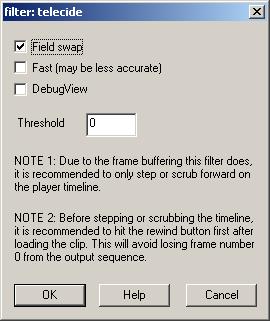
1) In the first case you can use the Telecide plugin (you could also use the DeinterlacePALMovie plugin which gives you the same options) to correct for phase shifts and swapped fields:
In the Video tab -> Filters -> Add -> telecide -> ok
Phase shifts are automatically corrected when adding this filter. To check whether the field order is correct, enlarge the clip at 150%.
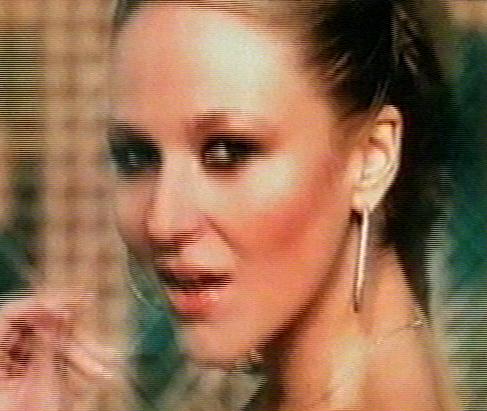
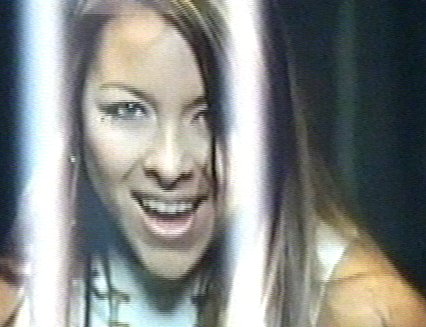 |
 |
| figure 1: swapped fields | figure 2: correct |
If you see jaggies, as in figure 1 (look her the teeth or her skin), it means that the fields are swapped, and you have to swap them back. Open the telecide plugin once more: Video -> Filters -> select the telecide plugin and press "Configure". Check "Field swap" and press "OK".
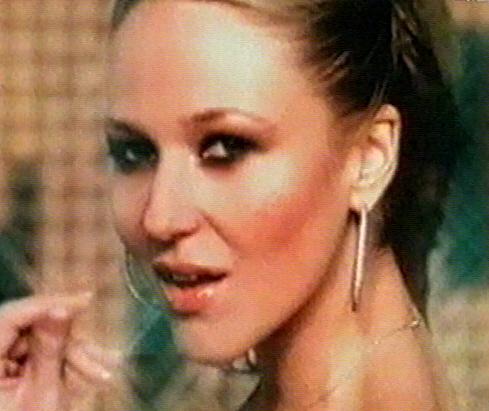
 |
 |
If you don't see jaggies (as in figure 2), you are done deinterlacing and can proceed with the next subsection.
2) In the second case you can try using the DeinterlaceMAP plugin. It detects motion to stop the still area speckling, but in motion areas where interlacing is visible it will deinterlace it. In other words, it is a motionbased deinterlacer.
In the Video tab -> Filters -> Add -> Deinterlace MAP plugin -> OK
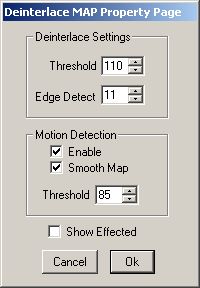 Deinterlace
Settings:
Deinterlace
Settings:
Threshold - This sets the deinterlacing threshold for the interlace detection algorithm. The lower the value more pixels are deinterlaced.
Edge Detect - This gives lines and edges immunity to the deinterlacing algorithm, it is an addition factor in the interlace detection algorithm. The larger the value the more lines and edges are left alone but more interlacing is ignored.
Motion Detection:
Enable - enables or disables the motion map.
Smooth Map - This will smooth out the motion map using Erode and Dilate techniques.
Threshold - Sets the pixel change between frames for a pixel to be considered moving.
We have choosen for the default settings here, the result looks as follows
 |
 |
| figure 3: orginal | figure 4: deinterlaced with Deinterlace MAP |
3) In this case you have bad luck. Best is to complain to your broadcasting station :) The problem is most likely a messed up NTSC -> PAL conversion.
 |
| figure 5: The upper field contains blending (or ghosts), the lower field is fine. |
If the blended fields are mainly present in one of the two fields you can duplicate the other field. Select the internal deinterlacer:
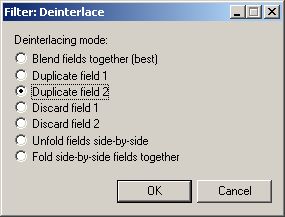 In
case the blends are mainly present in the upper field select "Duplicate
field 2", so that the "good" field will be duplicated. If the
blends are mainly present in the lower field, you should select "Duplicate
field 1". You will loose information, but it's better then the presence of blended
fields.
In
case the blends are mainly present in the upper field select "Duplicate
field 2", so that the "good" field will be duplicated. If the
blends are mainly present in the lower field, you should select "Duplicate
field 1". You will loose information, but it's better then the presence of blended
fields.
If you want a little bit better quality, you could also select "Discard field 1" instead, and resize it back to 720x576 (assuming the original is also 720x576) by selecting the internal resizer.
Finally, if blended fields are presents in both fields, you are out of luck. There is no satisfactory way of dealing with this kind of material. You have basically two choises:
a) Treat your clip as trully interlaced and deinterlace it as in case 2.
b) Use the bob (DeinterlaceSmooth). It delivers video at twice the frame rate, which results in smoother video. The idea is that you won't notice the blended fields due to the high framerate. This can only be used if your pc is fast, and you are encoding to XviD/DivX. The input video to this filter must consist of individual fields at 50 or 60fps, splitted by AviSynth (using SeparateFields) for example.
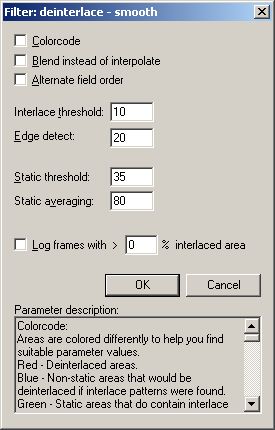 Some
settings:
Some
settings:
Blend: Blends this and previous field in interlaced areas. (You should probably avoid using this as it just blurs the video.)
Interpolate - Interpolate the field to full frame size in interlaced areas.
Alternate field order - Put even or odd fields on first line of output video. The correct setting depends on your video clip. If static video jumps up and down slightly when you step through it, change this setting.Interlace threshold - Controls the detection of interlace patterns. Lower values deinterlaces more.
Edge detect - It's difficult to distinguish between interlace lines and real edges (which should not be deinterlaced). This value controls this decision. Higher value leaves more edges intact.
Static threshold - The filter tries to detect static areas to avoid deinterlacing fine details which could result in flickering. This value controls how much a pixel can variate and still be called static. Use as low value as possible to avoid leaving interlace patterns. Values above 50 (or so) are not recommended. Good quality video can use lower values. If you don't have any text or logos that may flicker I suggest using very low values. 0 makes it work like version 1.0.
Static averaging - Controls how long history to look at when determining if areas are static or not. Low values (= short history) find static fast (but maybe incorrectly, leaving interlace patterns). High values means static details may flicker for a longer time before "converging". Also, it can be slower to react when areas go from static to non-static. Valid range is 0-100. A good rule is to set <static averaging> = 2 * <static threshold>, or higher (but don't get too close to 100).
NTSC:
1) telecined material (29.97 fps)
2) trully interlaced (29.97 fps)
3) phase shifts and or swapped fields (29.97 fps)
First check whether the clip is telecined. Open the clip in VirtualDub and scroll through the frames where there is a lot of movement. If in every five frames you see three progressive and two interlaced frames you have a telecined clip. In that you should people perform an InVerse TeleCine (IVTC), which is case 1. For the other two cases: right click on the right (target) clip and select "2x size" to enlarge the clip, and move the slider frame by frame (in a small range of frames, but with a lot of movement). If you see horizontal lines we are dealing with case 2. If you hardly see any horizontal lines, it means we are dealing with case 3.
1) In the Video tab -> Frame Rate
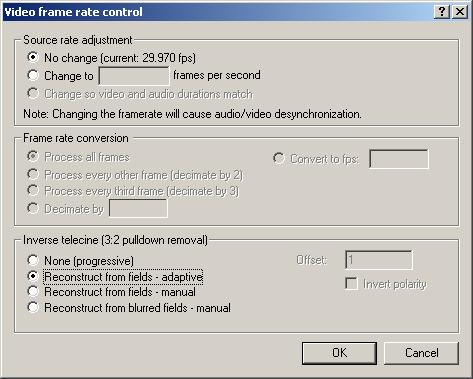
Enable Inverse telecine and select "Reconstruct from fields - adaptive", and leave Source rate adjustment on "No change (current: 29.970 fps)".
2) In this case, use the DeinterlaceMAP plugin. It detects motion to stop the still area speckling, but in motion areas where interlacing is visible it will deinterlace it. In other words, it is a motionbased deinterlacer. See PAL case 2, which is similar.
3) In this case, use the Telecide plugin (you could also use the DeinterlacePALMovie plugin which gives you the same options) to correct for phase shifts and swapped fields. See PAL case 1 which is similar.
References:
(Un)Viewfields:
Plugin to put the fields on top of each other.
DeinterlaceMAP:
Deinterlacer.
Telecide: This plugin corrects
phase shifts and swapped fields.
DeinterlaceSmooth: A
bobber, it delivers video at twice the frame rate.
What is Deinterlacing? Facts, solutions,
examples: Nice overview site.
IVTC tutorial: More about
IVTC and deinterlace stuff.
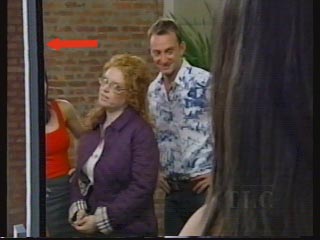
If you have a capture with a disturbing logo in the picture you might want to try to remove it with a logo removal filter. Have a look at Excursion: Logo Removal (only for more advanced users recommended). Some people prefer a clean logo over a blurry patch in the video. So it is up to you if you want to use one, and it is worth all the hazzle. Anyway do not expect perfect results.
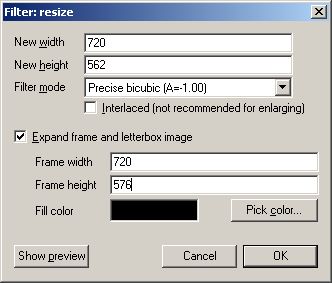
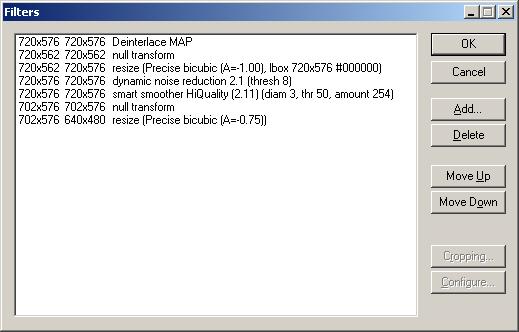
Usually you will see about ten lines of garbage at the bottom of your captured clip (visible in the screenshots in figure 5). This is head switching noise caused by your VCR. Since this is ugly we should remove it and replace it with black pixels. This can be done by adding the null transform filter (crop away the garbage, which is 14 pixels in the clip in figure 5), in subsection 7.1.6 it explained how to do that. After that, add the resize filter to add black pixels back. In the settings of the resize filter, insert the image size after cropping (which is 720x562 here). Check "Expand frame and letterbox image", and insert the original size (which is 720x576 here). Your filter chain becomes for example:
 |
 |
Note, there won't be any resizing, only black pixels will be added.
There are basically two reasons why you should smooth (= denoise) a clip:
a) Analog captures (as opposed to digital captures which are often clean)
contain noise. The source of this noise is mainly due to the cables carrying the
signal to your house.
b) To make your final clip more compressible. This is especially important if
your target is SVCD (or VCD), because DivX/XviD compresses better than SVCD/VCD.
The main difficulty is to find good a trade off between noise/compressibility, the level of detail you want to keep in your clip and the encoding time. Best is to smooth before any resizing, because you will remove more noise this way. It is recommended to use a spatial (smoothing within a frame) and a temporal smoother (smoothing between frames), both with low settings. The disadvantage of a spatial smoother is that it causes blurring, and the disadvantage of a temporal smoother is that it causes ghosting. In general, one should apply a temporal denoiser first, followed by a spatial denoiser (with low settings) which cleans the remaining artefacts. Some good temporal and spatial smoothers:
Temporal denoisers:
- DNR (Dynamic Noise Reduction, by
Steven Don)
- Denoise
(by tHE fISH)
- TemporalSoften2
(by Dividee)
Spatial denoisers:
- 2d Cleaner optimized (by Jim
Casaburi)
- Smoothiq (Smart Smoother
High Quality, by Sh0dan and Donald Graft)
If you look into the forums and look at filter chains, you will see sometimes that people are using tons of smoothers in their on their clip. This is not necessary and it only costs much encoding time. Remember that even if you use one smoother your encoding time will decrease dramatically.
In case you have to crop your clip, you can accomplish this as follows: Video -> Filters -> Add. In the window choose the "null transform" filter and click ok. Now just click "Cropping" to open the following window:
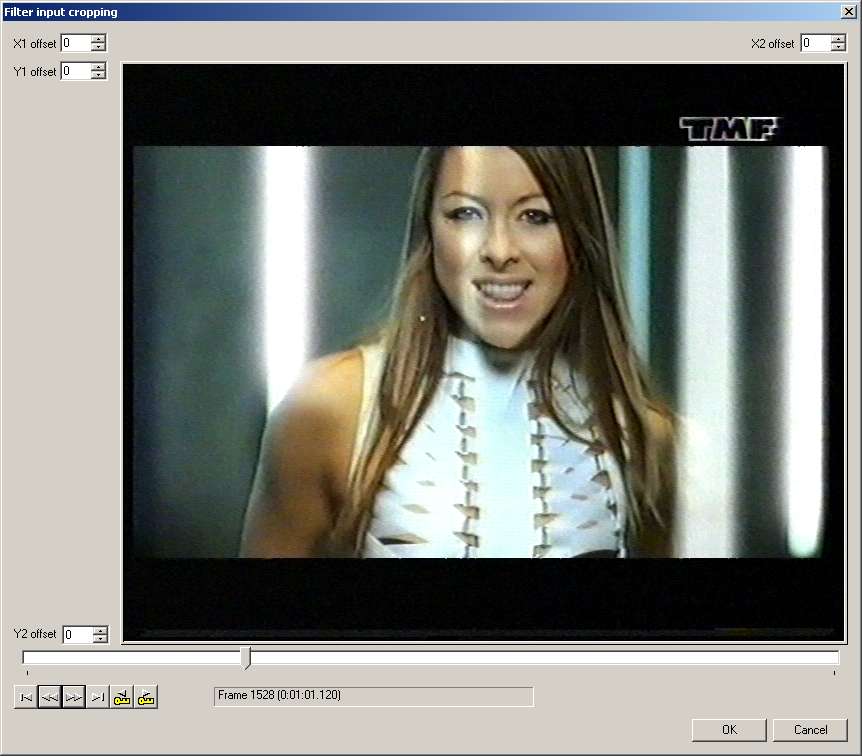
As you probably expected you can crop left (X1 offset), right (X2 offset),
above (Y1 offset) and below (Y2 offset).
This clip is captured with a SAA7108 chip with an active capture window of
53.333 µs (at 720x576). In the examples in the sections 3
and 4, it is explained that this implies that 18 pixels have to be
removed from the horizontal (black) borders. To center the image in this
example, 4 pixels are cropped from the left, and 14 from the right.
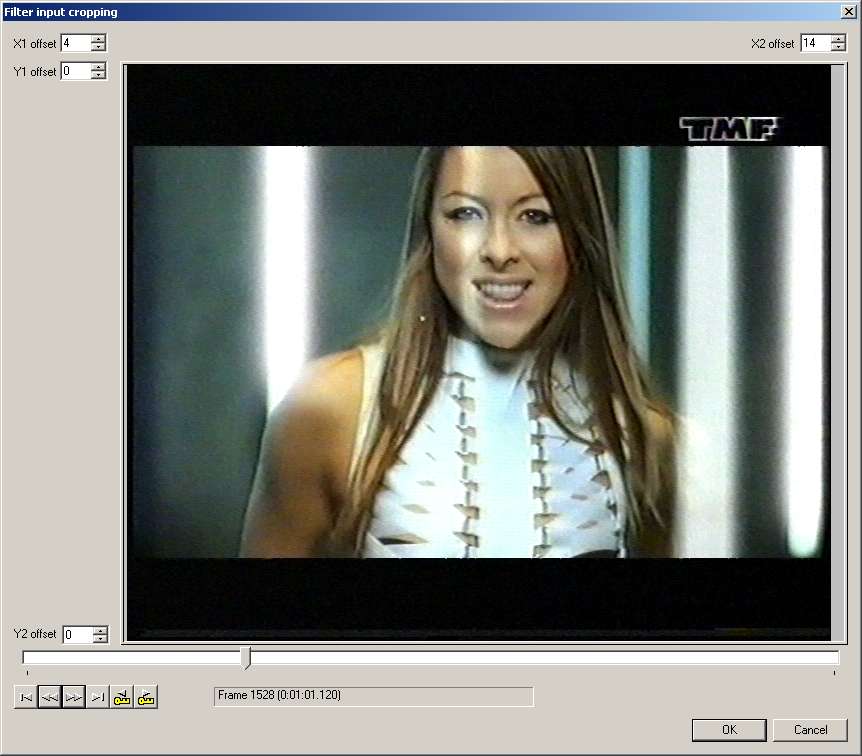
Make sure that you are cropping mod 2 (thus X1+X2 should be even), which is the case here.
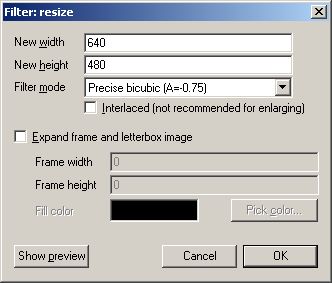
The resizing is explained in the sections 4 (frame sizes for newbies) and 5 (frame sizes for advanced users). As shown above with the cropping filter, choose the internal resizing filter this time from the list and hit "ok". In the configuration menu that pops up, enter the new size (for example 640x480). Under "Filter Mode" you have to choose a method how the resizing will be done. "Precise bicubic (0.75)" is good enough. Your filter chain becomes for example:
 |
 |
A final remark about cropping and resizing. Above, we avoided the use of Pixel Aspect Ratio (PAR). Its usage is necessary if you want to crop all black borders (horizontal and vertical borders), as some people like to do. If you don't care about that, you can proceed with the next subsection. If you are one of those people, continue reading. The reason for avoiding the use of PAR in this section is two folded. (1) It is difficult, and not necessary (unless you want to crop all black borders). (2) The previous versions of this guide, and also all other popular guides, treat this incorrectly. The reason is that they all assume that the active capture window is equal to the prescribed ITU standards (as given in the introduction 3.1). As explained in the sections 4 and 5, this is with most driver/chip combo's not the case. In other words, the PAR depends on the active capture window (and on the capture size). More information, including several cropping/resizng examples can be found in section 17 of the appendix.
The brightness is simply the amount of black and white. Setting it to 0 results in black, and setting it to 255 results in white. The contrast setting can be used to stretch or shrink the luma range. The saturation setting can be used increase the colorness, changing it to 0 results in greyscale. More information about color can be found in section 15 of the appendix.
Adjusting the brightness
The first thing you want to do is to set your darkest black to the lowest value (zero).
Install the ColorTools plugin. Open your video in VirtualDub. Scan through your
video and look for a fade to black. If you don't have one, just find a frame
with black. Note the frame number. An example is given below, because of the wide
black line.
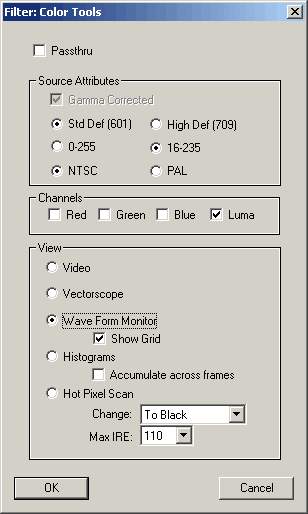
Choose Video->Filters->Add and add ColorTools. Set the options as the picture below. NTSC vs PAL does not matter, but you can change this if you like.
Go to add filters and add the internal VirtualDub Levels filter. Cancel out of
the config dialog. Move Levels up the filter chain so that it is before the
Waveform Monitor. Click on configure for the Levels filter. In the configure
dialog, click show preview to see the Waveform Monitor graph
(WFM). Check the box "Operate in luma instead of RGB", because we will adjust
the luma first. The color saturation will be done after this.
Scan through your video and look for
your black object. It should be graphed the lowest on the scale.
Scan back and forth through the video looking for a more black object, just to
make sure you have a good frame. (Try not to use black borders as your lowest
point. The borders may not be part of the original source, so it's better to
have a real part of the picture set to black.) Below is the waveform of the frame
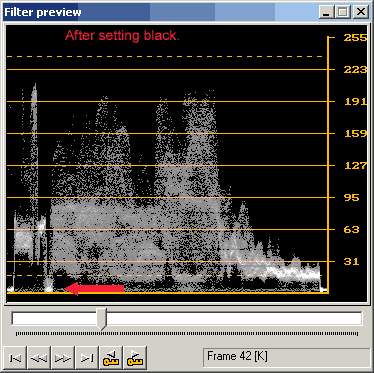
above. The left most input triangle is what we adjust to set the black to zero.
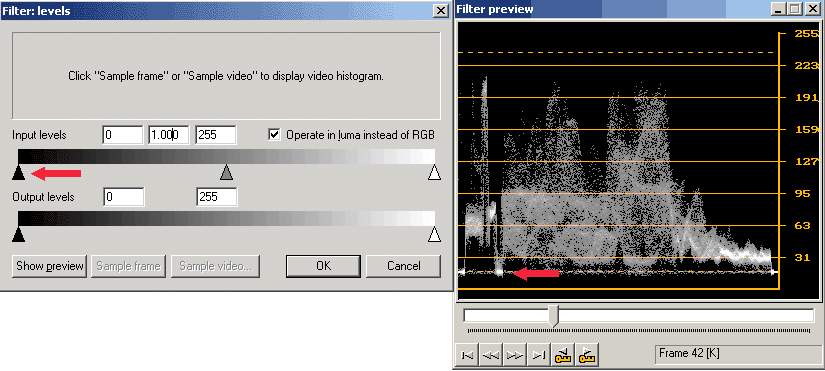
Move the Input triangle and note how the entire waveform moves up and down the scale. Set the levels so the black object just hits zero. Try not to crush the wave too low. A little is not a terrible thing. It is doubtfull that you can visually tell the difference between black zero and black 8. But if you crush too much, you will loose detail in the dark shadows.
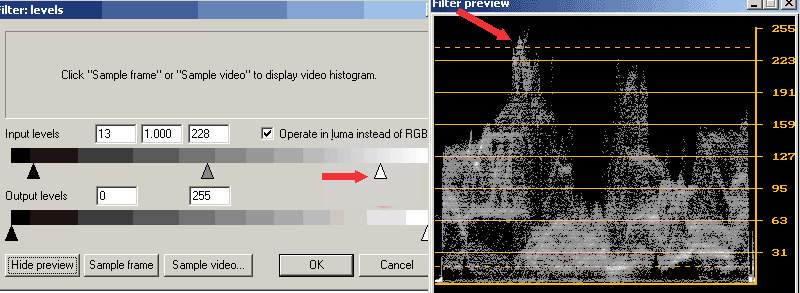
Adjusting the contrast
Within the Levels filter, open the preview and scan the WFM output
for a frame with the highest spot on the chart. Using the right most input
triangle on the levels adjustments, stretch and shrink the WFM output, to see
what this does. Now move the bright values up to get close to the top of the WFM
chart. Also in this case, make sure not to overshoot, especially if there is a big
bright spot in the video.
Adjusting the color saturation/intensity
The vividness of color can be
measured on a vectorscope. There are targets (little boxes) on a vectorscope.
They identify where a 75% intensity value for the primary (and complementary)
colors would fall. For TV viewing, you should never adjust colors past these
targets. Some high intensity/highly saturated colors are not valid for a TV
signal. They will most likely be clipped and cause distortions. Red is
especially problematic. TVs tend to actually add a red cast to a signal. So for
TV viewed source, you should try to keep the red a bit low.
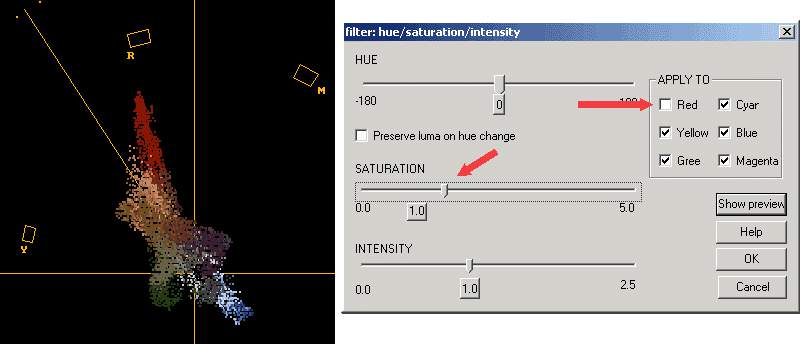
Add the hue/saturation/intensity filter by Donald Graft to your filter chain. Move it above color tools. Go to the config of color tools and select vectorscope. Go to the config of hue/saturation/intensity and select preview. Scan your source for the color peaks.
Here is the vectorscope chart of the frame shown above. The red shirt is the most intense color. We don't want to increase red here, because it will glow on the TV.
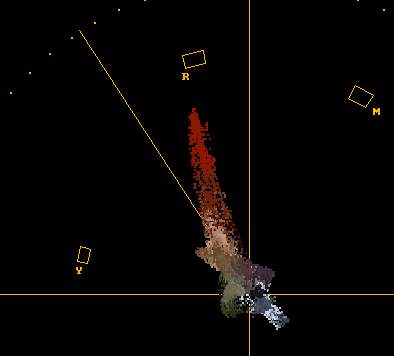
We decided to not change red, but to juice up the other colors. Go to the h/s/i filter and adjust the saturation slider, and watch the preview. Go back to the config of the color tools plugin and select 'passthru'. Now go back the the h/s/i preview again. You may have to jump back and forth a few times to get an idea of what you are adjusting. For PC viewing, adjust the colors to where you like them, by previewing the source. For TV viewing, you really need to preview on a TV with some type of TV-out connection. If you don't have this, you can adjust to where you like on the PC and then back off by about 1/2. Another pitfall is highlighting color bleed from subsampled source (like DV or DVB). Red is the easiest to spot. There is some in the sample above (and red is not increased). Here are the adjustments and the 'after' vectorscope.
And finally, the before and after picture.
These changes require the ability to preview on a TV if that is where you are going to view your final results. Unless you are willing to tweak quite a bit, these adjustments may be better left alone.
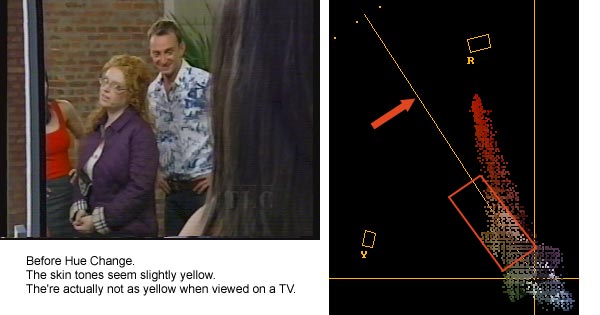
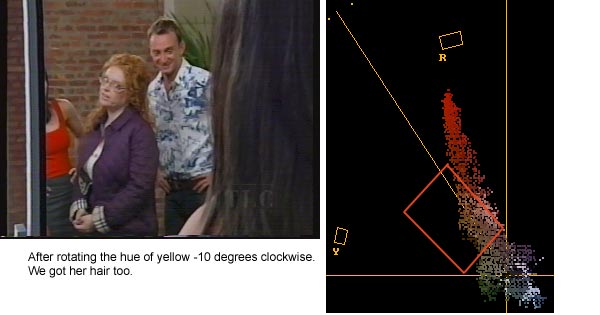
Adjusting hue (the color flavor)
Hue problems are most noticable in skin tones. Other than
these, being able to tell the proper hue of an object (without a comparison
sample), is difficult. For example, there is a wide range as to the proper color
of leaves. The vectorscope has a line,
around which all skin tones should fall. The line is between red and yellow.
Below is a sample frame and it's vectorscope chart. The skin tone line, and the
skin tones are identified. Also shown is an 'after' picture where the hue of
only the yellow has been slightly adjusted by -10. The Hue/Saturation/Intensity
by Donald Graft was again used to make this change. It can't be stressed
enough. Although the vectorscope can show you what you are doing with a hue
change, you really must preview on your final output device (TV or PC) to truely
know the results. Also, the results are really a matter of 'taste'.
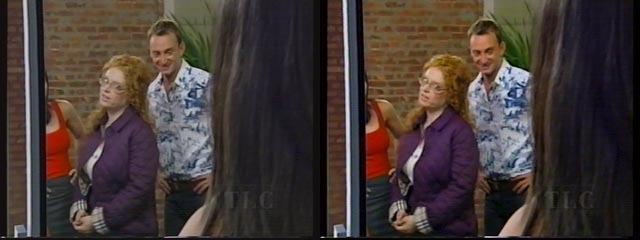
Before changing the hue:
After changing the hue:
Adjusting gamma
Changing the gamma allows you to increase/decrease the
brightness of a picture while keeping the brightest and darkest parts relatively
unchanged. Unfortunately, gamma is difficult to adjust in a standard way. You
must preview the results of your changes to see what is happening. If your
preview monitor's gamma does not match the gamma of the final playback monitor,
you risk poor results. Below is an example before and after of a gamma change.
We went back to the levels filter for this change and adjusted the gamma to
1.313, making the picture brighter. The result is that you can see more details in the black
hair to the right, but the picture is now a bit washed out. Make the adjustment
using the center triangle of the input levels. Moving the slider to the left
will brighten a dark frame and may bring out hidden details. Moving to the right
will enrich a washed out frame (darken a bright frame). TVs and PCs have different brightnesses. A
dark picture on a PC will appear much brighter on a TV. You must preview any
gamma changes on your final viewing device.

After adjust the colors, proceed with 7.1.11 Cutting out commercials.
References:
ColorTools
plugin (by Trevlac): Shows color information. It includes histograms, a
waveform monitor, and a vectorscope.
hue/saturation/intensity filter (by
Donald Graft): Allows you to change the hue, saturation and intensity.
Suppose you don't want to deinterlace, because you want to convert to dvd for example. This is a bit complicated to do, but it is possible. The order in which you could do the filtering:
Your filter chain becomes for example:

The reason that you have to use ViewFields, do the filtering and use UnViewFields is that you have to do the filtering on the fields separately. If you don't do that you will average lines from different fields, and get artefacts. There are several exceptions, where this doesn't happen (and you don't need to use ViewFields/UnViewFields):
Note that vertical resizing averages multiple lines, and will mess up your video when using it on an interlaced source.
References:
(Un)Viewfields:
Plugin to put the fields on top of each other.
Now we have to find the commercials. To accomplish this you should use the slider. To fine tune to the right frame you can use the cursor keys. If you additionally hold down the Alt-key you can jump ahead (or back) fifty frames per click.
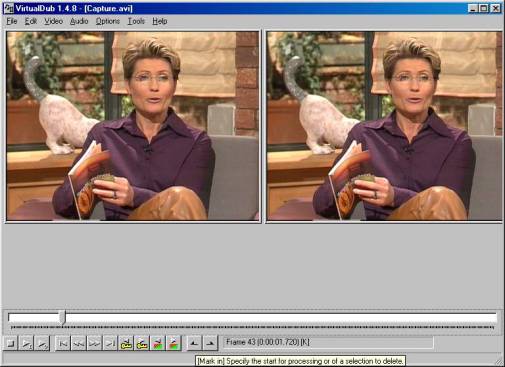
After you've found the starting point, hit ![]()
Then find the ending point the same way and hit ![]()
Now the selected range appears blue and you can delete it by hitting
DEL or by choosing Edit -> Delete selection:
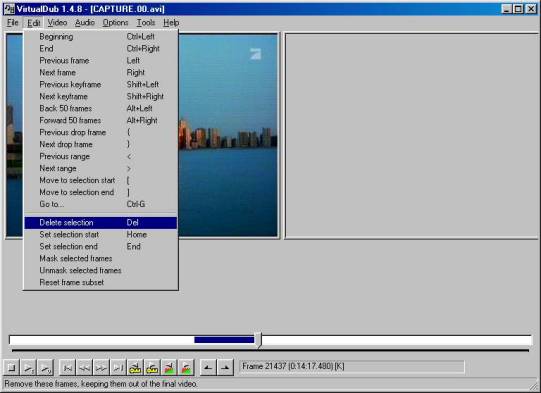
Repeat this step for each section you want to cut out. Afterwards put the slider all the way to the right and note the running time of the movie. You will need it for calculating the compression. (You find the time of the movie in my sample picture where 0:14:17.480 is displayed. This means 14 minutes, 17 seconds and 480 milliseconds.)
If you close VDub now, all the changes you made (filtering as well as the cut parts) are gone. To prevent this, it is highly recommended to save the processing settings: File -> Save processing settings (choose a name, i.g. "capture.vcf"). Now you can shutdown VDub and next time you start it, you just have to open your videofile again and then File -> Load Processing settings. You can continue where you stopped last time.
Footnote:
(1) Note that the fields are put on top of each other when using ViewFields. If
you apply a spatial denoiser, a unwanted consequence is that the border between
the fields is also smoothed. There is nothing which can be done to avoid that
(if it bothers you, you will have to use AviSynth). However, sometimes the top
and bottom of a clip is black, and it doesn't have any visual
consequences.
Next step: Video and audio Encoding and Authoring
Back to the Index: HOME
Last edited on: 06/12/2004 | First release: n/a | Authors: Version4Team | Content by Doom9.org