DVD2SVCD
All of you who have used CCE previously or created an SVCD with another tool
than FlaskMpeg and the bbMPEG plugin know that SVCD creation isn't exactly fun
as it requires many different tools and many steps. To cut a long story short:
All your cries for help have been heard and DVD2SVCD is the program for you
if you simply like to enter the number of CDs, which audio and subtitle streams
you want, then enter the DVD in the drive, press a button and when you come
back a few hours later you have the CD images ready to be burned. Lately support
for PVA (digital broadcast) and AVI input has been added, along with TMPG support.
DVD2SVCD combines many programs together: vStrip to rip the DVD (best ripper
around), DVD2AVI to create a DVD2AVI project, Mpeg2dec and Avisynth for the
fastest frameserving from DVD2AVI to CCE, BeSweet for high quality audio processing,
video encoding in CCE, TMPG or Procoder, then applying pulldown flag in case
of an NTSC video, multiplexing video and audio using bbMPEG and finally creating
SVCD images for burning using VCDImager. Furthermore DVD2SVCD supports multiple
audio streams and selectable subtitles (the latter only works on standalone
players). The program comes as a complete package that contains all the free
softwares required. You only have to add CCE SP or TMPG.
When in doubt about a certain program option please refer to the following
two reference documents: DVD2SVCD advanced reference
(for experienced users) and DVD2SVCD newbie
reference (for beginners).
You'll need the following software for this guide:
DVD2SVCD
CCE SP
or TMPG
or Canopus
ProCoder.
A Cue/Bin capable burning like Nero,
DVD Decrypter, burnatonce, etc.
Step 0: Setup
The DVD2SVCD installer will install all the noncommercial applications for
you. Then install CCE SP, TMPG or Procoder.
Step 1: DVD2SVCD
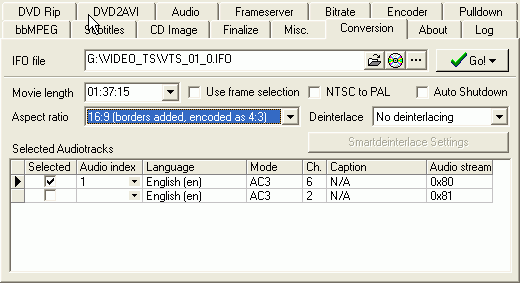
Start up DVD2SVCD. It starts with the about tab that gives you a very basic
guide. Maybe that's all you need. If not, let's get started. First you select
the Conversion tab.
 Press
the Disc button and DVD2SVCD will automatically load the main movie IFO file.
Selecting the Movie length dropdown list will get you to a window where you
can select the chapters you want to convert. By default this is set to all chapters.
In the Track Length dropdown list (shown when you activate the movie length
dropdown list) you can also select a PGC to convert. By default that's set to
the main movie, but if you have a multiangle or seamless branching movie you
may want to select another PGC. If you check Use frame selection you'll be given
the opportunity to select the part(s) of the movie you wish to encode. This
can be useful if you're not happy with the program's selection of the cutting
points (when you'll have to put in the next CD).
NTSC to PAL should be pretty straightforward. Check it if you have an NTSC
DVD and a DVD player that cannot handle NTSC SVCDs. The output of the conversion
will be a PAL SVCD (this option will not be active if you're processing a PAL
DVD). Auto Shutdown should be straightforward as well. If you check it the program
will shut down the PC once the conversion has been completed.
The back of the DVD case should tell you whether the aspect ratio is 4:3 or
16:9. Most movies are 16:9 nowadays but if you're not sure better look up the
disc at Amazon.com, they list whether it's 16:9 or not (usually 16:9 is called
"enhanced for widescreen TVs" or "enhanced for 16:9 TVs").
Once you're sure make the appropriate Aspect ratio selection.
At the beginning the first audio track is selected, if you configure the audio
in a later step you can then see here that more than one (or a different one)
has been selected. If you want multiple audio tracks you have to set an audio
index for the track to be added, then the appropriate line will be auto selected
(the selected checkbox will be checked).
If you have a PAL title that's interlaced select a deinterlace mode from the
dropdown list:
 If
you need a quick and dirty deinterlacing select SeparateFields/SelectEvery or
VerticalReduceBy2. Telecide is a more thorough operation and will give you the
best results. Smartdeinterlace and Blendfields are not really suggested.
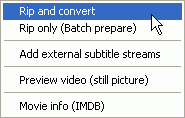
Now you're basically done and you could press the GO button, select Rip and
convert, sit back and relax and wait for the process to be finished. If you're
running DVD2SVCD for the first time you may want to go
through all the settings and make sure everything is properly set. Especially
the audio and subtitle
options should be configured or you might end up not having the proper audio/subtitle
language. If you can be bothered you could also set
the name of the disc each time you make a new project.

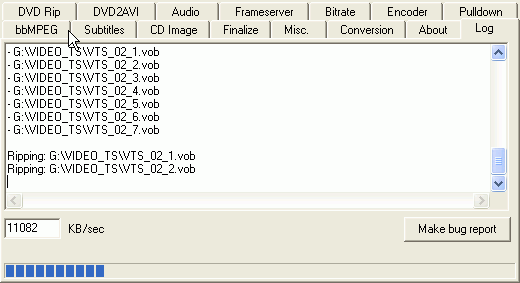
Once you've selected Rip and convert DVD2SVCD will switch to the log tab which
shows you what's being done at the moment:

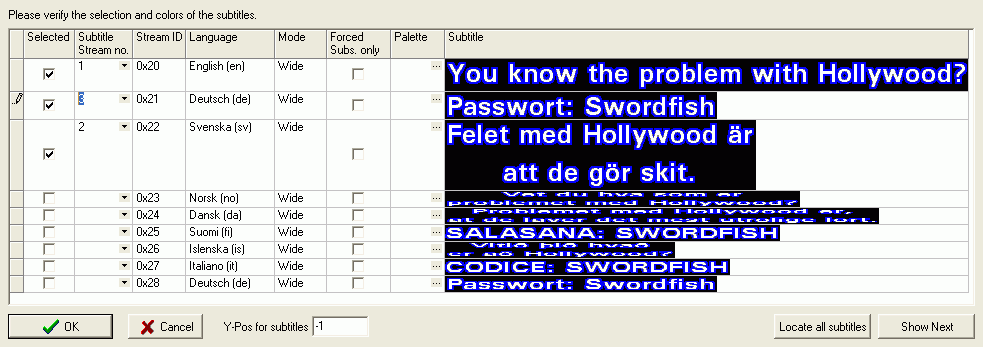
After a moment window will pop up prompting you to select the right subtitle
stream again, giving you a change to verify the subtitle selection and if the
colors are OK. If you want forced subtitles only (remember: those are the subs
that you can't turn off because they help you through foreign language bits
of the movie), check the Forced Subs only checkbox for the appropriate subtitle
stream.

Here's your last chance to change the subtitle selection. If the colors would
be off press the small ... button on the left of the respective subtitle preview
and change them until the preview looks okay. In the end your subtitles should
look like on the screenshot above.
If the one subtitle being shown isn't enough for you to decide just press the
Show Next button.
When everything is OK press OK. Now DVD2SVCD will automatically go through
all the steps. At the end you should have a number of CD image files (.bin/.cue).
If the process should abort at some point, go to the Misc. Settings tab, press
the Crash recovery button and select your project file (DVD2SVCD project file.d2s).
DVD2SVCD will then start the first unfinished task and everything after that.
Note that from this point on you can disregard all references to the save-to
directories when using DVD2SVCD unless you want to change to change them to
something else.
Step 2: Burning
Select one of the following options:
Nero
DVD Decrypter
Step 3: Troubleshooting
There's an excellent live
Q&A for DVD2SVCD and you can get help via the DVD2SVCD
Forum after having read the Q&A.
This document was last updated on
October 20, 2005
 Press
the Disc button and DVD2SVCD will automatically load the main movie IFO file.
Selecting the Movie length dropdown list will get you to a window where you
can select the chapters you want to convert. By default this is set to all chapters.
In the Track Length dropdown list (shown when you activate the movie length
dropdown list) you can also select a PGC to convert. By default that's set to
the main movie, but if you have a multiangle or seamless branching movie you
may want to select another PGC. If you check Use frame selection you'll be given
the opportunity to select the part(s) of the movie you wish to encode. This
can be useful if you're not happy with the program's selection of the cutting
points (when you'll have to put in the next CD).
 If
you need a quick and dirty deinterlacing select SeparateFields/SelectEvery or
VerticalReduceBy2. Telecide is a more thorough operation and will give you the
best results. Smartdeinterlace and Blendfields are not really suggested.

