DVD -> DVD-5 guide
Recordable DVDs are getting more and more affordable which finally makes it possible to create true DVD backups. Unfortunately there's a big catch: most DVDs on the market are dual layered ones (called DVD-9) and have a size larger than a recordable DVD. Until recently the only way to solve this problem was to rip the DVD, re-encode the video to a lower bitrate, and re-author the disc which is a lot of work and depending on the complexity of a DVD the re-authoring phase is extremely hard.
IfoEdit has a completely different approach: It allows you to strip audio and subtitle streams you don't need, to get rid of certain menus and extras but still preserve the general DVD structure. So for instance you could get rid of the annoying FBI warning, delete audio streams you will never use, and bring the size of the movie down to a point where you can burn it onto a recordable DVD media. And if all the stripping doesn't help you can always re-encode the video and simply replace the video stream the DVD has with a lower bitrate one. IfoEdit also allows advanced changes to the .ifo files (which contain the "logic" behind DVD playback) to edit out region codes, RCE protection, change menu links, etc.
You'll need the following software for this guide:
DVD Decrypter
IfoEdit
DVD-R calculator
ReMPEG2 or TMPG
& DGIndex
Nero or whatever DVD burning program came
with your burner
Table of content:
1: Rip the DVD
2: Analyze the structure of the DVD
3: Strip out unused menus
4: Strip out unwanted audio tracks and subtitle streams
5: Transcode the video stream
6: Add the new video stream
7: Making the disc region-free
8: Remove User option prohibitions
9: Final sector correction
10: Burn the disc
First you have to copy the whole content of your movie to your harddisk. The best tool for the job is DVD Decrypter.
Step 2: Analyze the structure of the DVD
After the ripping process you will have a number of IFO, BUP and VOB files. In this step we're going to analyze the structure of the DVD to find out which files to keep and which ones we don't need.
Step 3: Strip out unused menus
From this point on you should use the built-in DVD player in IfoEdit to check if the operations you just performed didn't render your project unusable. If for some reason the built-in player should not work for you you can always follow the HD playback guide instead.
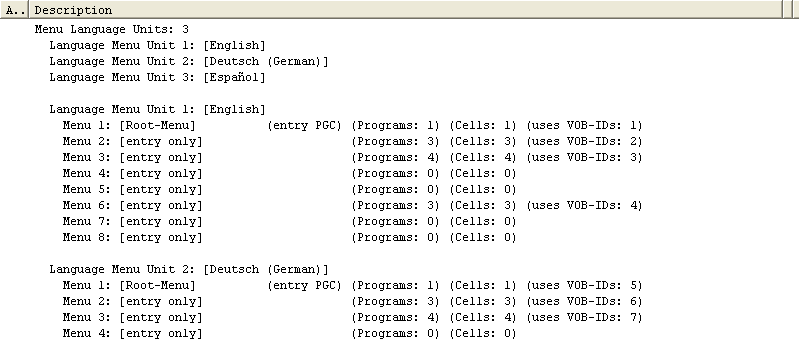
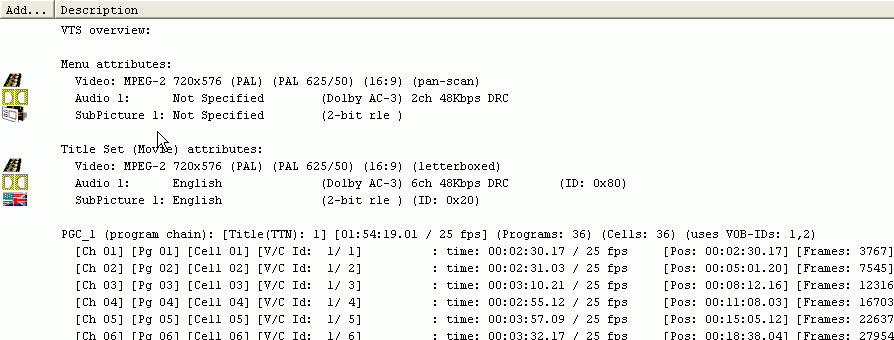
After creating the list of VOB IDs and Cell IDs you perfectly know what's on the disc and you can start to think about what you want to keep and what to delete. I don't really need the menu in 3 languages, my player is set to default to the English menu so let's dump the German and Spanish menu.
As we've established above, the menu pages are contained in vts_01_0.vob which has vts_01_0.ifo as associated ifo file so load that file in IfoEdit.
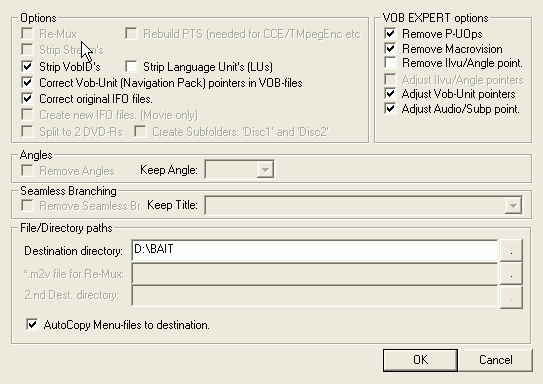
As you can see, we have 3 sets of menus and you can also see how the menu pages are linked but the linking does not concern us at this point. Now press the Menu Extras button.
 Make
sure all the options shown in the screenshot are checked.
Make
sure all the options shown in the screenshot are checked.
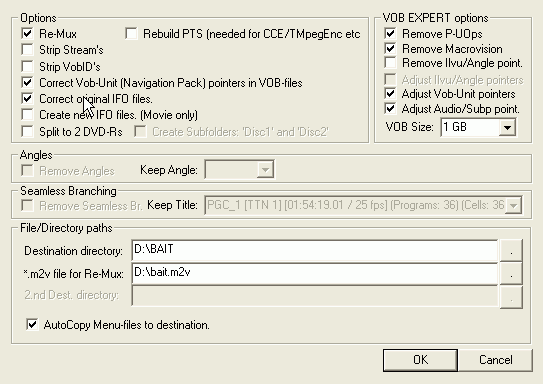
As we're not only going to get rid of the menu pages but actually want to strip the VOB IDs containing these pages from the VOB file make sure both Strip VobID's (that's to strip stuff from VOB files) and Strip Language Unit's (that's to get rid of the menu entries in the IFO) are checked.
Adjust Vob-Unit pointers in VOB EXPERT options must also be checked along with Remove P-UOps and Adjust Audio/Subp point as we're going to strip out some stuff and that requires that some offsets be changed since the size of the files changes. Last but not least we also have to adjust the IFO file so check Correct Vob-Unit (Navigation Pack) pointers in VOB-files and Correct original IFO files.
Click on the dot button to the right of the Destination Directory field to select the place where the changed files will be saved. It is very important that you keep track of what you do with the files and where to place them, so I suggest you create a bunch of directories to place files into, one for each step and then move files as the project goes along.
Last but not least we have the AutoCopy Menu-files to destination. This is
a useful option so you'll always have the menu files where you need them (though
in this particular step it doesn't matter as we're creating new menu files anyway).
Press OK and you'll get to another screen:
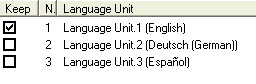
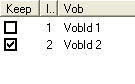
Here check unit 1 to keep the English menus and dump the rest. Press Strip it and you'll get to yet another selection screen:
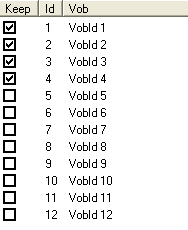 Here
you can select which VOB IDs you want to keep. As stated before, IDs 1-4 are
required as they contain the English menu pages, the rest is not needed anymore.
Here
you can select which VOB IDs you want to keep. As stated before, IDs 1-4 are
required as they contain the English menu pages, the rest is not needed anymore.
Make sure Correct IFO tables is checked then press Strip it. Another window will come up informing you of the progress of the operation. Once the new file has been written IFO edit will go over the VOB file again to adjust the offsets. You'll be notified with the warning shown below once the process has finished.

IfoEdit will also write a new vts_01_0.ifo file (and the associated bup file) to the folder your new VOB file gets written too.
As software DVD players do not support menus in different languages and always play the first menu language there's no way to check if our project works so let's proceed without verification. If you load up the newly created IFO you can see that the menus have indeed been stripped. The German and Spanish menus are gone.
And while we're at it let's strip out the annoying Copyright Notice that comes after the main movie: VOB ID1 in video_ts.vob. Load up video_ts.vob and press Menu extras.
 In
this case we only want to strip some VOB IDs so you don't have to check Strip
Language Unit's.
In
this case we only want to strip some VOB IDs so you don't have to check Strip
Language Unit's.
Then in the next screen only check VobId 2 as VobID 1 is the warning we want to remove.
Then make sure that correct IFO tables is selected and press Strip it.
If you have a seamless branching movie (that's a movie where you can select
to view different versions of the movie, like the theatrical release, the director's
cut, etc) you'll notice that the seamless branching options are enabled. In
case you have such a movie you may want to check out the seamless
branching notes before proceeding.
Step 4: Strip out unwanted audio tracks and subtitle
streams
In step 3 we created a new VTS_01_0.* and VIDEO_TS.* files. Now it's time to copy the rest of the files from the folder you ripped to to the new folder to once again have all the files at one place.
Load the new VTS_01_0.IFO and have a look at the languages and subtitles:

As you can see we have a lot of stuff here we don't really need. One audio language is more than enough for me and let's keep the English subs and get rid of the rest. Press VOB Extras to start the stripping process:
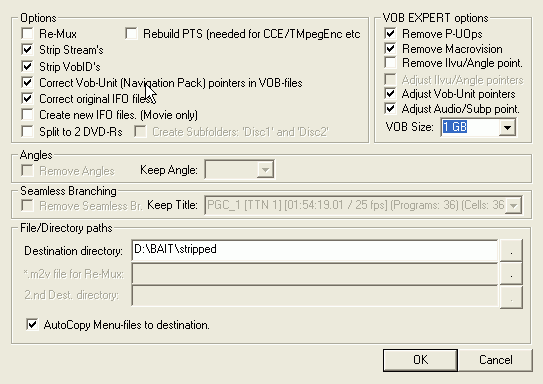 We're
not going to add a new video stream for the moment so Re-Mux stays unchecked.
Strip Stream's has to be checked of course since that's exactly what we want
to do. If you wanted to get rid of the Warner logo (recall it's VOB ID1 in the
main movie VOBs) you could check Strip VobID's and uncheck it from the VOB ID
selection screen that comes up later (we already stripped VOB IDs in the step
before so you know what to do).
We're
not going to add a new video stream for the moment so Re-Mux stays unchecked.
Strip Stream's has to be checked of course since that's exactly what we want
to do. If you wanted to get rid of the Warner logo (recall it's VOB ID1 in the
main movie VOBs) you could check Strip VobID's and uncheck it from the VOB ID
selection screen that comes up later (we already stripped VOB IDs in the step
before so you know what to do).
The correcting and adjusting stuff has to be checked again (but it's always checked by default), then set a destination directory and check AutoCopy Menu-files to destination so that once you're done with that step you have all the files together again.
Also don't forget to set the VOB size to 1 GB, then press OK.
In the next screen you'll be able to select which audio and subtitle streams
you want to keep. If you checked Strip VobID's the VOB ID selection dialogue
will come first.
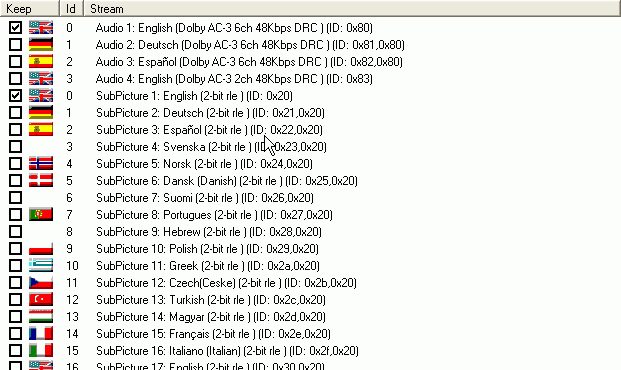
As said before, we want to keep audio stream 1 and subtitle stream 1 and get rid of the rest so only check these 2 streams. Make sure Correct IFO tables is checked and press the Strip it button to get started (if you would be stripping VOB IDs then the VOB ID selection screen would come up next). Once again you'll see a progress window but this time it will take considerably larger as several GBs have to be written (a RAID comes in handy here ;). The once again, IfoEdit will go over the VOBs a 2nd time to correct the offsets and the following warning marks the end of the process:
Now you will have a set of VOB files in the new directory along with an ifo and a bup file. Move the missing files (video_ts.*, vts_01_0.vob to the new folder to once again have a complete set of files). If you load the new ifo file in IfoEdit you'll see that the streams have indeed gone:
Verify that everything works as desired. Of course, the menu to select the language will no longer be able to select a new language, it will always be English, and the same applies to the subs.
Once you've verified that everything works properly let's have a look at what we've achieved so far. After the ripping process we had a size total of 6'056'374'272 bytes. Now we have 5'158'866'944 bytes. Almost a GB less but we're still not quite there as the size is still above the max size of a DVD-5.
Step 5: Transcode the video stream
Since the movie is still too large we have to transcode the video stream to bring the size down.
There are two options here: ReMPEG2 or TMPG. The former is known to cause less playback problems but also returns a lower quality stream than using the latter. If you don't follow any of the two ways and use another MPEG-2 stream you will have synch problems in the end.
An important note: Transcoding the video has been placed here after the stripping procedure for a reason: If you would get rid of some VOB IDs in the main movie VOB set and would transcode before the stripping, the alternative .m2v file you get would still contain the stripped VOB IDs and would therefore be too long. While it may work, it would be asynch as the audio stream would be shorter than the video stream. During my tests I actually did the inverse, I only transcoded VOB IDs 2-3 and then my movie was asynch by the amount of time the Warner logo is on.
Step 6: Add the new video stream
ReMPEG2 created a new video stream for you which we're now going to use to replace the oversized original stream.
Open up the latest version of vts_01_0.ifo in IfoEdit and select VOB extras.
 This
time check Re-Mux but not Rebuild PTS (that doesn't work properly yet anyway).
Note that the *.m2v file for Re-Mux is now active at the bottom of the window
so select your .m2v file there.
This
time check Re-Mux but not Rebuild PTS (that doesn't work properly yet anyway).
Note that the *.m2v file for Re-Mux is now active at the bottom of the window
so select your .m2v file there.
Strip Stream's and VobID's should be unchecked. Press OK to start the processing. As usual IfoEdit will make two passes, first it will write the new VOBs then it will correct the navigational pointers. It will also create a new ifo file for you yet again.
Once the operation is complete use a software DVD player to ensure your disc works as desired.
The rest of the steps has been put on a separate page.
This document was last updated on 12/24/02