There are several advantages of using AviSynth instead of Virtualdub:
More information about AviSynth and its filters can be found here.
Often you want to cut parts of your capture (for example to cut out commercials). An easy way to do this is to make an avs file (also called script), loading your captured avi:
AviSource("d:\capture.avi")
or if you captured in segments:
SegmentedAVISource("d:\capture.avi")
where the filenames are given by d:\capture.00.avi, d:\capture.01.avi and so on through d:\capture.99.avi. Open the avs file in VirtualdubMod and delete sections of your clip (select a range, and press del). Open the Script editor (under the Tools tab), and under the edit-tab select "Import Frameset as Trims". Your script should look like this (if the lines are switched, switch them back).
AviSource("c:\lopez-Jenny_from_the_bronx.avi")
Trim(0,3)
++ Trim(8,31) ++ Trim(43,101)
You can also use a utility called vcf2avs. It converts your processing
file (vcf) to an avs file including the trims. For more information see
AviSynth
Q&A or vcf2avs
by Dark$oul71 (discussion and download) and vcf2avs by bb (discussion and download). Btw those are not the same programs.
They just have been developed at the same time and therefore somehow carry
the same name!
If you do it manually, remember that VirtualdubMod starts counting
at frame one, while AviSynth starts counting at frame zero.
Suppose for example, that you want to keep the frames 1-2000, your script becomes:
AviSource("d:\capture.avi")
Trim(0, 1999)
or if you want to cut something in the middle (for example you want to remove the frames 100-200)::
clip = AviSource("d:\capture.avi")
Trim(clip, 0, 99)+Trim(clip, 201, 1999)
or if you captured in segments:
SegmentedAVISource("d:\capture.avi")
Trim(0, 1999)
There are different kinds of chroma artefacts which can be visible in your capture of a vhs recording
For details, have a look at Removal of chroma artefacts.
Your capture can contain temporal noise in the form of small dots (spots) and streaks found in some videos. A common cause of this is dirty VHS heads, but it can also be in the broadcast material itself. They can be removed with the DeSpot plugin. For details, have a look at Removal of clicks and scratches.
As stated in the introduction (section 3), an analogue signal is transmitted on field basis. During the capture process 50 fields are combined to 25 frames (for PAL), and 59.94 fields to 29.97 frames (for NTSC). This is called interlaced video. It can be trully interlaced (which means 50/59.94 different fields), or progressive "broadcasted" as interlaced (which means that half of the frames are duplicated). This will show up as a progressive stream after capturing (it might have a phase shift though, or the fields may be in the wrong order).
You have to decide whether you want to deinterlace or not. You should take into account the following considerations:
You should do this first before any smoothing, cropping or resizing. First you have to determine what kind of interlacing effect your source has. Note this is different for every broadcaster, and sometimes broadcasting. This implies you have to do this procedure every time you captured something. There are several cases:
PAL:
1) progressive with phase shifts and or swapped fields (fields in a reversed order)
2) trully interlaced
3) bad NTSC to PAL conversions (blended fields)
It might be that the deinterlacer you want to use doesn't work in the color format of your capture. KernelDeint for example requires YUY2 or YV12. If you have this problem you should convert the color format on the fields instead of the clip itself, for example:
AviSource("d:\capture.avi") # assuming source is RGB
Trim(begin, end)
ConvertToYUY2(interlaced=true)
To decide which case you are dealing adjust your avs file, open the script in VirtualdubMod. Right click on the clip and select "2x size" to enlarge the clip, and move the slider frame by frame (in a small range of frames, but with a lot of movement). If you hardly see any horizontal lines, it means we are dealing with case 1. If you see horizontal lines we are dealing with case 2. To find out whether you have blended fields (thus when dealing with case 3), adjust your script:
AviSource("d:\capture.avi") # assuming source is YUY2
Trim(begin, end)
SeparateFields()
such that the fields can be seen separately. Enlarge the clip and scroll through the fields. If you see blended fields (also called ghosting) it means you are dealing with case 3. If you are done with this, remove SeparateFields from your script.
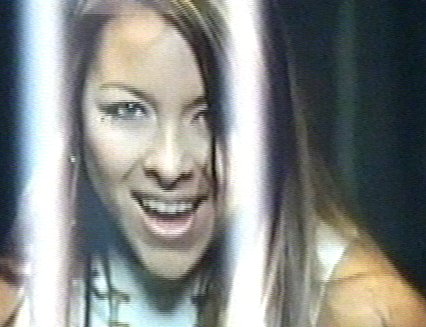
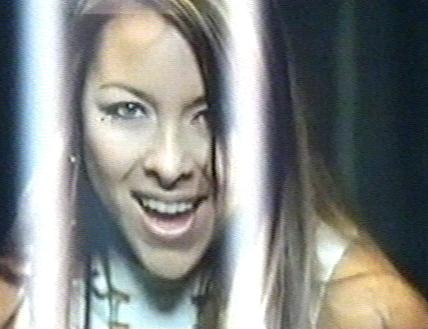
1) In the first case you can use Telecide (from the Decomb plugin) to correct for phase shifts and swapped fields. Phase shifts are automatically corrected when adding this filter. To check whether the field order is correct, enlarge the clip at 150%.
 |
 |
| figure 1: swapped fields | figure 2: correct |
If you see jaggies, as in figure 1 (look her the teeth or her skin), it means that the fields are swapped, and you have to swap them back using order=1. If you don't see jaggies (as in figure 2), it means that the field order is correct, and you can use order=0.
AviSource("d:\capture.avi")
Trim(begin, end)
Telecide(order=1)
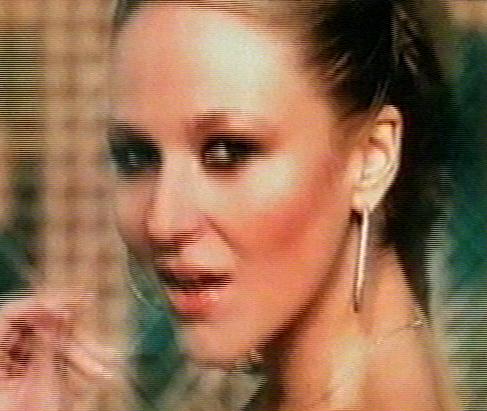
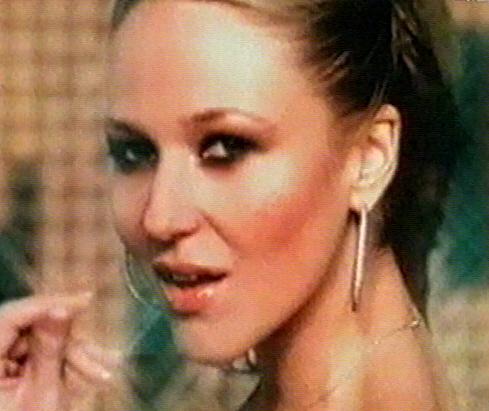
2) In the second case you can try using the KernelDeint plugin. It detects motion to stop the still area speckling, but in motion areas where interlacing is visible it will deinterlace it. In other words, it is a motionbased deinterlacer. As done as in case (1), determine the correct field order, and add KernelDeint to your script:
AviSource("d:\capture.avi")
Trim(begin, end)
KernelDeint(order=0)
We have choosen for the default settings here, the result looks similar as in figure 4:
 |
 |
| figure 3: orginal | figure 4: deinterlaced with Deinterlace MAP |
3) In this case you have bad luck. Best is to complain to your broadcasting station :) The problem is most likely a messed up NTSC -> PAL conversion.
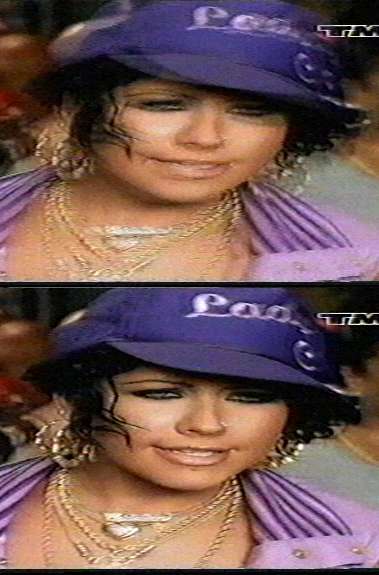 |
| figure 5: The upper field contains blending (or ghosts), the lower field is fine. |
If the blended fields are mainly present in one of the two fields you can throw away one field and "reduce" the other field by using the following script:
AviSource("d:\capture.avi")
Trim(begin, end)
SeparateFields()
SelectEven()
# or SelectOdd()
if you want the odd frames
HorizontalReduceBy2()
You will loose information, but it's better then the presence of blended fields. Note that your clip is scaled (vertically and horizontally) by a factor of two. Finally, if blended fields are presents in both fields, you are out of luck. There is no satisfying way of treating this kind of material. You have basically three choises:
a) Don't deinterlace, see 7.2.11 processing interlaced video.
b) Treat your clip as trully interlaced and use the following script:
AviSource("d:\capture.avi")
Trim(begin, end)
KernelDeint(order=0)
c) Use a Bob:
Bob()
SelectEven()
or for better quality, a smart Bob (using the KernelDeint plugin for example):
# SmoothBob uses Smoothdeinterlace to bob the video.
# Parameter Topfirst = 1 (default) will use the top field as
the first field, = 0 will use the bottom field as first field
function KernelBob(clip a, int ord)
{
f = a.KernelDeint(order=ord)
e = a.SeparateFields.Trim(1,0).Weave.KernelDeint(order=1-ord)
Interleave(f,e)
}
# SmoothDeinterlace requires YUY2:
ConvertToYUY2(interlaced=true) # if necessary
KernelBob()
SelectEven()
NTSC:
1) telecined material (29.97 fps)
2) trully interlaced (29.97 fps)
3) phase shifts and or swapped fields (29.97 fps)
It might be that the deinterlacer you want to use doesn't work in the color format of your capture. KernelDeint for example requires YUY2 or YV12. If you have this problem you should convert the color format on the fields instead of the clip itself, for example:
AviSource("d:\capture.avi") # assuming source is RGB
Trim(begin, end)
ConvertToYUY2(interlaced=true)
First check whether the clip is telecined. Open the avs file in VirtualdubMod:
AviSource("d:\capture.avi") # assuming source is YUY2
Trim(begin, end)
If in every five frames you see three progressive and two interlaced frames you have a telecined clip. In that case people perform an InVerse TeleCine (IVTC), which is case 1. For the other two cases: right click on the right (target) clip and select "2x size" to enlarge the clip, and move the slider frame by frame (in a small range of frames, but with a lot of movement). If you see horizontal lines we are dealing with case 2. If you hardly see any horizontal lines, it means we are dealing with case 3.
AviSource("d:\capture.avi")
Trim(begin, end)
Telecide(order=0)
Decimate(cycle=5)
2) In this case, use the KernelDeint plugin. It detects motion to stop the still area speckling, but in motion areas where interlacing is visible it will deinterlace it. In other words, it is a motionbased deinterlacer. See PAL case 2, which is similar. Your script becomes for example:
AviSource("d:\capture.avi")
Trim(begin, end)
KernelDeint(order=0)
3) In this case, use the Telecide (from the Decomb plugin) to correct for phase shifts and swapped fields. See PAL case 1 which is similar. Your script becomes for example:
AviSource("d:\capture.avi")
Trim(begin, end)
Telecide(order=0)
References:
What is Deinterlacing? Facts, solutions,
examples: Nice overview site.
IVTC tutorial: More about IVTC
and deinterlace stuff.
Decomb,
KernelDeint and other deinterlacers/decombers: Here you can find plugins for AviSynth
v2.0x and v2.5x.
If you have a capture with a disturbing logo in the picture you might want to try to remove it with a logo removal filter. Have a look at Removal of logos (only for more advanced users recommended). Some people prefer a clean logo over a blurry patch in the video. So it is up to you if you want to use one, and it is worth all the hazzle. Anyway do not expect perfect results.
Usually you will see (about) ten lines of garbage at the bottom of your captured clip. This is head switching noise caused by your VCR. Since this is ugly we should remove it and replace it with black pixels. So your script becomes for example (assuming PAL):
LoadPlugin("c:\Program Files\AviSynth25\plugins\LoadPluginEx.dll")
LoadPlugin("c:\AviSynth2\plugins\dustv5.dll")
AviSource("d:\capture.avi")
Trim(begin, end)
Telecide(order=0)
Letterbox(0,
16) # You can also block out the left and right portions. Crop
and AddBorders
can also be used (a bit slower).
Note, that the number of pixels you crop of an YUY2 (and also YV12) clip must be even.
There are basically two reasons why you should denoise (= smooth) a clip:
a) Analogue captures (as opposed to digital captures which are often clean)
contain noise. The source of this noise is mainly due to the cables carrying the
signal to your house.
b) To make your final clip more compressible. This is especially important if
your target is SVCD (or VCD), because DivX/XviD compresses better than SVCD/VCD.
The main difficulty is to find good a trade off between noise/compressibility, the level of detail you want to keep in your clip and the encoding time. Best is to denoise before any resizing, because you will remove more noise this way. It is recommended to use a spatial (denoising within a frame) and a temporal denoiser (denoising between frames), both with low settings. The disadvantage of a spatial denoiser is that it causes blurring, and the disadvantage of a temporal denoiser is that it causes ghosting. In general, one should apply a temporal denoiser first, followed by a spatial denoiser (with low settings) which cleans the remaining artefacts. The denoisers which give the best quality are spatio-temporal denoisers. They apply a temporal smoother to relatively static areas and a spatial smoother to moving ones.
If you look into the forums and look at posted script, you will see sometimes that people are using tons of smoothers in their script. This is not necessary and it only costs much encoding time. Remember that even if you use one smoother your encoding time will decrease dramatically.
Some examples of spatio-temporal smoothers: NoMoSmooth, Convolution3D, PixieDust, FluxSmooth, MipSmooth and STMedianFilter.
What denoisers should you use? The difference in quality between the denoisers is significant, but also the encoding time can vary a lot. Ivo and Wilbert peformed an analogue comparison test, which compares different denoisers. If you are interested you can read it through, and decide which denoisers to use.
If you want to use AviSynth v1.0x/v2.0x plugins in AviSynth v2.5x, here is a way described how to do that. Note these plugins require YUY2. Note that AviSynth v2.5x has an auto plugin loading feature, so you don't need load those plugins manually.
# LoadPlugin("c:\Program Files\AviSynth25\plugins\LoadPluginEx.dll")
# LoadPlugin("c:\AviSynth2\plugins\dustv5.dll")
# LoadPlugin("c:\Program Files\AviSynth25\plugins\peachsmoother.dll")
# LoadPlugin("c:\Program Files\AviSynth25\plugins\nomosmooth.dll")
# PixieDust(5) # very slow, but compression (and noise
removal) is good, while preserving much detail.
# PeachSmoother() # see the corresponding readme for getting the
optimal settings.
# NoMoSmooth()
# Convolution3d(preset="vhsBQ")
# FluxSmooth(7, 7)
# STMedianFilter(8, 15, 4, 7)
We used the standard settings here, you can tweak them yourself if you are not satisfied. PixieDust is very good, so the script becomes for example:
# using AviSynth v2.5x (clip is YUY2):
LoadPlugin("c:\Program Files\AviSynth25\plugins\LoadPluginEx.dll") # be carefull not to
put this plugin in your plugin dir.
LoadPlugin("c:\AviSynth2\plugins\dustv5.dll")
AviSource("d:\capture.avi")
Trim(begin, end)
Telecide(order=0)
LetterBox(0, 16)
PixieDust(5)
When capturing long clips, you could use PeachSmoother for example:
If you want to use a spatial and a separate temporal smoother you can use for example "VagueDenoisers" and "TemporalCleaner". The script becomes:
# using AviSynth v2.5x (clip is YUY2):
LoadPlugin("c:\Program Files\AviSynth25\plugins\LoadPluginEx.dll")
AviSource("d:\capture.avi")
Trim(begin, end)
Telecide(order=0)
LetterBox(0, 16)
VagueDenoiser(threshold=4, method=1, nsteps=6, chroma=true)
TemporalCleaner(6, 12)
References:
Denoisers:
Here you can find plugins for AviSynth v2.0x and v2.5x.
As an example, it is assuming a clip is captured with a SAA7108 chip with an active capture window of 53.333 Ás (at 720x576). In the examples in the sections 3 and 4, it is explained that this implies that 18 pixels have to be removed from the horizontal (black) borders. By visual inspection (see screenshots in 7.1.7), it turns out that 4 pixels should be cropped from the left, and 14 pixels from the right. The script becomes:
LoadPlugin("c:\Program Files\AviSynth25\plugins\LoadPluginEx.dll")
LoadPlugin("c:\AviSynth2\plugins\dustv5.dll")
AviSource("d:\capture.avi")
Trim(begin, end)
Telecide(order=0)
LetterBox(0, 16)
PixieDust(5)
Crop(4,0,-14,-0)
The resizing is explained in the sections 4 (frame sizes for newbies) and 5 (frame sizes for advanced users), the cropped image should be resize to 640x480 (or a scaling of it). The script becomes:
LoadPlugin("c:\Program Files\AviSynth25\plugins\LoadPluginEx.dll")
LoadPlugin("c:\AviSynth2\plugins\dustv5.dll")
AviSource("d:\capture.avi")
Trim(begin, end)
Telecide(order=0)
LetterBox(0, 16)
PixieDust(5)
Crop(4,0,-14,-0)
BicubicResize(640, 480)
A final remark about cropping and resizing. Above, we avoided the use of Pixel Aspect Ratio (PAR). Its usage is necessary if you want to crop all black borders (horizontal and vertical borders), as some people like to do. If you don't care about that, you can proceed with the next subsection. If you are one of those people, continue reading. The reason for avoiding the use of PAR in this section is two folded. (1) It is difficult, and not necessary (unless you want to crop all black borders). (2) The previous versions of this guide, and also all other popular guides, treat this incorrectly. The reason is that they all assume that the active capture window is equal to the prescribed ITU standards (as given in the introduction 3.1). As explained in the sections 4 and 5, this is with most driver/chip combo's not the case. In other words, the PAR depends on the active capture window (and on the capture size). More information, including several cropping/resizng examples can be found in section 17 of the appendix.
If you at your capture, you might see that the colors are be a bit distorted. Shiny colors will be more shiny, dark colors will be more dark. Normally YUV values are not mapped from 0 to 255 (PC range), but a limited range (TV range). This limited range is 16-236 for the luma component and 16-240 for the chroma component of the YUV signal. The problem is that some capture devices scale it to the range 0-255, and this must be scaled back to 16-236. Scroll through the clip and see if your colors are indeed distored. If so, it can be corrected by using the internal ColorYUV filter:
ColorYUV(levels="PC->TV")
Scroll again through the clip, to see if the distortion is corrected. If not, remove the line and correct it manually. Properly set brightness, contrast, and saturation can greatly improve video quality. The process of basic color correction is simple; adjust the the range of black to white (tonality), and the color balance (hue and saturation) so that the image (pick any of the following)
The brightness is simply the amount of black and white. Setting it to 0 results in black, and setting it to 255 results in white. The contrast setting can be used to stretch or shrink the luma range. The saturation setting can be used increase the colorness, changing it to 0 results in greyscale. More information about color can be found in section 15 of the appendix.
Adjusting the brightness and
contrast
We will use the histogram the adjust the brightness and contrast. (You can also
use Tweak for doing this.) Since
the histogram requires YV12, we add the following lines to the script:
ColorYUV(off_y=0,
gain_y=0)
ConvertToYV12()
Histogram()
Open this script in VirtualdubMod. Right-click on the clip and select normal to enlarge the clip. You will see the clip with next to it the histogram. On the horizontal axis the luminance is plotted. If you look closely you will see that the range 0-15 is brown (meaning invalid), the range 16-236 black (valid) and 237-255 brown (invalid). The histogram itself can be white (if it lies in the valid range 16-236) or yellow (if it lies in the invalid range). Note that the brown bars are exaggerated, otherwise you won't see them hardly on the images (because they are compressed).
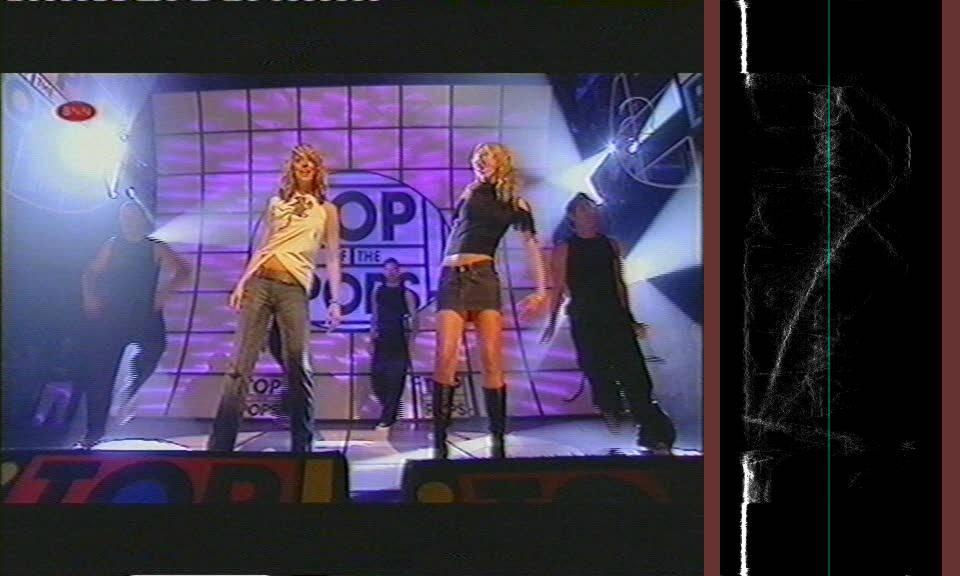
Look up a part of a frame that is black (black borders for example, this frame for example). If the histogram is yellow on that part, it means that we have to increase the luminance (i.e. brightness) till the histogram becomes white. If it is white we have to decrease the luminance just before it becomes yellow. Open the script editor (under tools), adjust the off_y and press F5 for previewing. The script becomes for example:
ColorYUV(off_y=-20, gain_y=0)
ConvertToYV12()
Histogram()
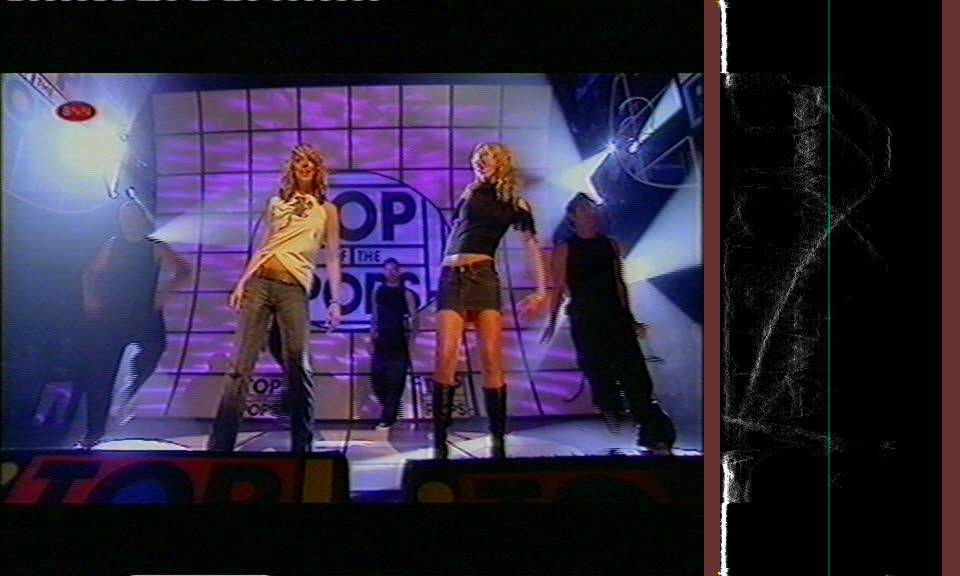
Look up a part of a frame which is very bright (the frame above for examle). Increase (or decrease if necessary) the gain_y to stretch the luminance till you can't increase it any further. The script becomes for example:
ColorYUV(off_y=-20, gain_y=64)
ConvertToYV12()
Histogram()
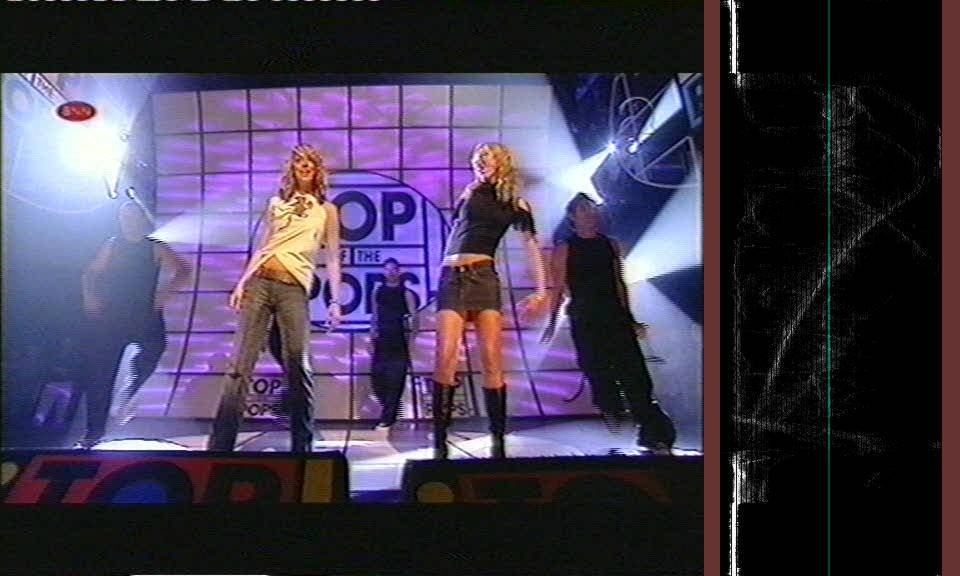
You will see that also the left boundary has moved (because it was about 16 instead of 0, and changing gain_y means multiplying). Go back to your original frame, and adjust it again. The script becomes for example:
ColorYUV(off_y=-28, gain_y=64)
ConvertToYV12()
Histogram()
Continue till you are satisfied. If you are done, remove the Histogram from the script, and it is time to adjust the saturation (i.e. colorness/chrominance).
Adjusting the color
saturation/intensity
It's not possible to adjust the saturation of the colors red, green or blue
separately in AviSynth (unless you know how to import VirtualDub filters in
AviSynth (1)). The saturation can only be adjusted for all colors at
once with ColorYUV or Tweak. You can use the VScope plugin to graph the colors
of a frame. It shows a waveform monitor (wfm) and a vectorscope. The line
VideoScope("both", true, "U", "V", "UV")
for example, adds a wfm for U at the bottom, one for V on the side, and one for UV at the right corner of the frame (all three of them have the range 0-255).
Here ColorYUV will be used. The arguments "cont_u" and "cont_v" depend on the saturation in the following way:
cont_u = - (1 - saturation_u) * 256 (similar for cont_v)
Example: saturation_v = 0.8 implies cont_v = - 0.2 * 256 = - 51.2 (and cont_u = 0). Look up a frame which contains something very red (for adjusting V) and one which contains something very blue (for adjusting U), or just look at the skin of people, and increase/decrease the saturation. The script becomes for example:
saturation_v = 0.8
cv = - (1-saturation_v)*256
ColorYUV(off_y=-28, gain_y=64, cont_u=0, cont_v = cv)
VideoScope("both", true, "U", "V", "UV")
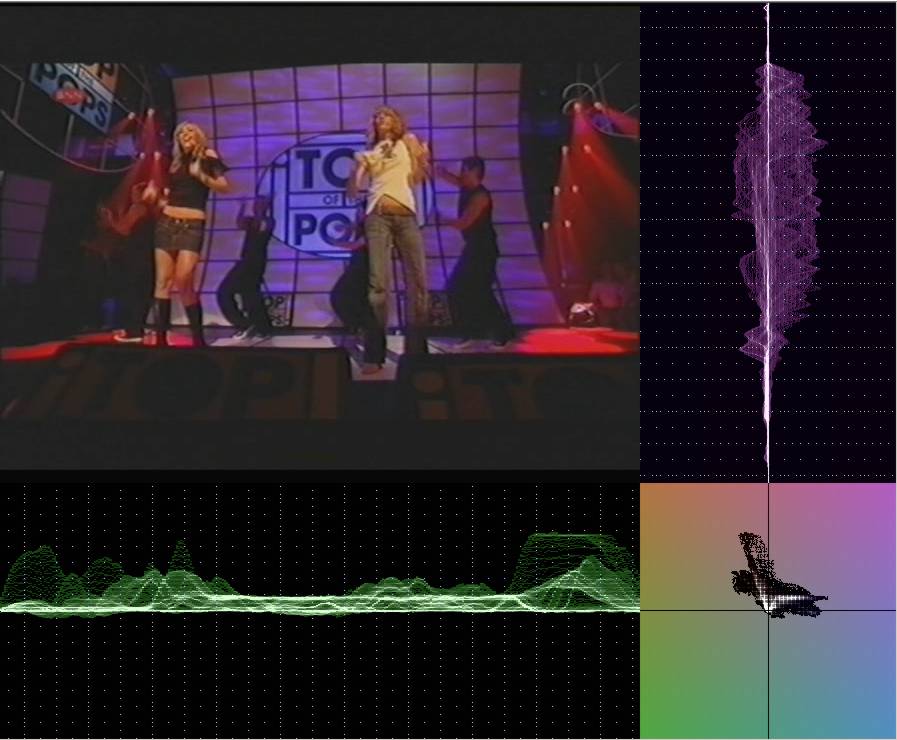
To be sure that the luminance and chrominance lie in a valid range (that is 16-235), set opt="coring" as an option in ColorYUV. Remove the VScope plugin from the script, since we don't need it anymore:
sat_v = 0.8
cv = - (1-sat_v)*256
ColorYUV(off_y=-28, gain_y=64, cont_u=0, cont_v = cv, opt="coring")
References:
VScope (by Randy French):
Plugin which shows color information. It includes a waveform monitor, and a
vectorscope.
These changes require the ability to preview on a TV if that is where you are going to view your final results. Unless you are willing to tweak quite a bit, these adjustments may be better left alone.
Adjusting hue (the color flavor)
Hue problems are most noticable in skin tones. Other than these, being able
to tell the proper hue of an object (without a comparison sample), is difficult.
For example, there is a wide range as to the proper color of leaves. The
vectorscope has a line, around which all skin tones should fall. The line is
between red and yellow. Below is a sample frame and it's vectorscope chart. The
skin tone line, and the skin tones are identified. Also shown is an 'after'
picture where the hue of only the yellow has been slightly adjusted by -10. The Tweak
filter can be used to make this change. It can't be stressed enough.
Although the vectorscope can show you what you are doing with a hue change, you
really must preview on your final output device (TV or PC) to truely know the
results. Also, the results are really a matter of 'taste'. For Tweak, positive
hue numbers rotate clockwise. This adjustment has much the same effect as what
was done in the virtualDub hue adjustment section. The only difference is that
with Tweak, we adjusted (rotated) the entire range of colors. In vdub, we just
rotated yellow.
Tweak(bright=0, cont=1, sat=1.1, hue=10, coring=false)
Adjusting gamma
Changing the gamma allows you to increase/decrease the
brightness of a picture while keeping the brightest and darkest parts relatively
unchanged. It can be done with the Levels filter. Unfortunately, gamma is difficult to adjust in a standard way. You
must preview the results of your changes to see what is happening. If your
preview monitor's gamma does not match the gamma of the final playback monitor,
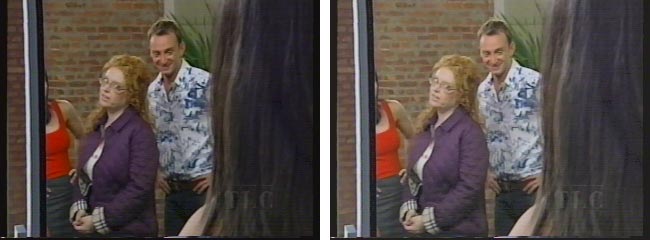
you risk poor results. Below is an example before and after of a gamma change.
The gamma is adjusted to 1.313 with the Levels filter, making the picture brighter.
Levels(0, 1.313, 255, 0, 255)
The result is that you can see more details in the black hair to the right, but the picture is now a bit washed out. Make the adjustment using the center triangle of the input levels. Lowering the value will brighten a dark frame and may bring out hidden details. Highering the value will enrich a washed out frame (darken a bright frame). TVs and PCs have different brightnesses. A dark picture on a PC will appear much brighter on a TV. You must preview any gamma changes on your final viewing device.
It is always nice to fade in and fade out your clip, but of course not necessary. If you do it, you can use the FadeIO2 filter. Your script becomes for example:
LoadPlugin("c:\Program Files\AviSynth25\plugins\LoadPluginEx.dll")
LoadPlugin("c:\AviSynth2\plugins\dustv5.dll")
AviSource("d:\capture.avi")
Trim(begin, end)
Telecide(order=0)
LetterBox(0, 16)
PixieDust(5)
BicubicResize(640, 480)
ColorYUV(levels="PC->TV")
FadeIO2(13)
If you completed your AviSynth script, you can proceed with the Encoding and Authoring section.
If you want to process interlaced video (thus leaving it interlaced), you should remember the following issue. When using only a spatial smoother, it is sufficient to use:
SeparateFields()
Filter(...)
Weave()
But when using a spatio-temporal smoother (or just a temporal smoother), this produces incorrect results. The reason is that the temporal smoothing occurs over two fields from the same frame (this happens for half the number of frames). To avoid this, you should put them in different clips:
SeparateFields()
even = SelectEven(last).Filter(...)
odd = SelectOdd(last).Filter(...)
Interleave(even, odd)
Weave()
The script above becomes for a spatial smoother:
LoadPlugin("c:\Program Files\AviSynth25\plugins\LoadPluginEx.dll")
LoadPlugin("c:\AviSynth2\plugins\dustv5.dll")
AviSource("d:\capture.avi")
Trim(begin, end)
SeparateFields()
LetterBox(0, 16)
SpaceDust(5) # spatial smoother
BicubicResize(640, 240) # note that the height is divided
by two, since we are resizing the fields instead of the frames
ColorYUV(levels="PC->TV")
FadeIO2(13)
Weave()
and spatio-temporal smoother:
LoadPlugin("c:\Program Files\AviSynth25\plugins\nomosmooth.dll")
AviSource("d:\capture.avi")
Trim(begin, end)
SeparateFields()
LetterBox(0, 16)
even = SelectEven(last).NoMoSmooth() # spatio-temporal smoother
odd = SelectOdd(last).NoMoSmooth()
# spatio-temporal smoother
Interleave(even, odd)
BicubicResize(640, 240) # note that the height is divided
by two, since we are resizing the fields instead of the frames
Weave()
ColorYUV(levels="PC->TV")
FadeIO2(13)
The noise in your capture is mainly due to the cable that carries the television signal to your home. This implies the noise will be random, compared to a different broadcasting (of the same clip). Using AviSynth it is possible to average multiple broadcastings (of the same clip) using the filter Overlay. The idea is to deinterlace first before averaging the clips, and use a lighter denoiser afterwards. First you have to determine whether there are frames present in the first source that are missing in the secound source (and the other way around). Look up which frames they are (by opening both captures at the same time, looking up the first common frame and skipping through the clips by say 1000 frames). Your script becomes for example:
clip1 =
AviSource("f:\atomic_kitten-the_tide_is_high.avi").Trim(248,5389).Telecide(order=0)
clip2 = AviSource("f:\atomic_kitten-the_tide_is_high2.avi").Trim(129,5271).DeleteFrame(501).Telecide(order=0)
Overlay(clip1,
clip2, mode="blend", opacity=0.5)
LetterBox(0, 16)
PixieDust(5)
BicubicResize(640, 480)
sat_v = 0.8
cv = - (1-sat_v)*256
ColorYUV(off_y=-28, gain_y=64, cont_u=0, cont_v = cv, opt="coring")
FadeIO2(13)
References:
Averaging
two analog captures for noise reduction: A big Doom9-thread about averaging
of analog captures to reduce noise.
Footnotes:
(1) See this doom9 thread
for using the clrtools plugin in AviSynth. The import script for the
hue/saturation/intensity filter by Donald Graft can be found here
(search for VD_Hue).
Next step (optional): Compressibility test with Gordian Knot
Next step: video and audio Encoding and Authoring
Back to the Index: HOME
Last edited on: 06/12/2004 | First release: n/a | Author: Version4Team | Content by Doom9.org