The following guide aims to help you through the first steps in creating a
DVD from a DV source.
You'll need the following software for this guide
your favorite DV editing program (see below for a list of programs)
AviSynth
BeSweet & GUI
CinemaCraft Encoder
(CCE), TMPGEnc,
Canopus
Procoder or MainConcept
MPEG Encoder
your favorite DVD authoring program
0. Transfer video from Camcorder to your PC
Before you can start editing your video, you first have to transfer
it to your PC. Most DV camcorders have digital outputs that allow for a
quick and lossless transfer.
1. Cutting, Editing, Transitions, etc.
The first step in DVD creation is the most creative part: Editing your video.
This can be done using a variety of basic DV editing programs like Ulead
VideoStudio, MGI
VideoWave, Pinnacle
Studio, or using a professional software, e.g. Adobe
Premiere, Ulead
MediaStudio Pro, or SonicFoundry
Vegas Video. The large variety of editing programs and the different editing
options they offer is beyond the scope of this guide. So capture your DV file
from your camcorder using the editing software of your choice, and edit it until
the result pleases you (obviously I can't tell you where to cut and which effects
to use, as everybody has a different opinion on this subject).
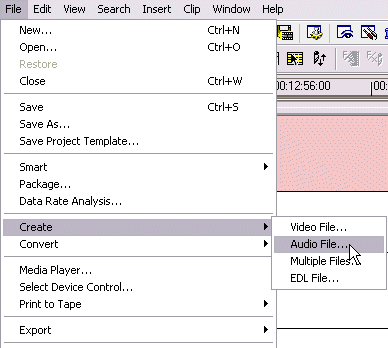
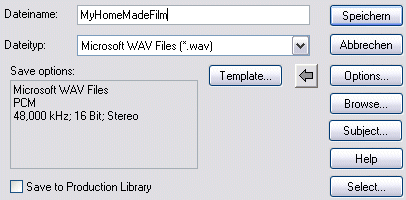
Once the editing step is done, save the DV file as either type-1 or as a type-2
AVI. Save the audio separately to a WAV file (your DV editing program should
offer this option - below is an example how this could look).
2. Encoding the audio
You can use either MP2 or AC3 (Dolby Digital 2.0) audio for a PAL DVD. MP2 is
not allowed on NTSC DVDs, but certain players still support it. Make sure your
DVD authoring software supports AC3; if not, you have to use MP2. My preferred
authoring program is DVDlab,
which supports AC3. Use BeSweet to convert your WAV file to the desired target
format. There is a BeSweet GUI available, which you can use for MP2 encoding;
for AC3 I prefer AC3Machine, which is a GUI for BeSweet as well, but focused
on AC3 encoding.
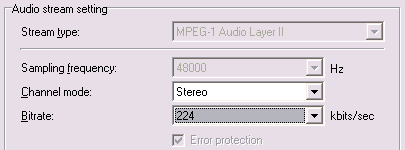
2.1 MP2 encoding
Start up BeLight, drag and drop your WAV file onto BeLight, select the MP2 DVD preset and start encoding. For more information on MP2 encoding with BeSweet, check out this guide.
2.2 AC3 encoding
Start up BeLight, drag and drop your WAV file onto BeLight, select the AC3
192 kbit/s 2 channel preset and start encoding. For more information on AC3
encoding with BeSweet, check out this guide.
3. Encoding the video
DVDs use MPEG-2 as video format. There are several good MPEG-2 encoders available:
CinemaCraft
Encoder (CCE), TMPGEnc,
Canopus
Procoder, MainConcept
MPEG Encoder, and a few more. In this guide I'll focus on CCE 2.66, TMPGEnc
2.5, Canopus Procoder 1.5, and MainConcept MPEG Encoder 1.4.2.
If you aim for a specific size, you need to calculate the video bitrate first.
I suggest to convert all file sizes to Megabytes, so that you don't get confused.
We start with the size available. Let's say you want to fill a whole DVD-R,
so the size available is 4.38 GB or 4485 MB. Subtract the size of your audio
file (in MB), e.g. 167 MB, so the space available for the video is 4485 MB -
167 MB = 4319 MB. Calculate the duration of the video in seconds, e.g. if the
video is 1h 44min 10sec, the total length in secs is 6250. So the video bitrate
should not exceed 4319 * 1024 * 8 / 6250 kbps = 5660 kbps. Because there's some
muxing overhead, and you probably want to add menus and chapters, you should
get lower than that, so in the example above I'd use an average bitrate of 5500
kbps.
3.1 CCE
3.1.1 Create an AviSynth script
The way you write your AviSynth script depends on the source and on your personal
taste. Here are two examples to start with; of course you may change filter
settings, use different filters, etc.:
Progressive DV
orcode:
AviSource("C:\MyDVFiles\DV_type2_file.avi") Convolution3D(1, 6, 10, 6, 8, 2.8, 0)
(the 25 above is the frame rate for PAL; for NTSC you'd use 29.97.)code:
DirectShowSource("C:\MyDVFiles\DV_type1_file.avi", 25) Convolution3D(1, 6, 10, 6, 8, 2.8, 0)
code:
AviSource("C:\MyDVFiles\DV_type2_file.avi") SeparateFields() odd=SelectOdd.Convolution3D(1, 6, 10, 6, 8, 2.8, 0) evn=SelectEven.Convolution3D(1, 6, 10, 6, 8, 2.8, 0) Interleave(evn,odd) Weave() DoubleWeave.SelectOdd()
This way each field will be filtered separately, thus the interlaced structure
will be preserved. Replace AviSource with DirectShowSource like
above if your DV AVI is type-1.
NTSC issues
As NTSC DV uses the 4:1:1 colorspace, there is an issue with the conversion
to the 4:2:0 colorspace used in DVD MPEG-2. To address this issue use trbarry's
filter ReInterpolate411().
To get improved color conversion, simply add a
ReInterpolate411()
command below the AviSource or DirectShowSource command, respectively.
3.1.2 EclCCE
![]() EclCCE
is a nice tool provided by RB, which extends CCE's capabilities, e.g. it enables
the CCE trial version of saving ECL (project settings) files. But the addition
I like best is the integration of a shutdown checkbox, so that you can shutdown
your computer after the encoding has finished.
EclCCE
is a nice tool provided by RB, which extends CCE's capabilities, e.g. it enables
the CCE trial version of saving ECL (project settings) files. But the addition
I like best is the integration of a shutdown checkbox, so that you can shutdown
your computer after the encoding has finished.
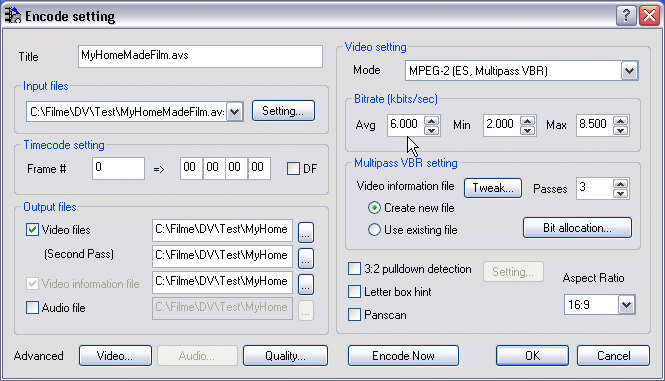
3.1.3 CCE settings
Start EclCCE (or CCE directly). Open the AVS file you created in step 3.1.1
by right-clicking the CCE window and selecting Add. The AVS appears in
the CCE window. Double-click the new entry to change the encoding settings:
 You
can use MPEG-2 (ES, One-pass VBR) if the video you want to encode is
not very long, you don't need to meet a given size exactly, and you want to
save time during encoding. In this case select a Q factor of 60 or less - I
often use 40.
You
can use MPEG-2 (ES, One-pass VBR) if the video you want to encode is
not very long, you don't need to meet a given size exactly, and you want to
save time during encoding. In this case select a Q factor of 60 or less - I
often use 40.
Usually you'll want to have a predictable size with the best quality possible.
You'll choose MPEG-2 (ES, Multipass VBR), set the calculated bitrate
as your average bitrate, and set minimum and maximum bitrate to 2000 and 8500
respectively. Use at least 2 passes; 3 passes is even better, but more is useless.
Set the correct aspect ratio, 4:3 for most DV sources, 16:9 if you recorded
in 16:9 mode. Don't process the audio in CCE (we will use BeSweet for better
quality).
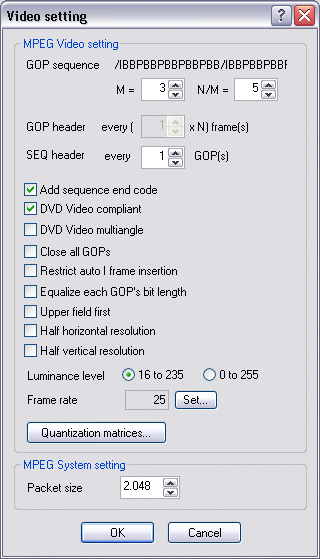
In the Video settings select DVD video compliant , and uncheck the Upper
field first box (field order correction is performed in AviSynth script).
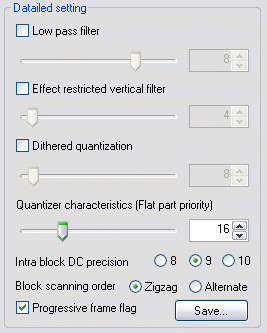
In the menu you get when clicking the Quality button, deselect Low
pass filter, Effect restricted vertical filter, and Dithered quantization.
I leave the flat part priority at the default of 16. Set Intra block DC precision
to 9 or 10 Bits. For interlaced sources set Block scanning order to Alternate.
For progressive sources select Zigzag and check Progressive frame
flag.
For more information on the various settings in CCE, check out the CCE
guide. If you're using CCE Basic, follow the
CCE Basic guide instead, but keep the DV specific settings in mind (block
scanning order, progressive / interlaced and the field order)
3.2 TMPGEnc
 It
is really easy to use TMPGEnc for DV to DVD conversions. Start the encoder,
cancel the wizard (if applicable), and open your DV type-1 or type-2 file via
the Browse button next to the Video source field. Your AVI file
will automatically be entered in the Audio source field, too, and an
Output file name will be suggested.
It
is really easy to use TMPGEnc for DV to DVD conversions. Start the encoder,
cancel the wizard (if applicable), and open your DV type-1 or type-2 file via
the Browse button next to the Video source field. Your AVI file
will automatically be entered in the Audio source field, too, and an
Output file name will be suggested.
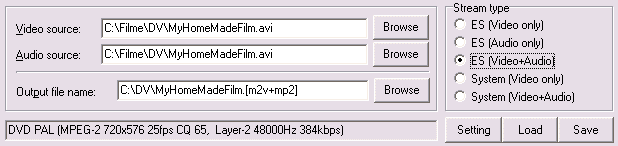
We are going to create elementary streams as input for a DVD authoring program.
In the Stream type box select ES Video+Audio, if you want to create
an MP2 file in TMPGEnc (skipping the BeSweet step above). Otherwise, select
ES Video only (MP2 or AC3 created by BeSweet). Click the Load
button, and open a template, either DVD (PAL).mcf or DVD (NTSC).mcf.
 Click
on the Setting button to make further adjustments. Because you loaded
a template, many options are greyed out. If you'd like to change these for some
reason, load the template unlock.mcf, which you will find in the subdirectory
Extra. In this guide we won't need that.
Click
on the Setting button to make further adjustments. Because you loaded
a template, many options are greyed out. If you'd like to change these for some
reason, load the template unlock.mcf, which you will find in the subdirectory
Extra. In this guide we won't need that.
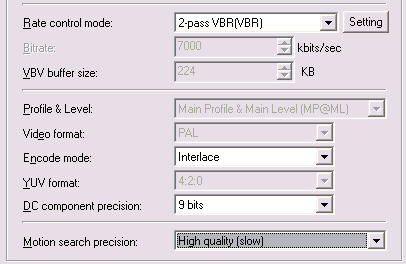
Let's have a look at the Video tab first. You may leave the Rate control
mode settings to their respective defaults (Constant Quality, quality factor
65, min. bitrate 2000 kbps, max. bitrate 8000 kbps). If you need to fit your
movie to a certain size, select 2-pass VBR(VBR), and click the Setting
button next to the rate control mode. Adjust the Average bitrate
to your needs.
The Encode mode should be set according to your source material. If it's
interlaced, select Interlace; if it's progressive, select Non-interlace.
Leave the DC component precision at 9 bits, or set it to 10
bits.
The Motion search precision has a large impact on the final quality,
but on the processing time as well. Motion estimate search (fast) is
a good compromise between quality and speed. If you want the best quality possible,
select High quality (slow) or even Highest quality (very slow).
But be warned: your encoding session can take many hours!
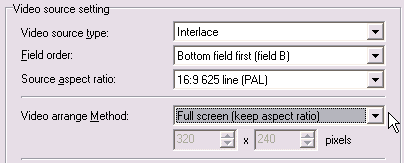 Move
over to the Advanced tab. Set Video source type according to your
source (should be the same as Encode mode on the Video tab).
Move
over to the Advanced tab. Set Video source type according to your
source (should be the same as Encode mode on the Video tab).
The Field order is for interlaced sources only. DV should be Bottom
field first (field B), unless you have a strange source...
Under Source aspect ratio select one of the 4:3 or 16:9 settings, depending
on your source again. E.g. I use 16:9 625 line (PAL) for my 16:9 recordings,
and 4:3 625 line (PAL) for my 4:3 recordings.
Also select Full screen (keep aspect ratio) as the Video arrange Method.
You may activate filters here, too. I'll leave this topic to your experiments.
 As
we won't make changes to the GOP structure or the quantize matrices, skip to
the Audio tab (which is not present if you selected stream type ES
(Video only)). You may change the audio bitrate here, if you want TMPGEnc
to encode your audio.
As
we won't make changes to the GOP structure or the quantize matrices, skip to
the Audio tab (which is not present if you selected stream type ES
(Video only)). You may change the audio bitrate here, if you want TMPGEnc
to encode your audio.
Confirm the tabbed dialog by clicking the OK button, then click on Start
in the upper left and wait until TMPGEnc is finished.
For more information on TMPG, check out this
guide.
3.3 Canopus ProCoder
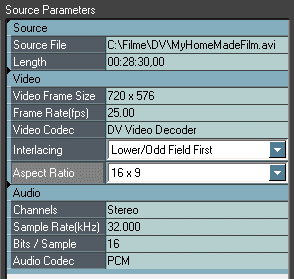 Start
ProCoder. In the Source tab, add the DV file you want to encode. Once
the file is opened, you'll see the Source Parameters on the right, containing
information about the video and the audio. The only thing you may want to change
here is the Aspect Ratio setting, which defaults to 4 x 3, but
has to be changed into 16 x 9 for 16:9 sources.
Start
ProCoder. In the Source tab, add the DV file you want to encode. Once
the file is opened, you'll see the Source Parameters on the right, containing
information about the video and the audio. The only thing you may want to change
here is the Aspect Ratio setting, which defaults to 4 x 3, but
has to be changed into 16 x 9 for 16:9 sources.
 Switch
to the Target tab, and click the Add button. The Add Target
dialog box opens, and you continue on its VCD/DVD tab. Select the appropriate
template, either MPEG2 - DVD PAL, or MPEG2 - DVD NTSC. Confirm
by clicking OK.
Switch
to the Target tab, and click the Add button. The Add Target
dialog box opens, and you continue on its VCD/DVD tab. Select the appropriate
template, either MPEG2 - DVD PAL, or MPEG2 - DVD NTSC. Confirm
by clicking OK.
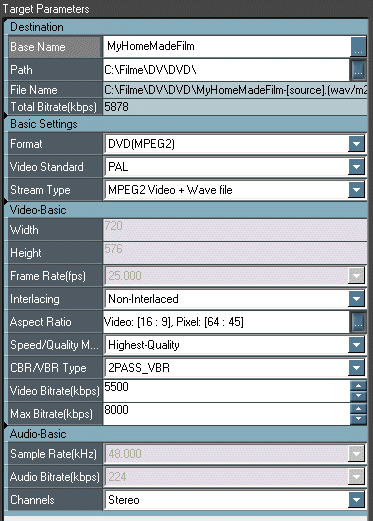
The Target Parameters contain all the settings you can change before
starting the conversion. First you may want to change the Base Name and
the Path, which specify filenames and location of your output files (video
and audio). Under Stream Type, make sure MPEG2 Video + Wave file
is selected.
Interlacing will usually stay on Lower/Odd field first, unless
your source is progressive. In that case select Non-Interlaced. Set Video
Aspect Ratio to 4:3or 16:9, depending on whether you shot
your DV in 4:3 or 16:9 mode. And there's the Pixel Aspect Ratio setting,
which has to be set to one of the D1 entries (D1/DV NTSC, D1/DV NTSC 16:9,
D1/DV PAL, or D1/DV PAL 16:9), depending on your video format and whether
you shot in 4:3 or in 16:9 mode.
Under Speed/Quality you may select Highest Quality. If you don't
care for processing time, Mastering Quality may give slightly better
results.
CBR/VBR Type should be set to either VBR 1-pass or VBR 2-pass.
The latter needs twice the encoding time, but you'll get closer to the specified
bitrate, and thus your filesize will be predictable. For the same (average)
bitrate VBR 2-pass reaches better quality. There are two video bitrates
to be set: Video Bitrate(kbps) is the average bitrate you calculated
at the beginning of step 3, whereas Max. bitrate(kbps) specifies the
limit for the encoder. Set that one to 8000.
There are a lot more options available when you click the Advanced button,
and you can add video and audio filters. As a beginner you can safely leave
everything to the defaults here, but of course feel invited to experiment! E.g.
if you recorded at 24 fps, you'll need to add a Video Pulldown filter.
Now you may want to save your profile ;-) You can create so-called droplets,
too, but you have to find out yourself how to do that :-)
Finally switch to the Convert tab, click the Convert button and
take a cup of coffee. You should end up with an m2v video file (MPEG-2 elementary
stream) and a WAV audio file.
Special thanks to Dali Lama for the inspiration!
3.4 MainConcept MPEG Encoder
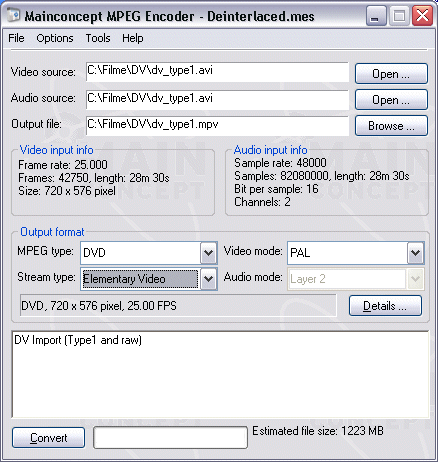 Start
the MainConcept MPEG Encoder (MPE in brief). Open your DV video file by clicking
the Open button behind the Video source line. Among MPE's supported
file types are DV type-1 / type-2 and AviSynth scripts (AVS files). As soon
as you open the video file, MPE will show the same file in the Audio source
line, and it will suggest an output file.
Start
the MainConcept MPEG Encoder (MPE in brief). Open your DV video file by clicking
the Open button behind the Video source line. Among MPE's supported
file types are DV type-1 / type-2 and AviSynth scripts (AVS files). As soon
as you open the video file, MPE will show the same file in the Audio source
line, and it will suggest an output file.
You may verify the file properties in the Video input info and Audio
input info boxes. In the Output format box, select DVD as
MPEG type, and set the Video mode to your needs, either PAL or
NTSC. If you want MPEG-1 Layer II audio, you can let MPE create the audio together
with the video. Because you'll need to author the DVD later on, you better select
Elem. Video and Audio as Stream type, not Program (Video+Audio).
If you want to encode the audio separately, select Elementary Video here,
and the output file's extension will automatically change to .mpv.
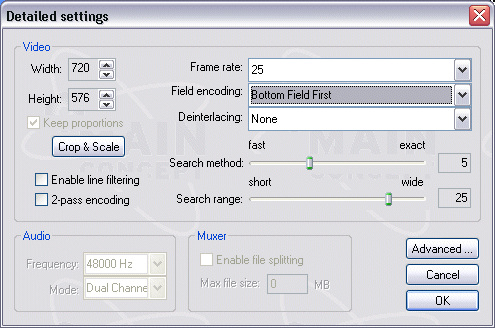 Now
click on the Details button for the detailed settings. Here you can change
the video size, which you should keep at 720x576 for PAL or 720x480 for NTSC.
You can crop and scale the video, if desired, but I guess this is more interesting
for analogue sources. An important setting is the 2-pass encoding checkbox,
which you may want to check for best quality at lower bitrates. I doubt that
you'll see an effect except for the doubled processing time, if you go for bitrates
above 6000 kbps, but in general 2-pass encoding will produce better quality
at a given bitrate.
Now
click on the Details button for the detailed settings. Here you can change
the video size, which you should keep at 720x576 for PAL or 720x480 for NTSC.
You can crop and scale the video, if desired, but I guess this is more interesting
for analogue sources. An important setting is the 2-pass encoding checkbox,
which you may want to check for best quality at lower bitrates. I doubt that
you'll see an effect except for the doubled processing time, if you go for bitrates
above 6000 kbps, but in general 2-pass encoding will produce better quality
at a given bitrate.
Set the Frame rate to 25 for PAL or 29.97 for NTSC. Most camcorders don't
have a progressive scan option, so most likely you have to select Bottom
Field First as Field encoding. If your DV video is progressive, you
should select Progressive Frame here, of course.
The Search method and Search range sliders allow you to modify
the motion estimation search and thoroughness. The more you move the sliders
to the right, the more precise will motion estimation be (and thus the better
quality), but this also increases the encoding time. You can live with the defaults,
but you may as well increase the values for better quality MPEG-2.
If you encode audio, the settings should be correct automatically (48000 Hz,
Stereo). You should not enable file splitting in the Muxer box.
 Let's
dig a little deeper into MPE's dialog structure by clicking on Advanced.
Here you find a true El Dorado for tweakers, but amazingly you'll find some
important basic settings here, too.
Let's
dig a little deeper into MPE's dialog structure by clicking on Advanced.
Here you find a true El Dorado for tweakers, but amazingly you'll find some
important basic settings here, too.
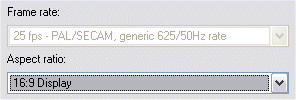
On the Video Settings tab, select the proper Aspect ratio, i.e.
the aspect ratio you set in your camcorder when filming. You may select either
4:3 Display or 16:9 Display, the latter for anamorphic video.
If your camcorder supports letterboxed 16:9 only, you probably have to select
the 4:3 option. Don't touch the GOP structure settings, and you'll get DVD compliant
MPEG-2 video.
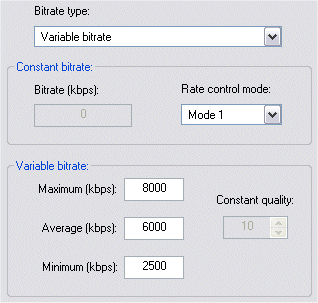 You
can set Variable bitrate or Constant bitrate as the Bitrate
type, no matter whether you chose 2-pass encoding or not. The variable bitrate
option requires a maximum, an average, and a minimum bitrate. I suggest to leave
max. and min. bitrate at the defaults of 8000 kbps and 2500 kbps, respectively.
You may set a higher max. bitrate, but that may lead to a few problems with
authoring and playback later on, depending on the software and standalone player
(and even the DVD-R media) you use. The most important setting is the Average
(kbps), because this one is responsible for the file size you'll get, so
set it to the value you calculated. The constant bitrate setting is easy: simply
set your bitrate, there's only one. Leave the Rate control mode at its
default, which is Mode 1.
You
can set Variable bitrate or Constant bitrate as the Bitrate
type, no matter whether you chose 2-pass encoding or not. The variable bitrate
option requires a maximum, an average, and a minimum bitrate. I suggest to leave
max. and min. bitrate at the defaults of 8000 kbps and 2500 kbps, respectively.
You may set a higher max. bitrate, but that may lead to a few problems with
authoring and playback later on, depending on the software and standalone player
(and even the DVD-R media) you use. The most important setting is the Average
(kbps), because this one is responsible for the file size you'll get, so
set it to the value you calculated. The constant bitrate setting is easy: simply
set your bitrate, there's only one. Leave the Rate control mode at its
default, which is Mode 1.
The Advanced Video Settings tab has some more settings to play with:
You may switch between Noise sensitivity and Noise reduction by
clicking the NR button, and you can play with the value, which may improve
noisy low light shots. I won't cover all the settings here, but there's one
which is useful specifically for DV encoding: You may want to check Input
video is RGB16-235, if your DV codec is known to reduce the color range,
and you feed the encoder with RGB video. You may verify this using the histogram
in VirtualDub, but remember that this setting applies only if your source is
RGB, e.g. converted in AviSynth or via another frameserver, so normally you
don't have to worry about this setting.
Confirm all settings with their OK buttons, and click Convert
in the main dialog. Now all you need is patience until the encoding is done.
MainConcept's MPEG Encoder is pretty fast, almost as fast as CCE, so the coffee
break won't be too long.
4. Author the DVD
There are several DVD authoring programs available on the market. Make sure
you choose one which can import your video and audio files without re-encoding
E.g. DVDlab is a good choice, because it is
low-priced, and you can import the video, MP2 audio, and even AC3 audio without
re-encoding
The process of creating the menus and the DVD structure depends very much on
the authoring program used, so I won't focus on this topic. Low-budget programs
often use a "single-VTS" approach, i.e. all your video and audio files are muxed
into a single video title set. As a consequence you have to make sure that you
use the same kind of audio in all your clips (if you plan to put more than one
on a DVD). For an extensive list of DVD authoring guides, click
here.
Any comments are very welcome. bb
This document was last updated on February 11, 2007