CCE & IfoEdit
CCE is known as one of the best MPEG-2 encoders there is and I've just recently
shown in another guide that it can create DVD like quality at bitrates low enough
to fit at least 2 full length movies onto a DVD-R. But, in the pursuit of the
best possible DVD backup people usually like to preserve the extra features
and menus and re-authoring them is not that simple, especially when you're dealing
with a DVD that has a complex structure.
This process has more or less been developed by people and moderators in my
DVD forums and nowadays it is possible to re-create rather complex titles perfectly.
It involves a lot of manual work and good knowledge in the DVD
basics and you have to be willing to invest a considerable amount of time
and learn how to handle an impressive number of programs. This guide teaches
you how to re-create a multi PGC title which has different audio formats in
different PGCs (another layer of complexity). We're going to use Sonic Scenarist
in this guide (the mother of all DVD authoring tools) but using Maestro
should also be possible though the Maestro guide does not cover the subject
as extensively as this document. If you don't need subtitles, multiple audio
tracks and your project contains only one PGC you can use a more simplistic
DVD authoring program in step 4 (and of course skip step 3 if you have no subtitles)
and then continue with step 5 and the rest. If you're interested in re-encoding
the extras as well there's an additional guide that uses a different DVD as
source and focuses mainly on the extras (so you
still have to read this guide as well).
You will need the following software for this guide
IfoEdit
ImgTool
IfoUpdate
Scenchap
Subrip
ChapterXtractor
Scenarist
Table of content
1: Preparation
2: Encoding
3: Subtitles
4: Re-author
5: Merge the Scenarist files into your project
6: Make the disc regionfree
7: Remove User option prohibitions
8: Final sector adjustments
9: Burn the DVD
Step 1: Preparation
In this guide we're going to put the DVD-9 Training Day, R2 having a total
size of 7.5GB onto a single DVD-R disc. This edition of the movie contains 3
language tracks, a commentary track, multiple PGCs in the main movie VTS having
different audio tracks than the main movie, 20 subtitle tracks and a lot of
extras. If that doesn't scare you then I suppose you either don't know what
the heck I am talking about and may be better off learning the DVD-R
basics first or you re-author The Matrix for breakfast in which case you
most likely have no use for this guide ;) This training day is going to take
you very far into DVD-R land and you're going to see things you have never seen
before. But if you stick to the path you should be getting where you want to
go to.
To begin with here's the directory listing of the DVD:
29.03.2002 03:47 16'384 VIDEO_TS.BUP
29.03.2002 03:47 16'384 VIDEO_TS.IFO
29.03.2002 03:44 1'968'128 VIDEO_TS.VOB
29.03.2002 03:46 30'720 VTS_01_0.BUP
29.03.2002 03:46 30'720 VTS_01_0.IFO
29.03.2002 03:44 0 VTS_01_0.VOB
28.03.2002 04:18 1'073'739'776 VTS_01_1.VOB
28.03.2002 04:18 58'195'968 VTS_01_2.VOB
29.03.2002 03:47 79'872 VTS_02_0.BUP
29.03.2002 03:47 79'872 VTS_02_0.IFO
29.03.2002 03:45 8'607'744 VTS_02_0.VOB
28.03.2002 04:20 1'073'739'776 VTS_02_1.VOB
28.03.2002 04:21 1'073'739'776 VTS_02_2.VOB
28.03.2002 04:22 881'936'384 VTS_02_3.VOB
28.03.2002 04:23 1'073'739'776 VTS_02_4.VOB
28.03.2002 04:24 1'073'739'776 VTS_02_5.VOB
28.03.2002 04:25 1'073'739'776 VTS_02_6.VOB
28.03.2002 04:25 39'243'776 VTS_02_7.VOB
29.03.2002 03:47 20'480 VTS_03_0.BUP
29.03.2002 03:47 20'480 VTS_03_0.IFO
29.03.2002 03:45 0 VTS_03_0.VOB
28.03.2002 04:26 658'708'480 VTS_03_1.VOB
VTS_02 is obviously the main movie VTS set and it's going to be our first task
to reduce its size considerably. In the end the VTS_02 set was only 2.57GB large,
just small enough to fit it on the DVD with the rest of the files and no additional
re-encoding. Now before you start worrying about bitrate calculations I suggest
the following rule of thumb: Encode the main movie VTS along with extras it
may contain to a level of quality you deem acceptable. If the extras don't fit
around the main movie strip them or re-encode them. If you intend to go through
with this guide transcoding a couple of additional extras should not be too
bothersome.
You have to rip everything but the main movie VOBs (VTS_02_1.VOB, VTS_02_2.VOB
up to VTS_02_7.VOB) to your harddisk in DVD Decrypter's file mode (pressing
F will switch to file mode, then select all files minus the mentioned ones and
press the rip button).
Step 2: Encoding
First let's have a look at VTS_02. Start up DVD Decrypter and press I to switch
to the IFO parsing mode.
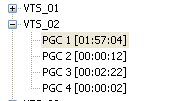 As
we can see on the left VTS_02 has 4 PGCs. Judging by the length you can safely
say that PGC_1 is the main movie. PGC_2 is the WB studio logo, PGC_3 the theatrical
trailer and PGC_4 is a useless black still which we're going to keep just in
case.
As
we can see on the left VTS_02 has 4 PGCs. Judging by the length you can safely
say that PGC_1 is the main movie. PGC_2 is the WB studio logo, PGC_3 the theatrical
trailer and PGC_4 is a useless black still which we're going to keep just in
case.
Now, you have to rip each PGC separately and you best put every PGC in its
separate directory so that you won't mix them up later in the process. DVD Decrypter
makes this process really straightforward, just click on the appropriate PGC
and then press the big DVD -> HD button. If you want to know more about DVD
Decrypter there's a detailed guide explaining everything
you ever wanted to know about the program.
Once you've ripped all PGCs it's time to re-encode the video stream of each
PGC separately. CCE is the best program to do this.
Before you start you may want to rethink the re-encode each PGC strategy. Obviously
you want to re-encode the main movie, but the 12 seconds studio logo may not
be worth the effort. In our example case I re-encoded both PGC1 and PGC3 and
kept the other two as they were. In case you're going to keep a PGC as it is,
enable Stream Processing in DVD Decrypter before ripping (click on the Stream
Processing tab, then check Enable Stream Processing), then select the video
track and make sure Demux is checked, then repeat this for every audio stream.
And while you're in DVD Decrypter you can use it to find out more about the
audio stream and their position in the VOB. To do that select a PGC, then click
on the Stream Processing tab:
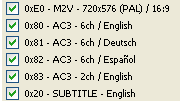 This
is my PGC_1. I have 3 6ch audio tracks and one 2ch audio track (the director's
commentary).
This
is my PGC_1. I have 3 6ch audio tracks and one 2ch audio track (the director's
commentary).
Then we have PGC_2:
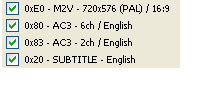 As
you can see, one 6ch and one 2ch audio track. And interestingly enough the 2ch
has the same stream ID (0x83) as the 2ch track in PGC1. Write down the stream
ID of every track in every PGC. In this example PGC_3 had one 2ch track having
stream ID 0x84 and PGC_4 had no audio tracks.
As
you can see, one 6ch and one 2ch audio track. And interestingly enough the 2ch
has the same stream ID (0x83) as the 2ch track in PGC1. Write down the stream
ID of every track in every PGC. In this example PGC_3 had one 2ch track having
stream ID 0x84 and PGC_4 had no audio tracks.
Step 3: Subtitles
Subrip can output directly to the Scenarist format
so it's the ideal choice for the job.
Step 4: Re-author
As mentioned before, we're going to use Scenarist as it allows for multiple
subtitles and multiple audio tracks. Maestro is another
possible solution.
The first thing you have to do is create a new project in the project wizard.
This is pretty straightforward. You set a project name, the TV format (PAL or
NTSC depending on the source disc), an aspect ratio (most DVDs are 16:9, this
is usually written on the back of your DVD and when you created the DVD2AVI
project you wrote down that value). Then we have the subtitle conversion colors.
Make sure they have been set as shown here:
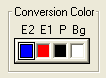
The next step once again involves subtitles:
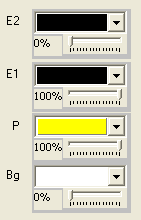 Make
sure that E2 and E1 are set as shown here and that E2 is set to 0% and E1 to
100%. The P color is your subtitle font color, select whatever color you like.
As you can see I chose yellow, but many people prefer white. Also make sure
that the slider is set to 100%. and last but not least set Bg to white and 0%.
Make
sure that E2 and E1 are set as shown here and that E2 is set to 0% and E1 to
100%. The P color is your subtitle font color, select whatever color you like.
As you can see I chose yellow, but many people prefer white. Also make sure
that the slider is set to 100%. and last but not least set Bg to white and 0%.
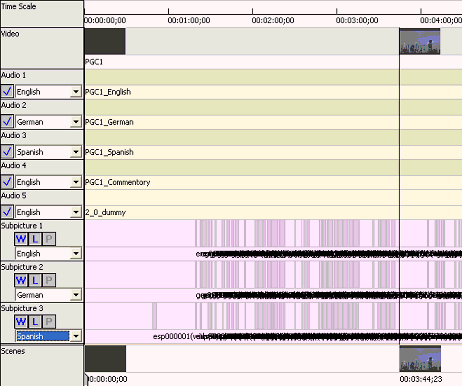
Once the project has been created drag and drop your video file(s) and audio file(s)
into the lower right part of the screen. Scenarist will then check the files for
compliance.
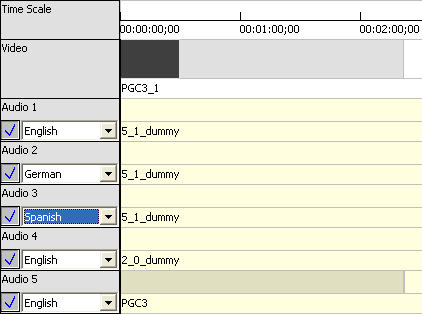
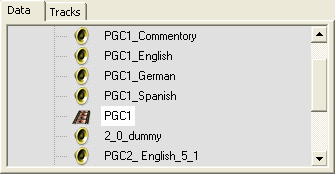 Here
you can see a part of my project. I have 4 m2v files, one for each of my PGCs,
3 5.1 audio tracks for PGC_1 along with one 2.0 track for the same PGC, a 5.1
and a 2.0 audio track for PGC_2, a 2.0 audio track for PGC_3 and no audio for
PGC4.
Here
you can see a part of my project. I have 4 m2v files, one for each of my PGCs,
3 5.1 audio tracks for PGC_1 along with one 2.0 track for the same PGC, a 5.1
and a 2.0 audio track for PGC_2, a 2.0 audio track for PGC_3 and no audio for
PGC4.
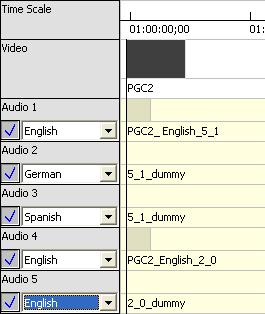
Maybe you've noted the 2_0_dummy audio file. This is a particularity with certain
DVDs.
Scenarist uses the first PGC as reference for all other PGCs you create. When
it comes to audio streams this means that audio streams on other PGCs than the
first one must match the corresponding audio track of the first PGC. In our example,
the 2nd PGC has 2 audio track, a 6ch and a 2ch one. If you were to just add the
6ch, then the 2ch track to PGC2 you would not be able to compile the project.
The 2nd PGC must have the 2ch audio track as the 4th track (giving it ID 0x83
as in the original DVD). In order to achieve that we have to work with dummy audio
tracks, very small and basically useless AC3 tracks which help us ensure that
the real audio tracks get placed in an order that Scenarist supports. Since Scenarist
takes PGC1 as reference we should do that as well. As PGC2 requires the 6ch AC3
at the first position and the 2ch AC3 at the 4th position we need two 6ch dummy
AC3 tracks. In order to ensure that the dummy AC3 have the exact same format I
simply created them from the first 6ch AC3 in PGC1 and the 2ch AC3 in PGC1 giving
me 2 dummy AC3 tracks which I then imported into Scenarist. BeSliced
makes creating dummy files really easy so that's what I used for the process.
And on a last note on this trick: It's of course only necessary if you have
an audio track setup as laid out in the beginning of step 2. If all PGCs have
the same AC3 channel format at the same position, or if you don't even have
multiple PGCs there's no need for dummy AC3s.
In the right "window" of the lower part of the screen Scenarist will
show the results of the compliance check and eventual errors when you're importing
assets. Then click double click on one of the imported assets (media objects
are called assets in Scenarist) to bring up its properties:
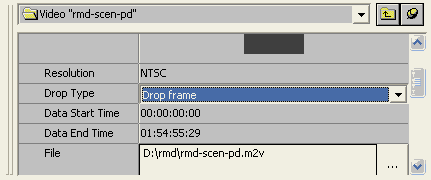 If
your source is NTSC you must set Drop Type to Drop frame for EVERY asset (including
audio even if an audio has no framerate).
If
your source is NTSC you must set Drop Type to Drop frame for EVERY asset (including
audio even if an audio has no framerate).
PAL projects don't need that step.
Once you've imported all the files, click on the Track editor tab and drag and
drop the main movie video file to the track editor. There will be a dark gray
rectangle in the main part of the window now representing that track. If you
have multiple PGCs add the video streams corresponding to the other PGCs as
well. In my example I have 4 video streams to be added. The last one is a very
short one and when dropping it I got the following window:
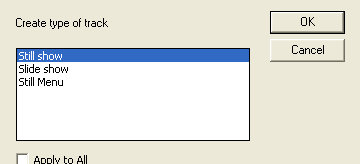 Here
I chose still show.
Here
I chose still show.
Once you've created all the tracks you have to export your Project to a script
so that we can add the chapters automatically (unless you want to add 30+ chapters
all manually by copying and pasting timecodes from ChapterXtractor that is ;)
To do that select File - Export.
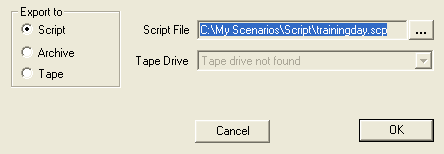 Select
a name for the script file and make sure Export to Script is checked, then press
OK. Now you can close Scenarist momentarily.
Select
a name for the script file and make sure Export to Script is checked, then press
OK. Now you can close Scenarist momentarily.
Start up ScenChap then drag and drop the .scp file you've just exported into
ScenChap.
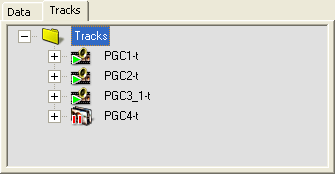
 For every track you've created in Scenarist a new tab will show up with the
appropriate track name.
For every track you've created in Scenarist a new tab will show up with the
appropriate track name.
Now it's time to start up ChapterXtractor.
Load the appropriate IFO file (in this case VTS_02_0.IFO) then press on the
Formats tab. Define a new preset as follows:

Make sure you use the appropriate format string: %hh:%mm:%ss;%ff (copy and
paste that just in case) and save the preset under a new name for later use.
Then you have to make sure that you select the appropriate timebase:

For PAL the FPS Rate has to be 25000, for NTSC 29700. Title finally allows
you to select the appropriate PGC. In my case PGC1 had 28 chapters. Once you've
selected the Scenarist preset copy and paste everything that's being shown in
the main screen into the appropriate tab in ScenChap. Here's an example of what
you're going to copy & paste:
00:00:00;00
00:03:45;01
00:07:43;17
00:11:50;21
00:15:00;02
00:19:46;10
Then select title 2 in ChapterXtractor, once again copy everything shown in
the main window and paste it to the appropriate tab in ScenChap. Normally only
the first PGC is chaptered though but make sure you verify if that's the case
for your particular project.
Once you've copied and pasted all chapters into ScenChap press the Insert Chapters
button.
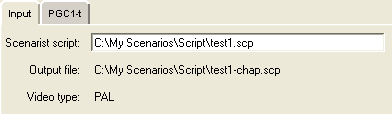
Now you can start up Scenarist again. In the project manager create a new project
based on the script you've just created:
 New
from Script... would be the correct button to press here.
New
from Script... would be the correct button to press here.
Then you'll get to this:
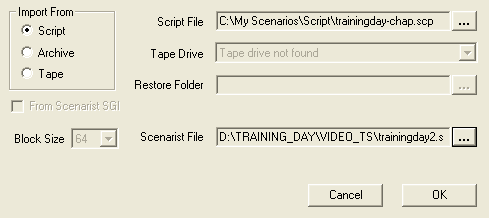 Make
sure Import From Script is checked, select the chaptered scp file and don't
forget to set a Scenarist file (that file will be created from the script file)
then press OK.
Make
sure Import From Script is checked, select the chaptered scp file and don't
forget to set a Scenarist file (that file will be created from the script file)
then press OK.
Once Scenarist has created the project you can go back to the Track editor and
you'll see that all the chapters have already been set.
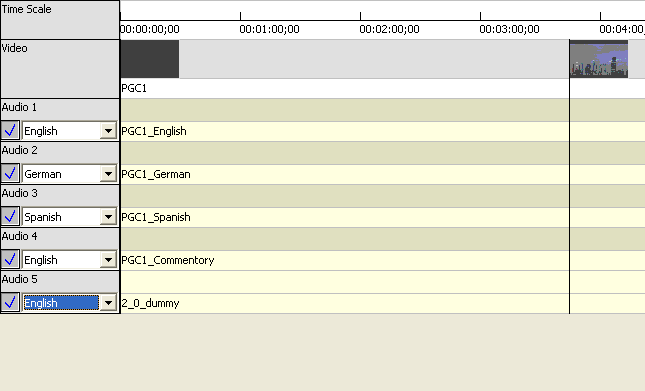
Now you have to add the audio channels and subtitles. First open the track
corresponding to PGC1:
 Now
drag and drop the audio channels from the data window (bottom left of the screen)
to the track one by one and in the correct order.
Now
drag and drop the audio channels from the data window (bottom left of the screen)
to the track one by one and in the correct order.
If you recall, track 1 was English, track 2 German, track 3 Spanish, Track
4 the commentary track.
Don't forget to set the language for each track. Then we once again have to
talk about dummy AC3 files. As our PGC3 has one single 2ch AC3 track having
ID 0x84 that means that every PGC that has audio tracks (audio-less PGCs don't
matter) must have a 2ch AC3 having ID 0x84. As we already have 4 AC3 tracks
(having IDs 0x80 up to 0x83) we have to add a dummy AC3 track as a placeholder
for the 0x84 stream (if we didn't we could not have an AC3 track having stream
ID 0x84 in PGC3). As the dummy track is only 1KB large that's a small price
to pay to ensure that the final product will work properly even on standalones.
Then it's time to import the subtitle tracks.

Press the blue button shown below (first one from the right).
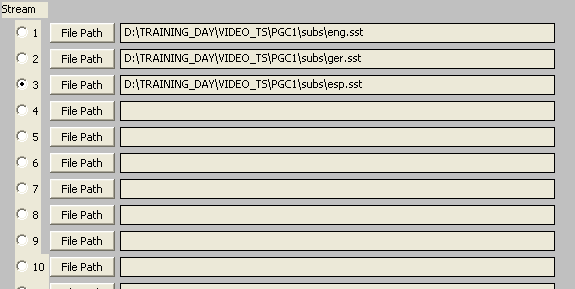 Here
select your subtitle script(s) then press Start and then OK to start importing.
Here
select your subtitle script(s) then press Start and then OK to start importing.
If you get warnings about improper resolutions I guess you haven't been following
my hints in the subtitle section of the guide and it's time to go back there
;)
As usual you can see the status of this operation in the "window"
on the bottom left.
If you get errors like this
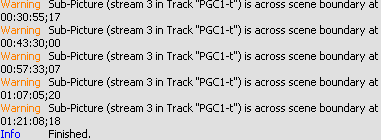 there's
nothing to be worried about. It simply means that if you select a certain chapter
and you have a subtitle that starts before the chapter point and ends after
the chapter point, that subtitle will not be shown if you fast forward to the
chapterpoint (but if you watch the movie normally it will be shown... your original
DVD will exhibit the same behavior).
there's
nothing to be worried about. It simply means that if you select a certain chapter
and you have a subtitle that starts before the chapter point and ends after
the chapter point, that subtitle will not be shown if you fast forward to the
chapterpoint (but if you watch the movie normally it will be shown... your original
DVD will exhibit the same behavior).
Don't forget to select the appropriate subtitle language and make sure that
both W and L have been pressed. In the end our PGC1 will look like this:
 Now
you might be wondering what will happen to the additional 17 subtitle tracks.
Honestly, I don't think anyone will bother to go through the lengthy subtitle
process 20 times for a single DVD title. But, the final product will work despite
the missing subtitle stream and if you select a stream that's not there nothing
will happen (you just don't get any subs). If it bothers you that you still
have these missing subtitle channels listed you could strip missing subtitle
tracks away once you've merged the Scenarist output and the remaining files
(after step 5).
Now
you might be wondering what will happen to the additional 17 subtitle tracks.
Honestly, I don't think anyone will bother to go through the lengthy subtitle
process 20 times for a single DVD title. But, the final product will work despite
the missing subtitle stream and if you select a stream that's not there nothing
will happen (you just don't get any subs). If it bothers you that you still
have these missing subtitle channels listed you could strip missing subtitle
tracks away once you've merged the Scenarist output and the remaining files
(after step 5).
Now that the first track is complete open the 2nd track in the track editor.
Though before that I suggest a first quality control check.
While you still have the first track open in the track editor go to the simulation
window by pressing the 4th button from the left in the main buttonbar:

Then use the timeline controls to advance in the movie to a point where you
can see a subtitle in the preview window.

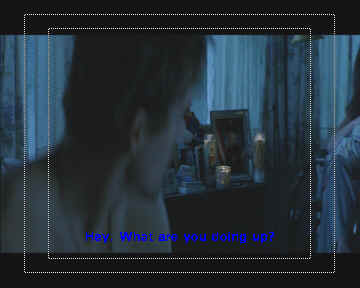 As
you can see the subtitle is blue, not our favorite subtitle color. While there
are color controls right below the preview window these apparently have no visible
effect on the outcome as the values get reset again right away. But we do have
an indication and that's the blue color. Now close the simulation window and
select Settings - Color palette.
As
you can see the subtitle is blue, not our favorite subtitle color. While there
are color controls right below the preview window these apparently have no visible
effect on the outcome as the values get reset again right away. But we do have
an indication and that's the blue color. Now close the simulation window and
select Settings - Color palette.
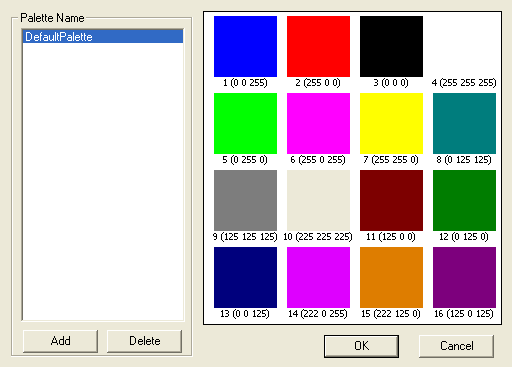 Now
press Add to create a new palette, then change color 1 (the blue one as in the
subtitle) to whatever color you would like to have for the subtitles. For instance
if you click on the first color and set it to white all your subtitles would
be white.
Now
press Add to create a new palette, then change color 1 (the blue one as in the
subtitle) to whatever color you would like to have for the subtitles. For instance
if you click on the first color and set it to white all your subtitles would
be white.
After that quality check you can now safely proceed to creating the other tracks.
 As
discussed before, we have one 6ch audio track having ID 0x80 (meaning it's the
first one) so you add that track first, then we have to create 2 dummy 6ch tracks
since the next real track has ID 0x83. So drag and drop your dummy 6ch AC3 twice,
then add the real 2ch track and another dummy track - this time you use the
2ch AC3 dummy as we did for PGC1 to complete the audio track setup. Also don't
forget the set the languages exactly the same as in PGC1, even for the dummy
tracks you have to set the appropriate language.
As
discussed before, we have one 6ch audio track having ID 0x80 (meaning it's the
first one) so you add that track first, then we have to create 2 dummy 6ch tracks
since the next real track has ID 0x83. So drag and drop your dummy 6ch AC3 twice,
then add the real 2ch track and another dummy track - this time you use the
2ch AC3 dummy as we did for PGC1 to complete the audio track setup. Also don't
forget the set the languages exactly the same as in PGC1, even for the dummy
tracks you have to set the appropriate language.
As there are no subtitles for PGC2 we can now proceed to the 3rd track in the
track manager.
Here we have only one real AC3 track, a 2ch one having ID 0x84. In order to
ensure that that track gets the appropriate ID we have to add 4 dummy tracks.
Since PGC1 has 3 6ch AC3 tracks then 2 2ch AC3 tracks we first add 3 dummy 6ch
tracks, then one dummy 2ch track and then the real AC3 track. As usual make
sure that all tracks have the proper language set.
As PGC4 contains no audio there's no further processing needed for the last
track in the track editor. Now go to the Scenario editor. At the bottom left
of the screen you can now select the track tab so that your tracks will be shown:
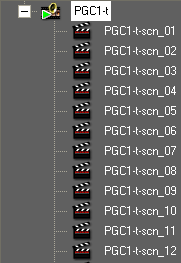
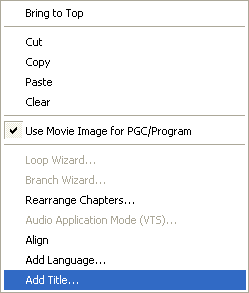
The first thing you have to do is add 3 titles to the existing VTS folder.
You can do that by right clicking on the VTS_1 folder (that's the one with a
golden disk on top) and selecting Add Title:
Keep the default names that will be proposed. Once you have 4 titles drag and
drop the tracks onto these title folders. Track1 (PGC1) goes to Title 1, the
2nd track (PGC2) goes to Title 2, etc. In the end your scenario should look
like this:
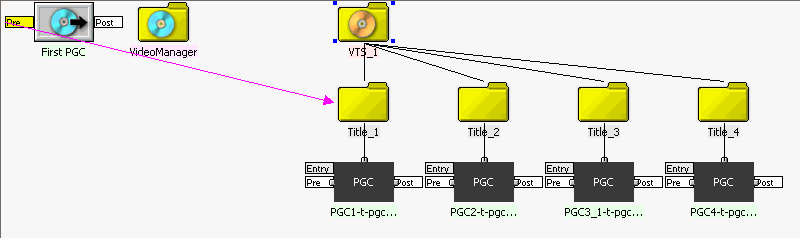
Whenever you drag and drop a track on a Title folder a PGC symbol will be created.
As you can see we now have exactly 4 PGCs, as much as the original had.
Once done you go to the Layout editor, select DVD Video as project type, select
an output directory (make sure there's enough space.. first Scenarist will multiplex
everything which will take as much space as your project already takes, then
it will create the VOBs and IFOs which till take as much space again).
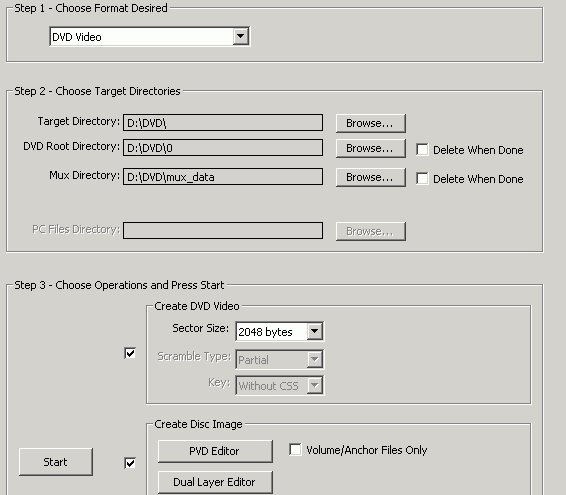
Last but not least check the checkbox on the right of Create DVD video and
set the sector size to 2048 bytes. Creating an image is not even necessary so
you don't have to check it. Then press start to start the compilation. Get a
coffee or something because this is going to take a while. A RAID definitely
comes in handy for this operation as it's very I/O demanding.
Once done you'll find a VIDEO_TS and AUDIO_TS directory in the DVD Root directory
that you set before. You can then play these files as described in the HD
playback guide to check if everything works as desired. The movie will have
no menu or anything, but should have all the subs and audio channels you want.
Step 5: Merge the Scenarist files into your project
By now you could think that the hard part is behind you and you're correct.
However, better not do this just before you go to bed because this step will
require your full concentration and it's very easy to mess things up.
Scenarist created the following files upon compiling the project:
17.07.2002 12:15 6'144 VIDEO_TS.BUP
17.07.2002 12:15 6'144 VIDEO_TS.IFO
17.07.2002 12:15 75'776 VTS_01_0.BUP
17.07.2002 12:15 75'776 VTS_01_0.IFO
17.07.2002 12:17 1'073'682'432 VTS_01_1.VOB
17.07.2002 12:19 1'073'709'056 VTS_01_2.VOB
17.07.2002 12:21 698'710'016 VTS_01_3.VOB
Since the main movie was in VTS_02 on the original DVD you have to rename the
VTS_01 files to VTS_02. After renaming you should have the following files:
17.07.2002 12:15 6'144 VIDEO_TS.BUP
17.07.2002 12:15 6'144 VIDEO_TS.IFO
17.07.2002 12:15 75'776 VTS_02_0.BUP
17.07.2002 12:15 75'776 VTS_02_0.IFO
17.07.2002 12:17 1'073'682'432 VTS_02_1.VOB
17.07.2002 12:19 1'073'709'056 VTS_02_2.VOB
17.07.2002 12:21 698'710'016 VTS_02_3.VOB
From step 1 we have the following original files directly off the DVD:
17.07.2002 12:35 16'384 VIDEO_TS.BUP
17.07.2002 12:35 16'384 VIDEO_TS.IFO
16.07.2002 23:39 1'968'128 VIDEO_TS.VOB
17.07.2002 12:35 30'720 VTS_01_0.BUP
17.07.2002 12:35 30'720 VTS_01_0.IFO
16.07.2002 23:39 0 VTS_01_0.VOB
16.07.2002 23:43 1'073'739'776 VTS_01_1.VOB
16.07.2002 23:43 58'195'968 VTS_01_2.VOB
17.07.2002 12:35 79'872 VTS_02_0.BUP
17.07.2002 12:35 79'872 VTS_02_0.IFO
16.07.2002 23:43 8'607'744 VTS_02_0.VOB
17.07.2002 12:35 20'480 VTS_03_0.BUP
17.07.2002 12:35 20'480 VTS_03_0.IFO
16.07.2002 23:43 0 VTS_03_0.VOB
16.07.2002 23:45 658'708'480 VTS_03_1.VOB
Now copy VTS_02_1.VOB, VTS_02_2.VOB and VTS_02_3.VOB to these files. Do NOT
copy the IFO files as well!
Once this has been done start up IfoUpdate.
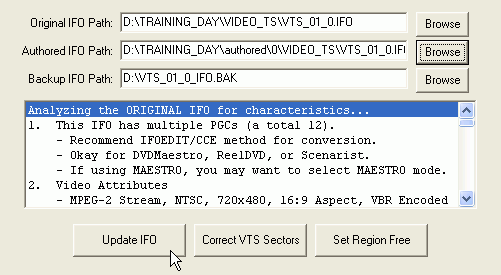 Select
the path of the original IFO file to be updated under Original IFO Path
(DIF4U put this in the corresponding VTS folder for you, it's the same file
as on your DVD disc), then set the Authored IFO Path to the corresponding
IFO file Scenarist has created for you, make sure there's a valid Backup
IFO path but before you press Update IFO let's have a look at the options
first:
Select
the path of the original IFO file to be updated under Original IFO Path
(DIF4U put this in the corresponding VTS folder for you, it's the same file
as on your DVD disc), then set the Authored IFO Path to the corresponding
IFO file Scenarist has created for you, make sure there's a valid Backup
IFO path but before you press Update IFO let's have a look at the options
first:
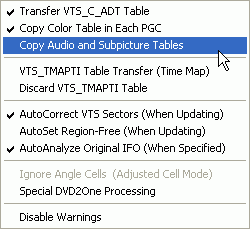 Make
sure Copy Audio and Subpicture Tables is not checked (otherwise the settings
of your Scenarist project will overwrite the setup contained in the original
IFO files and since we didn't set any languages in Scenarist this wouldn't be
too great), and check AutoCorrect VTS Sectors (When Updating) or your project
won't work afterwards.
Make
sure Copy Audio and Subpicture Tables is not checked (otherwise the settings
of your Scenarist project will overwrite the setup contained in the original
IFO files and since we didn't set any languages in Scenarist this wouldn't be
too great), and check AutoCorrect VTS Sectors (When Updating) or your project
won't work afterwards.
Repeat this process for every VTS_0x_0.IFO file Scenarist has generated for
you (in this case one per VTS so 3 in total for the movie in question: VTS_01_0.IFO,
VTS_02_0.IFO and VTS_03_0.IFO. NEVER!!! update VIDEO_TS.IFO!!!).
Once this has been done you're basically ready for burning.
However, you may want to remove certain user prohibitions (as in not being able
to change the audio track via the appropriate button on the remote while watching
the movie), make the disc region free, or strip out subtitle and audio channels
that you have no included in the re-authored project. You can find all these
steps here.
This document was last updated on
April 12, 2009