AVI to DVD guide
With DVD recorders getting cheaper and more popular people start asking themselves how they can put their AVI collections on a DVD so they can watch the movies on their standalones. Before you proceed heed this warning: DVD is a high quality format and any deficiencies in the source can easily be spotted. While DVD -> DVD±R can yield surprisingly good quality in most cases it's thanks to a high quality source and smart reduction of bitrate. Unless you're capturing you'll have AVIs that exhibit a considerable quality loss. While DivX and XviD look pretty good on the PC screen, even using a TV-out to watch them on your TV isn't so great either (hence standalone player capable of playing DivX, or DivX player for consoles or even connecting a notebook to the PC input of a projector is a much smarter way to handle this). Most people watch DivX with a post-processing filter activated. This filter does a lot to make the movie look better by applying smart deblocking techniques. When you convert an AVI to another format you don't have these filters in between... so since we're all nice people who only back up the DVDs we own we should back up the original DVD instead of backup up the backup to yet another format (resulting in yet another loss of quality).
Still here? You've been warned!
You'll need the following software for this guide
Gspot
Nandub
VirtualDub
BeSliced
BeSweet & GUI
VobSub (if you have subtitles)
SubRip (if you want selectable
subs on the DVD)
a DVD authoring program (for selectable subs: Maestro or Scenarist, otherwise
any program will do).
CCE, CCE
Basic, HC, QEnc
or TMPG
Step 1: Prepare the source
If you have a 1 CD movie you can proceed directly to step 2. For 2 CD movies we have a few additional things to perform. First we have to join the AVI files to get a single one which we're going to use for all further processing (theoretically it's possible to work with the splitted files, however I think the extra work that awaits us in further steps if we keep the files splitted outweighs the time we spend joining the files). Then we have to join the subtitle files if we have any. First let's have a look how to do that with VobSub subtitle files:
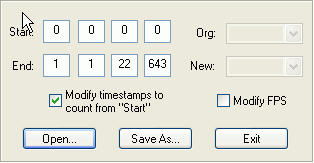
Start up the VobSub Cutter and load your subtitle file. In the end line you'll see the exact length of your subtitle file.
Then start the VobSub Joiner, select your two input files, give the output file a name and in the line Beginning of Input 2 you enter the End time of the first subtitle file that VobSub Cutter is showing.
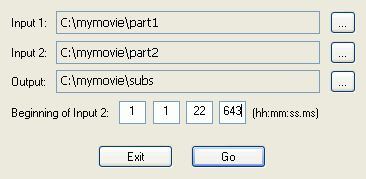 Then
press Go and you'll get a new set of files which you'll be using from now on.
Then
press Go and you'll get a new set of files which you'll be using from now on.
Now that we have all the joining action done it's time to proceed to audio processing.
Step 2: Audio processing
Here we have different options. First let's find out what kind of audio we're dealing with. Start GSpot and load the AVI file.
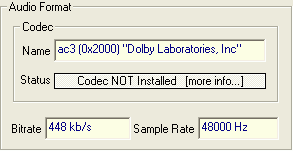 In
the audio format section you'll find out what kind of audio we have. As you
can see this AVI file contains a full fledged 5.1ch AC3 and it would be a shame
to touch it.
In
the audio format section you'll find out what kind of audio we have. As you
can see this AVI file contains a full fledged 5.1ch AC3 and it would be a shame
to touch it.
So in this case we're going to keep the audio as it is. All we have to do is
properly extract it.
In case we have an MP3 audio file we could theoretically directly convert is using BeSweet - however, during my tests I found some problems with AVI input so I prefer to take the safe route here and extract the MP3 to a WAV file first before recompressing it.
Now after we have the WAV file it's time to convert it to something DVD compatible. Actually, DVD supports LPCM so we don't really have to recompress it, but it would be a major waste of space. We have two options now: either we create an AC3 file or an MP2 file. Both are supported on DVDs, however, DVD specs require at least one AC3 or LPCM stream so creating a DVD with only an MP2 stream violates the DVD specs (some DVD authoring program may complain or even refuse to compile). In any case, keep in mind that the two guides linked above refer to AC3 -> AC3 / MP2 respectively but it works just the same with WAV input. Obviously you'll want to create a 2.0 channel AC3, not a 5.1ch AC3 since your source is only 2.0 channel ;)
Step 3: Converting the video to MPEG-2
Unless your AVI already has the proper resolution and black bars, you'll first have to resize it, but to do that, you first need to know the resolution and aspect ratio of your movie.
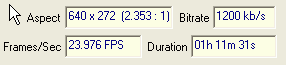 As
you should know by having read the aspect ratio article movies mostly have 3
aspect ratios: 1:1.33, 1:1.85 and 1:2.35 (GSpot inverses the two numbers in
its display). As you can see on the left this particular movie has an aspect
ratio of 1:2.35 (the 2.353 is much closer to 2.35 than 1.85 and 1.33).
As
you should know by having read the aspect ratio article movies mostly have 3
aspect ratios: 1:1.33, 1:1.85 and 1:2.35 (GSpot inverses the two numbers in
its display). As you can see on the left this particular movie has an aspect
ratio of 1:2.35 (the 2.353 is much closer to 2.35 than 1.85 and 1.33).
Now that you know aspect ratio and resolution, check this guide on how to write an AviSynth script to properly resize the video. You then have to add a few more lines to the script in case you're encoding subtitles as well:
LoadPlugin("c:\windows\system32\vobsub.dll")
avisource("moviename.avi")
BicubicResize(720,272)
AddBorders(0,104,0,104)
vobsub("subname")
ResampleAudio(44100)
The 5th line loads the vobsub subtitles called subname.sub and subname.idx. If you have textual sub replace the first line with:
LoadPlugin("c:\program files\GordianKnot\VirtualDub\plugins\Textsub.vdf")
and the 5th one with:
TextSub("badcompany.srt")
Obviously, if you have no subtitles you can leave out the first two lines. And if you want selectable subs you can use SubRip to convert VobSub subs to Maestro or Scenarist format. In case you have textual subs you can use MaestroSBT to convert them to Maestro or Scenarist format. Make sure you read the readme file and you shouldn't have any problems.
The 2nd line loads the movie (moviename.avi). The 3rd line resizes the movie. Replace the 2nd number with the appropriate number taken from the calculations above. The same applies for the 4th line which adds black borders on top and bottom of the picture. The example shown here is for an 1:2.35 movie and the output will be an NTSC DVD. The last line is to trick CCE to accept the AviSynth script even on AMD CPUs.
You can write this AviSynth script using any text editor, preferably Notepad and make sure you save it as movie.avs and without any .txt extension.
Now that we have the ugly part behind us, it's time to pick your favorite MPEG-2 encoder, load the AviSynth script and start encoding. I have written guides for the following MPEG-2 encoders:
Some of the guides might start with details about DGIndex and AviSynth - you can safely disregard all such references and jump straight to the point where the source is loaded into the encoder, as you have already preformed all previous steps (you have your AviSynth script read after all, have you not?)
A note about the bitrate: A DVD can hold up to 4'700'000'000 bytes. Subtract about 100MB (104'857'600 bytes) for the muxing overhead and the size of the subtitles (VobSub subs are ideal here as they have the same size as the subs in the final VOBs).
Step 4: Authoring
If you have selectable subs you don't have much choice and have to use either Maestro or Scenarist. If not just pick your favorite DVD authoring tool. For simple authoring cases as this is IfoEdit's authoring function may also come in handy.
This document was last updated on January 4, 2009